Install ThingWorx Navigate
Let’s dive right in. Using the ThingWorx Navigate Setup installation tool, we’ll install ThingWorx Navigate and the other required software. In the sections below, you’ll find more information to help you set up your system.
Open the installation tool
According to the installation package that you downloaded, unzip the download and then open the installer file:
• Windows with Microsoft SQL—ThingWorxNavigate-MSSQL-<version>-Windows-installer.exe
• Windows with PostgreSQL—ThingWorxNavigate-Postgres-<version>-Windows-installer.exe
• Linux with PostgreSQL—ThingWorxNavigate-Postgres-<version>-Linux-x64-installer.run
Double-click the file to open the ThingWorx Navigate Setup tool.
| For Linux, make sure you run ThingWorx Navigate Setup with the root user. |
Getting ready to install
Now, a reminder to make sure that you meet all the prerequisites:
• System and software requirements
• Server information for your Microsoft SQL or PostgreSQL database
• No previous instances of ThingWorx Integration Runtime.
Click Next.
Applications in this installer
This installation tool helps you install all applications that are required to run ThingWorx Navigate:
• Apache Tomcat
• ThingWorx Foundation
• ThingWorx Navigate
• ThingWorx Integration Runtime
Click Next.
License Agreement
1. Read the license agreement, and then select I accept. You can print a copy of the agreement.
2. Click Next.
Installation location
On the Installation location page, decide where to install ThingWorx Navigate.
1. Next to
Path, click

to set a location, or accept the default location:
◦ Windows—C:\Program Files (x86)\PTC\ThingworxNavigate
◦ Linux—/opt/PTC
Make sure you install ThingWorx Navigate in a location that has at least 5 gigabytes of free disk space.
2. Click Next.
Create a ThingWorx Administrator user password
1. Set the password for your ThingWorx Administrator account. Make sure the password meets these requirements:
◦ At least 10 characters, including letters, numbers, and symbols
◦ These are the symbols you can use: ! @ # $ % _ *
2. Click Next.
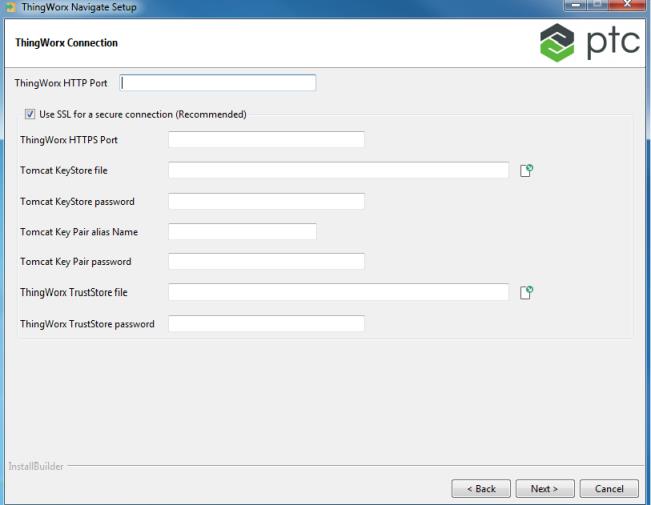
ThingWorx Connection: No SSL
If you choose not to configure ThingWorx for SSL, follow the steps in this section. For SSL configuration, skip to “ThingWorx Connection: ThingWorx Configured for Secure Sockets Layer (SSL) protocol (Recommended).”
1. Next to ThingWorx HTTP Port, accept the default port 8080. If 8080 is not available, set a new port.
2. Clear the Use SSL for a secure connection (Recommended) check box.
3. Then, click Next. The steps for defining your database server connection are in the section “Database server connection” below.
ThingWorx Connection: ThingWorx Configured for Secure Sockets Layer (SSL) protocol (Recommended)
We recommend configuring ThingWorx for SSL. Follow these steps to set up a secure connection to ThingWorx:
1. Enter your HTTP port number in the ThingWorx HTTP Port box.
2. Select the Use SSL for a secure connection (Recommended) check box:
3. Before you enter the information on this screen, make sure you prepare the correct TrustStore, KeyStore, and Key Pair files:
The topic
Using SSL with ThingWorx Navigate contains the instructions for generating TrustStore and KeyStore files. In that topic you’ll also find background information on the files and certificates associated with SSL.
Detailed background information is located in this technical support
article.
◦ ThingWorx TrustStore file—Generate the TrustStore file using the Java keytool command. Then, import the Apache Tomcat SSL certificate into this TrustStore.
◦ Tomcat KeyStore file—Create an Apache Tomcat SSL KeyStore in the JKS format (*.jks) using the Java keytool command.
Now that your files are ready, you can provide the information on the ThingWorx Connection screen. Continue with the steps below.
4. In ThingWorx HTTPS Port, enter a port number. Make sure this is a different port than the ThingWorx HTTP Port.
5. Next to
Tomcat KeyStore file, click

. Browse to the KeyStore file you created in Step 3, and then click
OK.
6. Next to Tomcat KeyStore password, enter the password you defined when you created the Tomcat KeyStore file.
7. Next to Tomcat Key Pair alias name, enter the alias name you gave when you created the Tomcat SSL KeyStore file.
8. Next to Tomcat Key Pair password, provide the password of the Key Pair for the Tomcat SSL KeyStore file.
| The information you provide here is entered in the JSON (*.json) file for ThingWorx Integration Runtime. The information is used to connect to ThingWorx when SSL is configured. |
9. Next to
ThingWorx TrustStore file, click
. Browse to the
ThingWorx TrustStore file you created in Step 3, and then click
OK.
10. Next to ThingWorx TrustStore password, enter the password you defined when you created the ThingWorx TrustStore file.
11. Click Next.
Database server connection
If you’re using Microsoft SQL, start with Step 1. For PostgreSQL, skip ahead to Step 2. Step 3 applies to both databases.
1. For MSSQL, enter the following connection information:
◦ IP Address or Host Name—Use a fully qualified host name
◦ Port number—The default is 1433
◦ Database Instance—This box is optional.
◦ Administrator user name
◦ Administrator password
Then, skip to Step 3 to create the ThingWorx database schema information.
2. For PostgreSQL, enter the following connection information:
◦ IP Address or Host Name
◦ Port number—The default is 5432
◦ Administrator user name
◦ Administrator password
3. For any database, create the following information for your ThingWorx database schema. Make sure these credentials are different from the administrator password that you created on a previous screen:
◦ ThingWorx Database Name—This must be a unique name.
◦ User name—For PostgreSQL, make sure this user name does not start with a number, and that it does not include capital letters.
◦ Password—The ThingWorx password requirements apply: At least 10 characters, including letters, numbers, and symbols.
◦ Confirm password—Retype your password.
4. Click Next.
Summary: Installation settings
Now’s the time to review your settings. If you need to change anything, click Back. When you’re ready, click Install.
The installation process can take several minutes.
Success!
ThingWorx Navigate is installed.
The next step is downloading and deploying your license. ThingWorx Navigate provides a tool to guide you through licensing. This tool will start automatically after you click Next on the Success! page.
Let’s move on to licensing. Click Next.
Troubleshoot the installation
If there is a problem with the installation, these log files may provide useful information on error handling:
• Installer log—Click the Open log file link in ThingWorx Navigate Setup, or find it in <Install Directory>\ThingworxNavigate.
• ThingWorx Foundation installer logs—Check these logs in <Install Directory>\ThingworxNavigate.
• Application and Security logs—Find these log files in <Navigate_installation_Directory>\ThingworxNavigate\ThingworxStorage\.
• Bitrock installer logs—Check the temp folder for the log of the installation tool itself.
For setups with PostgreSQL, you may encounter issues connecting to the database using the fully qualified hostname. Perform these PostgreSQL configuration steps to solve the issue:
1. From the <PostgreSQL installation location> folder, open the file pg_hba.conf in a text editor.
2. In the file, find the section IPv4 local connections.
3. Add a new row to that section: host all all md5, and then save and close the file.
4. Restart the PostgreSQL server.