About Symmetric Curves
This topic discusses the following:
Symmetric curves in Creo
You can create a curve that is symmetric and continuous, across a datum plane that serves as a mirror plane, for free curves and planar curves. You make a curve symmetric by selecting the Symmetrical Curve check box on the References tab of the Curve or Curve Edit tab, and then selecting a datum plane to be the mirror plane. Then for each interpolation point that you create, the system creates a counterpart point on the other side of the mirror plane. The curve’s control points and tangent vectors are also created on the other side. The curve becomes symmetric and is defined by both the original and mirrored points and tangents. A symmetric curve can have one midpoint that is located on the mirror plane.
One half of a symmetric curve is active, and the other half is not. You can select and edit the points on the active side of the curve, but you can’t select or edit the points on the other side. Whatever action you do to a point on the active side, the system does to the counterpart point on the other side of the mirror plane.
Both halves of the symmetric curve are part of one single curve. When you select either half of the curve, the entire curve is selected.
When you delete a point from the active side of the curve, the system deletes the counterpart point on the other side of the mirror plane. When you delete a midpoint, only the midpoint is deleted.
Reversing the curve direction
In a symmetric curve, the curve continues to the mirror plane from the last defined point, and the curve is mirrored across the plane. So the direction of the points in a curve is significant, specifically the first point and last point. The same set of points on a symmetric curve could produce different results, depending on which point is the last defined point.
You can reverse the direction of a symmetrical curve while the Curve or Curve Edit tab is open, by right-clicking the curve and choosing Flip Curve Direction from the shortcut menu. This defines the first point as the last point, and the last point as the first point.
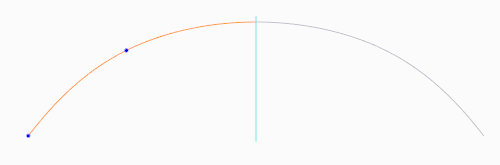
For example, you define a curve with three points, and make the curve symmetric. The system extends the curve to the mirror plane from last point you create, point 3, with the following result:
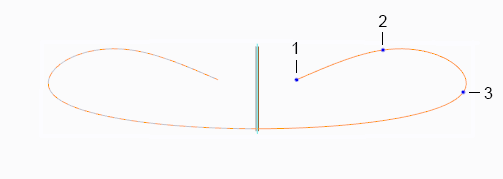
If the curve shape you wanted is the shape below, you can right-click the curve and choose Flip Curve Direction. The system defines the first point you created as the last point, with the following result:
Removing symmetry and converting curve types
When you remove symmetry by converting a free symmetric curve to a free curve, or a planar symmetric curve to a planar curve, the system offers you the following choices:
• Keep original side—Keeps the original points, and deletes all the mirrored points. Keeps the midpoint if one exists.
• Keep both sides—Keeps all the original points and the mirrored points. The symmetry constraint is removed, and all points can be edited.
• Cancel—Stops the conversion.
The following table shows how symmetry is involved when you convert between curve types:
Curve Type | Can Convert to Curve Type |
Free or planar | Free symmetric or planar symmetric |
Free symmetric or planar symmetric | Free or planar |
Free | Planar, and retain the symmetric property. The new planar curve reference must be normal to the existing mirror plane reference |
Planar | Free, and retain the symmetric property |
Additional information
Below is additional information about symmetric curves:
• You can’t combine a symmetric curve with any other curve, symmetric or non-symmetric. You must remove symmetry to combine curves.
• You can’t split a symmetric curve. Remove symmetry to split a curve.