About Extending Round Geometry
You can extend round geometry (pieces) to achieve the preferred rounds for your model. As you create a round, the round geometry automatically propagates across tangent points and then stops at a non-tangent point. If you need to continue the round geometry, you can extend the round piece up to a patch that you select. The following table illustrates the extend process.
|
|
• You can only extend open round sets. If you want to work with a closed-loop round set, you must first use open the round geometry.
• You cannot extend separate (overlapping) round pieces. To remove one of these pieces, hold down the CTRL key and select the piece, or clear it from its respective collector.
• If you need to extend round geometry at a different point other than a patch, you must define a Stop at Reference transition.
• An automatic blend is used to fill the gap around a corner. This blend cannot be modified or deleted. If a blend cannot be added, extend cannot be performed.
|
Extending Round Geometry
• The round placement edge reference is selected and the round geometry stops at non-tangent points (a).
• The round piece is selected from the Pieces tab and the trim/extend handles appear (b). As the right handle is dragged to extend the round piece, potential extension geometry appears. Notice that blend transitions are automatically added where a gap exists between tangent points. Also notice that the cursor and handle change during extending.
• Using the potential extension geometry as a guide, the handle is dragged to extend the round piece up to the third patch (c). Notice that the potential extension geometry outline changes color indicating the extent of the extension.
• Release the mouse button and the round piece is extended up to the patch (d).
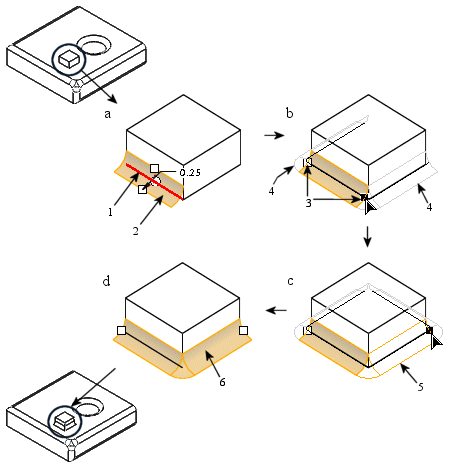
1. Edge placement reference
2. Round piece (consisting of three patches)
3. Trim/Extend handles
4. Potential extension geometry (including blend transitions)
5. Round extension
6. Extended round piece