Sectioning splits a part into two or more parts; it does not remove any material but creates one or more new parts.
To start the operation you need a part and a sectioning tool. This sectioning tool can be any of the following:
• one or more faces of a part,
• a surface of a part,
• a plane,
• a workplane and a closed profile,
• a part,
• a face part.
The workplane profile sections the part linearly for an infinite distance in both directions normal to the active workplane. You may position the workplane anywhere in the section path.
The figure shows an example of a part being sectioned using a profile:
If you use faces, parts, or face parts as the sectioning tool, they must be positioned at the point at which you want to section the part. The sectioning tool must also extend beyond the boundaries of the part being sectioned.
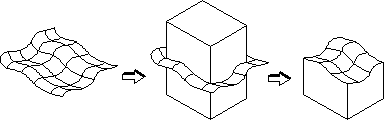
If you use a face part as a sectioning tool, you can create parts with complex faces. The figure below shows an example.
Creo Elements/Direct Modeling gives default names to the parts to indicate their ownership; for example, two new parts generated by splitting Part1 would be named Part1.1 and Part1.2.
If your sectioning tool is a workplane with a closed profile which lies within your part, Creo Elements/Direct Modeling will split your part in both directions of the workplane. Default is the active workplane if it contains a valid profile. If your sectioning tool is a face, a part, or a face part which extends all around beyond the part to split, Creo Elements/Direct Modeling will split the part along these tools.
To section a part with a profile,
1. Position a workplane and create a profile to cut through the part. This geometry must be a closed profile.
2. Click Modeling and then, in the Model group, click the arrow next to Remove.
3. Click Section. The Section dialog box opens.
4. Specify the part or parts to section.
5. Specify the workplane with the sectioning profile on it.
6. If necessary, change the keep workplane option.
7. Click to complete the operation.
Creo Elements/Direct Modeling sections the part and produces two or more resulting parts. Creo Elements/Direct Modeling gives default names to the parts to indicate their ownership; for example, two new parts generated by splitting Part1, would be named Part1.1 and Part1.2.
To section a part with a face part,
1. Click Modeling and then, in the Model group, click the arrow next to Remove.
2. Click Section. The Section dialog box opens.
3. Specify the part to split. The default is the active part.
4. Click Tool.
5. Specify the face part with which you want to split the part.
6. Make sure the face part is positioned in a way that it splits the part. The face part must extend completely beyond the part to split.
7. If necessary, adjust the Keep Tool option.
8. Click to complete the operation. Creo Elements/Direct Modeling will keep all sections of the part you split.
To section a part using faces,
1. Position two or more parts in a way that they intersect each other.
2. Click Modeling and then, in the Model group, click the arrow next to Remove.
3. Click Section. The Section dialog box opens.
4. Specify the part or parts to be sectioned.
5. Click Faces.
6. Specify the face or faces to section the part or parts.
7. Click to complete the operation.
The following list describes each of the options:
• Parts: Specifies the name for the part (or list of parts) to be machined. You can also use the browser (Browser) to specify the part. The default is the active part.
• Faces: Specifies the faces to use. These can be one face or a list of faces of one part. The Keep Tool function is not active, the faces are kept automatically.
• Tool: Specifies the sectioning tool to use. This can be a profile (workplane), a part, a face, a face part, a surface, or a plane. You can use the browser (Browser) to specify the tool. The default is the active workplane (if it contains a valid profile).
• Keep Tool: Specifies whether to keep the sectioning tool on completion of the operation. The default is to keep the tool.
• Keep Prof: Choose whether to keep the profile after the sectioning operation. This option is available only when the sectioning tool is a profile on a workplane.
• Def. Master: Define which part to keep as the original. After selecting a part and a sectioning tool, click Def. Master and select a face belonging to the part you wish to keep as the original following the Section operation.
• Back: Click Back to remove the master part definition or modify the part or sectioning tool after you use Def. Master.

 Remove.
 Section. The Section dialog box opens.
 to complete the operation.