When you generate a drawing, Creo Elements/Direct Annotation often draws clashing parts incorrectly. Press-fit parts, which are intended to clash, can be marked so they are drawn correctly.
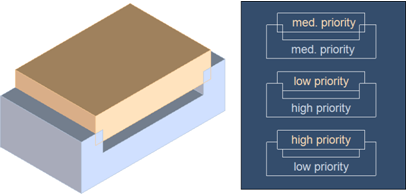
The priority specifies how the press-fit parts should be handled during view updates:
• Low: Subtract from this part.
• Medium: Show both parts. Use this setting if you want both objects drawn as-is. If marked, the parts will be drawn correctly. If unmarked, the parts may appear incomplete in the drawing.
• High: Subtract from other parts.
Avoid marking clashing parts with very different resolutions as press-fit parts. The resolution of the involved press-fit parts will be changed to the roughest resolution during view calculation and may cause corrupt bodies.
Drawing generation time increases with the number of press-fit parts in the model, whether they are marked or not.
To mark press-fit parts,
1. Click Structure and then, in the Part & Assembly group, click More.
2. Click Press Fits in the Tools section. The Mark Pressfits dialog box opens.
3. Select the Part you want to mark in the viewport or Structure Browser.
4. In the Mark field, select where you want the pressfit information saved:
◦ Contents: Stores the information in the contents data, so all shared parts will be marked.
◦ Instance: Stores the information in the instance data, so this part is handled individual, even if it is shared.
5. Set the Type:
◦ Pressfit part: The part is drawn as a press-fit.
◦ Standard part: The part is drawn normally. This is the same as unmarking the part.
6. Set the Priority:
◦ Off
◦ Low: Subtract from this part.
◦ Medium: Show both parts.
◦ High: Subtract from other parts.
7. To copy press-fit settings from another part, click Grab from and select a previously marked part in the viewport.
8. Click Default to reset all values to their default.
 Press Fits in the Tools section. The Mark Pressfits dialog box opens.
 to complete the operation.