With most 3D curve creation commands, you create independent 3D curves in 3D space. However, it is also possible to define curves lying on a surface. This can be useful for defining trimming lines and parting lines, or for restricting curves for new designs. The new curve adheres to the topology of the selected face.
You can also choose to imprint the finished curve on the surface, rather than creating a new wire part or adding to an existing one. The finished curve is imprinted as an edge on the defining surface. This can be used to split a face with an imprinted curve, and then Gather or Delete one of the split parts of the face.
A curve can be defined on a surface by clicking interpolation points on the surface and also by specifying tangency criteria to direct the curve. The additional tangents are relative to the base surface upon which the curve is drawn. Like splines, curves can be open or closed.
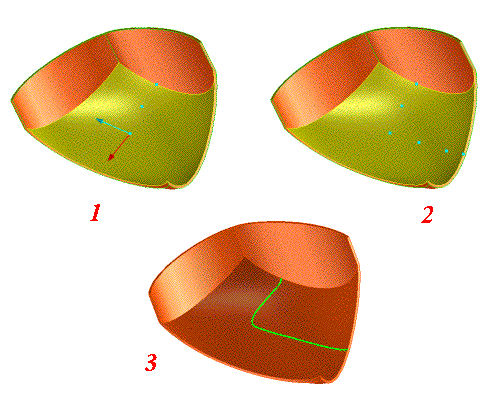
The figure shows a 3D curve being defined on a surface by tangency and points, and the resulting curve.
1. Specifying a tangency on the curve relative to the surface
2. Specifying interpolation points on the surface
3. The finished curve
3D curves must be defined on one face at a time. A Next option allows you to define a "chain" of curves to be a single wire part (this option is not available when imprinting curves). To create a curve over two faces, specify for both curves a common point on an edge connecting the faces.
Points at the face's untrimmed boundary can only be selected for the first and last points of a curve. You can, however, specify points on the face's edges as intermediate points. Note that a new 3D curve will lie on the untrimmed surface, and will not necessarily be contained entirely on the actual face; an imprinted curve, however, will be trimmed to fit on its defining face.
To create a 3D curve on a surface,
1. Click 3D Geometry and then, in the 3D Curve group, click More next to Spline 3D.
2. Click Curve on Surface in the Direct section. The Curve On Surface dialog box opens.
3. Choose a mode: Add Curve or Imprint.
4. If you are adding a curve, type a name for Part.
5. Click Face, then click the face where the curve will be created.
6. Click the start point of the curve.
7. Click Tangent to specify a tangent at the last entered point. Use the
Vector 3D CoPilot. You can define tangents at surface borders.
8. Continue specifying interpolation points and tangency criteria to define the curve.
9. Click to complete the operation.
Other menu options:
• Back: Remove the current point. You can continue to click Back and remove each point from the list.
• Next: Complete the curve as it is defined and continue to create curves using the same wire part name or imprinting curves. You must specify at least two points of the curve before it is valid.
• Closed: Create a closed periodic curve (three points are required). Once Closed is specified, no further points can be entered.
• Feedback: Shows the curvature feedback.
To connect curves on different faces, draw them separately on each face using the same wire part name and sharing a common boundary point.
Limitations
• You can only select boundary points of the untrimmed face for the first and last points of the curve.
• Tangent directions at surface borders are restricted. The angle must be greater than the reference value (approx. 10 degrees)
 Spline 3D.
 Curve on Surface in the Direct section. The Curve On Surface dialog box opens.
 to complete the operation.