You can create a section view to show a cross-section of a part.
A source or parent view must already be available and updated before you can create a section view. The figure shows a parent view (1) and an associated section view (2).
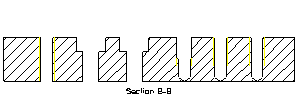
Certain types of parts (such as nuts, bolts and rivets) are not normally sectioned within a view of an assembly. Therefore, these parts, or individual views of them, can be secured from sectioning so that they remain whole in section views. Secured parts not actually split by the sectioning are not displayed.
To create a section view,
1. Click Annotation and then, in the Setup group, click the arrow next to Dep View.
3. Specify the parent view in one of the following ways:
◦ Click the view in the Creo Elements/Direct Annotation Viewport.
◦ Select the view from the Drawing Browser.
4. Click the Aligned check box to calculate the view perpendicular to the section line along all of its segments. Leave unchecked to calculate the view from the last segment of the section line.
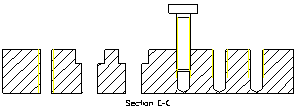
5. Select a Surface Mode option—the views show two parts, a secured part (the screw) and a block with some holes in it:
Off
On, no secured parts
displays sectioned surfaces only; excludes secured parts
On, incl. secured parts
displays sectioned surfaces only; includes secured parts
6. Draw a section line on the parent view. Right-click and click Accept Section Line to complete the line.
7. If necessary, enter a new section view label in the Label data entry field.
8. If necessary, change the view direction of the section:
◦ Click Reverse Dir to flip the section line; that is, reverse the view direction.
◦ Click Swap Dir to alternate the direction of the section line between its first and last segments.
9. Accept or change the Profile default setting.
10. Check Preserve View Center to maintain the position of the detail view when its border is moved.
11. To preview the view in a 3D viewport, click Preview.
12. Click to complete the operation.
13. Move the cursor into the Creo Elements/Direct Annotation Viewport.
Creo Elements/Direct Annotation attaches a view placeholder on the cursor.
14. Click the view position to fix the placeholder on the sheet.
The view can now be updated with the Update command. You can continue adding views and then update them in one operation.
When working with section views, note the following:
• When you do not use the Aligned option, the end segments of the section line should be parallel to each other, as the section view direction is derived from these lines. Use the Parallel To option (specifying the starting segment as the source) to complete a section line.
• Thread calculation on section views is only done if the 2D edges in the section view correspond to the root (for inner threads) or the crest (for outer threads) of the thread.
• The section line is not associated to the 3D model.
• If the parent view is deleted, the section view is also deleted.
• If the section view is deleted, the section line is also deleted from the parent view.

 Dep View.
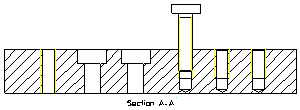
 to complete the operation.