Creating a Project from Scratch
Creating a Project from scratch is easy. The following procedure assumes that you are using the Tryout version and that the Project name that you enter is unique. For information about all types of Project creation scenarios, see “Creating a Project” in the guide or help for this application.
To create a Project from scratch:
1. In the Project Navigator, click Create new Project.

When the Create Tryout Project window opens, Directory and Name are filled in.
2. For Name, enter My New Project.
3. Select Run New Project Wizard.
4. Click OK.
The New Project Wizard starts and displays the Select Project Starting Point page.
5. Select Create a new Project and click Next. The Select Project Modules page appears.
You can use the Select All and Clear All buttons to select or clear all checkboxes. Repeatedly clicking a checkbox switches between selecting and clearing it.
6. Click Select All and then click Next. The Set Project Properties page appears.
7. For this Project, accept the default values and click Next. The Select Common Library Files page appears.
This page lists all files in the Common Library, which is a special Project where you keep files that you want to use with Projects that you create. All supplied Report Design, Report Binder, and Graph Template files are included in the Common Library by default.
8. Accept the default values and click Next. The Specify FMEA Setup page appears.
9. Accept the default selection of Set up FMEA now and click Next. The Select FMEA Worksheet Type page appears.
On this page, you select from a list of supplied standard layouts for performing FMEA (failure mode and effects analysis) tasks
10. Accept the default selection of FMEA Standard Template and click Next. The Select FMEA Modes Library page appears.
On this page, you select from a list of supplied FMEA Modes Library files for performing component FMEAs.
11. Accept the default selection of FMD97 Modes - Tryout and click Next. The Set FMEA Options page appears.
On this page, you specify whether any local effects that you enter in a FMEA are to automatically roll up as failure modes at the next level of your FMEA hierarchy. You also indicate whether to turn on the tables for control plans and DVPs (design verification plans) in this Project’s default System file.
12. Make sure all checkboxes are cleared so that modes are not rolled up and tables for control plans and DVP are not turned on. Then, click Next. The Wizard Complete page appears.
13. Click Finish. Progress indicators appear as the Project is created. Once the process is completed, the Project’s empty System file opens.
14. Slide the Project Navigator into view. Your newly created Project is now open and appears in the Project Navigator list. You can see the name of your new Project in the top Project: heading designated by the open folder icon: My New Project.
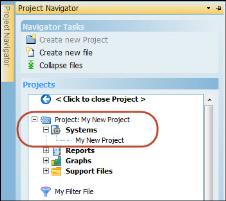
The term Project is used to denote the entire entity that encompasses all analysis files. For example, in the Project Navigator, you can see the following headings: Systems, Reports, and Graphs. These are some of the types of files that are contained in your Project.
The first heading, Systems, refers to the main files that contain the data to analyze. In this case, one System file is listed: My New Project. You can create additional System file in a Project if desired. In this case, we use only one.
The other files in your Project are used to either set up the Project or support your analysis tasks.
15. Slide the Project Navigator out of view. Because the newly created System file is empty, no data is displayed in it.