Customizing Matrix Editor Cells
The GWT layout renderers are used when displaying attribute values in the matrix area. You can customize the layout of the Matrix Editor cells to display the attributes either vertically or horizontally. To customize the layout of the Matrix Editor cells, perform the following procedure:
1. Create a new layout renderer class that implements com.ptc.windchill.enterprise.productfamily.pfb.client.renderer.CellLayoutRenderer.
2. Override the renderLayout (Map <String, Object>) method to provide your custom rendering logic using GWT components. See example CustomHorizontalCellLayoutRenderer.
3. Add the class path and name in the wt.property file. In this file, change the DISPLAY_MODE_VERTICAL property to use the new layout renderer when you want to display the attributes in the vertical mode, or change the DISPLAY_MODE_HORIZONTAL property to display attributes in the horizontal mode.
4. Propagate the changes by using the xconf manager.
Each layout renderer needs a Map<String, Object> parameter for the renderLayout method. The map provided to the renderLayout method has a key that is the internal name of the attribute, and the value is the value of the rendered attribute. The map is a LinkedHashMap that ensures that the order of the attribute in the map is the same as the order in the Matrix Editor view.
: Custom Horizontal Layout Renderer
The example class CustomHorizontalCellLayoutRenderer used in this section adds the attribute value into a separate div tag that has a css class attached to the internal name of the attribute.
|
|
Characters such as “|” or “.” must be replaced with the supported characters.
|
You can manage div tags by the rules from the CSS file. See the following example for displaying cell indicator, object name, and status attributes in the Matrix Editor.
.pfb-matrix-cell-horizontal { height: 16px; }
pfb-cell-attribute-value {
float: left;
height: 16px;
overflow: hidden;
text-overflow: ellipsis;
white-space: nowrap;
padding: 0px 3px;
}
.pfb-cell-cell-indicator { width: 20px; }
.pfb-cell-objName { width: 50px; }
.pfb-cell-status { width: 70px; }
pfb-cell-attribute-value {
float: left;
height: 16px;
overflow: hidden;
text-overflow: ellipsis;
white-space: nowrap;
padding: 0px 3px;
}
.pfb-cell-cell-indicator { width: 20px; }
.pfb-cell-objName { width: 50px; }
.pfb-cell-status { width: 70px; }
By adding the CSS rules for cell indicator, object name, and status in the Matrix Editor, the cells will have a fixed width of 20px, 50px, and 70px. However, if the attribute value is longer than the cell width, the value appears with an elipsis (“...”).
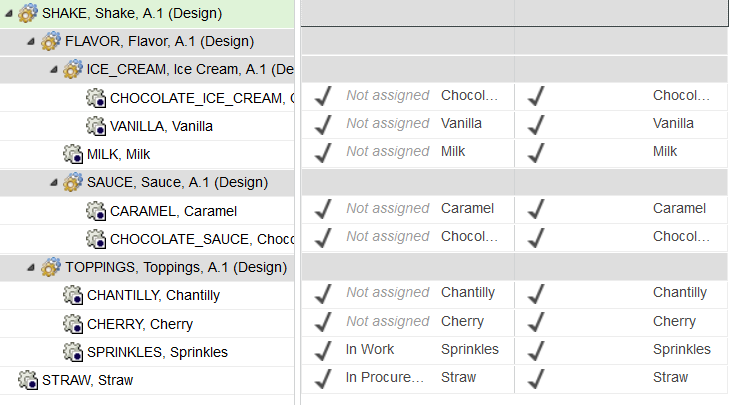
In the above image, the defined width for the Status attribute is 70px. The attribute value “In Procurement” is longer than the defined width of the cell and appears truncated with an elipsis (“...”).
Customizing Matrix Editor Cells to Display NULL Attributes
You can customize the Matrix Editor vertical or horizontal layout to provide better visibility to the empty (null) values for the Matrix area attributes.
1. Create a CSS rule that points to an empty HTML tag containing the value of an attribute.
2. Generate custom content for this rule by using the content property. This property can be a string or a URL to an image. For more details, see https://www.w3.org/wiki/CSS/Properties/content.
To provide this functionality for default horizontal and vertical renderers, add two CSS rules to the Windchill CSS file.
.pfb-matrix-cell-horizontal > span:empty::before {
content: 'EMPTY VALUE';
.pfb-matrix-cell-vertical:not(.pfb-matrix-cell-empty)
div.x-component:empty::before
{
content: 'EMPTY VALUE';
}
content: 'EMPTY VALUE';
.pfb-matrix-cell-vertical:not(.pfb-matrix-cell-empty)
div.x-component:empty::before
{
content: 'EMPTY VALUE';
}
These CSS rules cover the empty span and div that matches the path by the text EMPTY VALUE.
If you change the default horizontal or vertical renderer, these rules may get outdated and stop working. After making any changes in the HTML structure, you must ensure that these rules are still valid. |
Customizing View Cell Information Panel to Display NULL Attributes
You can customize the View Cell Information panel in the Matrix Editor to provide better visibility to the empty (null) values.
1. Create a CSS rule that points to an empty HTML tag containing the value of an attribute.
2. Generate custom content for this rule by using the content property. This property can be a string or a URL to an image. For more details, see https://www.w3.org/wiki/CSS/Properties/content.
3. Add the following CSS rule to the Windchill CSS file.
.view-attributes-panel > div.x-component:empty::before {
content: 'EMPTY VALUE';
}
content: 'EMPTY VALUE';
}
This rule covers all the empty div tags that match the path by using the text EMPTY VALUE.
Aggregating CSS Rules into One Rule
You can gather CSS rules and create one CSS rule that covers all the cases from the previous solution. For example, you defined three empty value replacements using CSS.
.pfb-matrix-cell-horizontal > span:empty::before {
content: 'EMPTY VALUE';
}
.pfb-matrix-cell-vertical:not(.pfb-matrix-cell-empty)
div.x-component:empty::before {
content: 'EMPTY VALUE';
}
.view-attributes-panel > div.x-component:empty::before {
content: 'EMPTY VALUE';
}
content: 'EMPTY VALUE';
}
.pfb-matrix-cell-vertical:not(.pfb-matrix-cell-empty)
div.x-component:empty::before {
content: 'EMPTY VALUE';
}
.view-attributes-panel > div.x-component:empty::before {
content: 'EMPTY VALUE';
}
You can replace these by one CSS rule that joins each CSS path with a comma.
.pfb-matrix-cell-horizontal > span:empty::before,
.pfb-matrix-cell-vertical:not(.pfb-matrix-cell-empty)
div.x-component:empty::before,
.view-attributes-panel > div.x-component:empty::before {
content: 'EMPTY VALUE';
}
.pfb-matrix-cell-vertical:not(.pfb-matrix-cell-empty)
div.x-component:empty::before,
.view-attributes-panel > div.x-component:empty::before {
content: 'EMPTY VALUE';
}
After changing the content property here, the handling of the null value in all the places changes. This change provides consistency for handling null values in all three places.