為 Theorem Worker 配置檔案同步處理
配置檔案同步處理後,CAD 資料將在發佈程序期間與 Windchill Workgroup Manager 同步,以反映來自 Windchill 的任何待處理變更。例如,PTC_REVISION 或 PTC_WM_LIFECYCLE_STATE 的值。產生的可檢視項會反映出對於檔案的暗示更新,然後會在 Windchill 中儲存為表示。
開始 Worker 檔案同步處理組態流程之前,確定您已收集下列變數的必要資訊:
|
變數
|
描述
|
|---|---|
|
(一般)
|
您已針對 CATIA 3DEXPERIENCE 下載及安裝 Theorem 轉接器,並在用戶端完成配置。
|
|
Worker 位置
|
指定 Worker 是在與 Windchill 伺服器相同的電腦上,還是在不同的 Windows 電腦上。
|
|
Worker 執行指令
|
指定啟動 Worker 可執行檔的指令 (含主機的本機路徑) 及逾時指令。
|
|
Worker Daemon 埠
|
如果您在不同的 Windows 電腦上使用遠端 Worker,在主機上執行的 Worker Daemon 所接聽的預設埠號為 601。
|
|
通用檔案系統
|
指定具有網路檔案系統 (例如 Microsoft Windows Networking、NFS 或 UNC 路徑) 的通用檔案系統。指示將由 FTP 指令 (pview 目錄) 完成從 Windchill 伺服器存取通用檔案系統的 Windchill 電腦路徑,必須與通用檔案系統中 Worker 電腦的路徑相同。
|
|
|
繼續進行下列 Worker 檔案同步處理組態程序之前,Theorem Worker、Windchill 伺服器和用戶端必須已按下列主題所述配置為正確支援檔案同步處理。
如果要作為服務執行檔案同步處理,您必須已完成配置 Theorem Worker 作為服務執行主題中的步驟。
|
欲為 Worker 配置檔案同步處理:
1. 登入 Windchill 伺服器並停止應用伺服器、Tomcat 與 Apache。
2. 清除 Tomcat servlet 快取,並刪除 C:\ptc\<版次編號>\tomcat\work\Catalina 目錄的內容。
3. 在 C:\ptc\<版次編號>\Windchill 中建立或放置名為 auth.properties 的檔案。
|
|
此檔案必須包含auth=使用者名稱:密碼這一行,不可有多餘的空格或行。使用者認證可用於 Windchill 發佈,且必須擁有所有資料的讀取權限。
|
4. 備份 C:\ptc\<版次編號>\Windchill\site.xconf。針對測試案例,您必須關閉檔案同步處理。
|
|
欲稍後再次關閉檔案同步處理,請還原備份的 site.xconf 檔案並在 Windchill 指令行執行 xconfmanager-fp。
|
5. 將以下幾行新增到 site.xconf 檔案中的結尾 </Configuration> 之前:
<Property name="publish.cadconvert.UG" overridable= "true"
targetFile="codebase/wvs.properties"
value="com.ptc.wvs.server.publish.CadConvertUG,assytype=topdown,
repiba=additional_reps,useworkerdownload=$(wt.home)$(wvs.dir.sep)
auth.properties"/>
targetFile="codebase/wvs.properties"
value="com.ptc.wvs.server.publish.CadConvertUG,assytype=topdown,
repiba=additional_reps,useworkerdownload=$(wt.home)$(wvs.dir.sep)
auth.properties"/>
<Property name="publish.cadconvert.SOLIDWORKS" overridable="true"
targetFile="codebase/wvs.properties"
value="com.ptc.wvs.server.publish.CadConvertSOLIDWORKS,useworkerdownload=
$(wt.home)$(wvs.dir.sep)auth.properties"/>
targetFile="codebase/wvs.properties"
value="com.ptc.wvs.server.publish.CadConvertSOLIDWORKS,useworkerdownload=
$(wt.home)$(wvs.dir.sep)auth.properties"/>
<Property name="publish.cadconvert.INVENTOR" overridable="true"
targetFile="codebase/wvs.properties"
value="com.ptc.wvs.server.publish.CadConvertINVENTOR,useworkerdownload=
$(wt.home)$(wvs.dir.sep)auth.properties"/>
targetFile="codebase/wvs.properties"
value="com.ptc.wvs.server.publish.CadConvertINVENTOR,useworkerdownload=
$(wt.home)$(wvs.dir.sep)auth.properties"/>
<Property name="publish.cadconvert.CATIA" overridable="true"
targetFile="codebase/wvs.properties"
value="com.ptc.wvs.server.publish.CadConvertCATIA,
useworkerdownload=$(wt.home)$(wvs.dir.sep)auth.properties"/>
targetFile="codebase/wvs.properties"
value="com.ptc.wvs.server.publish.CadConvertCATIA,
useworkerdownload=$(wt.home)$(wvs.dir.sep)auth.properties"/>
<Property name="publish.cadconvert.CATIAV5" overridable="true"
targetFile="codebase/wvs.properties"
value="com.ptc.wvs.server.publish.CadConvertCATIAV5,useworkerdownload=
$(wt.home)$(wvs.dir.sep)auth.properties"/>
targetFile="codebase/wvs.properties"
value="com.ptc.wvs.server.publish.CadConvertCATIAV5,useworkerdownload=
$(wt.home)$(wvs.dir.sep)auth.properties"/>
<Property name="publish.cadconvert.CATIAV6" overridable="true"
targetFile="codebase/wvs.properties"
value="com.ptc.wvs.server.publish.CadConvertCATIAV6,
useworkerdownload=$(wt.home)$(wvs.dir.sep)auth.properties"/>
targetFile="codebase/wvs.properties"
value="com.ptc.wvs.server.publish.CadConvertCATIAV6,
useworkerdownload=$(wt.home)$(wvs.dir.sep)auth.properties"/>
<Property name="publish.service.enabled" overridable="true"
targetFile="codebase/wvs.properties"
value="true"/>
targetFile="codebase/wvs.properties"
value="true"/>
<Property name="publish.usesPublishRules" overridable="true"
targetFile="codebase/wvs.properties"
value="PROE CADDS5 UG SOLIDWORKS CATIAV4 ARBORTEXT"/>
targetFile="codebase/wvs.properties"
value="PROE CADDS5 UG SOLIDWORKS CATIAV4 ARBORTEXT"/>
<Property name="worker.exe.allowlist.prefixes" overridable="true"
targetFile="codebase/wvs.properties"
value="D:\Theorem|C:\Theorem|E:\Theorem"/>
targetFile="codebase/wvs.properties"
value="D:\Theorem|C:\Theorem|E:\Theorem"/>
6. 儲存 site.xconf 檔案並從 Windchill 指令行執行 xconfmanager-fp。
7. 啟動 Apache、Tomcat 與應用伺服器。
8. 在 Worker 電腦上安裝 Windchill Workgroup Manager 用戶端,並註冊 CATIA 3DEXPERIENCE Rxx。
9. 如果您正在使用 Windows 系統,請在 Worker 中執行下列指令:
Start>Run>cmd
CD C:\Theorem\i486_nt\obj
WorkerDaemon.exe <port number>
CD C:\Theorem\i486_nt\obj
WorkerDaemon.exe <port number>
|
|
請勿嘗試在執行服務的同時手動執行 WorkerDaemon.exe。
|
10. 以管理員身份登入至 Windchill 伺服器。
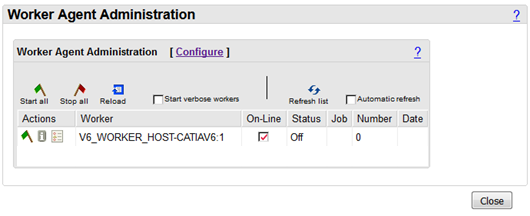
11. 導覽至 > > ,並執行以下步驟:

a. 選取「啟動詳細資訊 workers」核取方塊。
b. 按一下 CATIAV6 Worker 名稱旁邊的「啟動 Worker」(綠色旗子圖示)。旗標會變成紅色,執行時狀況會顯示為「可使用」。
12. 確定在 worker 電腦的指令提示中沒有出現錯誤。
Worker 檔案同步處理組態至此完成。