Pet 表
1. 创建 PetTable 类
a. > >
b. 将“包”设置为 com.acme.mvc.builders
c. 将“名称”设置为 PetTable
d. 将“超类”设置为 AbstractComponentBuilder (从 com.ptc.mvc.components)
e. 单击“完成”
2. AbstractComponentBuilder 要求实现两种方法 (Eclipse 将为每种方法生成方法存根)。第一种方法 buildComponentData 应返回将显示在表格中的对象 (行)。将方法的正文替换为以下代码,以仅查询所有宠物:
return PersistenceHelper.manager.find(new QuerySpec(Pet.class));
3. 第二种方法 buildComponentConfig 将返回一个表,其中包含要显示的列。首先,创建一种便捷方法来获取各个列 (ColumnConfig 和 ComponentConfigFactory 从 com.ptc.mvc.components 导入):
ColumnConfig getColumn(final String id, final ComponentConfigFactory
factory) {
final ColumnConfig column = factory.newColumnConfig(id, true);
column.setSortable(false);
return column;
}
factory) {
final ColumnConfig column = factory.newColumnConfig(id, true);
column.setSortable(false);
return column;
}
4. 接下来,创建一个新类 acmeManagerResource,用于管理表的本地化显示名称。完整列表如下所示:
package com.acme.jca;
import wt.util.resource.*;
@RBUUID("com.acme.jca.acmeActionResource")
public final class acmeManagerResource extends WTListResourceBundle {
@RBEntry("Pets")
public static final String PET_TABLE_LABEL = "pet_table_label";
}
import wt.util.resource.*;
@RBUUID("com.acme.jca.acmeActionResource")
public final class acmeManagerResource extends WTListResourceBundle {
@RBEntry("Pets")
public static final String PET_TABLE_LABEL = "pet_table_label";
}
5. 下一步,将 buildComponentConfig 的已生成正文替换为 ():
final ComponentConfigFactory factory = getComponentConfigFactory();
final TableConfig table; {
table = factory.newTableConfig();
table.setType(Pet.class.getName());
table.setLabel(WTMessage.getLocalizedMessage(RESOURCE,
acmeManagerResource.PET_TABLE_LABEL, null));
table.setSelectable(true);
table.setShowCount(true);
table.setShowCustomViewLink(false);
final ColumnConfig name; {
name = factory.newColumnConfig(Pet.NAME, true);
name.setInfoPageLink(true);
name.setSortable(true);
}
table.addComponent(name);
table.addComponent(getColumn(ColumnIdentifiers.INFO_ACTION, factory));
table.addComponent(getColumn(ColumnIdentifiers.NM_ACTIONS, factory));
table.addComponent(getColumn(ColumnIdentifiers.LAST_MODIFIED, factory));
table.addComponent(getColumn(Pet.KIND, factory));
table.addComponent(getColumn(Pet.DATE_OF_BIRTH, factory));
table.addComponent(getColumn(Pet.FIXED, factory));
}
return table;
使用 Ctrl-L 解析类,如下所示:com.acme.jca.acmeManagerResource、com.ptc.core.components.descriptor.DescriptorConstants.ColumnIdentifiers、com.ptc.mvc.components.TableConfig 和 wt.util.WTMessage。此外,将 RESOURCE 分配为字段:
static final String RESOURCE = acmeManagerResource.class.getName();
6. 将 PetTable 注册为 bean
a. 如下所示注释 PetTable 类声明:@ComponentBuilder("acme.pet.table")
b. 更改项目排除:
a. 将项目的 .classpath (eclipse/cust_Windchill_src/.classpath) 设置为可写入
b. >
c. 选择 Java 构建路径和“源”选项卡。
d. 在 cust_Windchil_src\src 下,选择“已排除”,然后选择“编辑”。
e. 选择 config/**,然后选择“编辑”。
f. 将 config/** 替换为 config/logicrepository/**,然后单击“确定”
g. 依次单击“完成”和“确定”
7. 创建名为 Pet-configs.xml 的新文件。
a. > >
b. 选择 > ,然后选择“下一步”(如果“XML/XML 文件”不可用,安装 Eclipse XML 编辑器和工具,可在使用 Helios 软件站点时在 Web、XML 和 Java EE 开发类别下找到,或仅创建“常规 -> 文件”)
c. 将父文件夹分配至 cust_Windchill_src\src\config\mvc,将文件名分配至 Pet-configs.xml,然后单击“完成”
d. 内容如下所示:
<?xml version="1.0" encoding="UTF-8"?>
<beans xmlns="http://www.springframework.org/schema/beans"
xmlns:xsi="http://www.w3.org/2001/XMLSchema-instance"
xmlns:context="http://www.springframework.org/schema/context"
xmlns:mvc="http://www.ptc.com/schema/mvc"
xsi:schemaLocation="http://www.springframework.org/schema/beans
http://www.springframework.org/schema/beans/spring-beans-2.5.xsd
http://www.springframework.org/schema/context
http://www.springframework.org/schema/context/spring-context-2.5.xsd
http://www.ptc.com/schema/mvc http://www.ptc.com/schema/mvc/mvc-10.0.xsd">
<!-- Define the builders -->
<bean class="com.acme.mvc.builders.PetTable"/>
</beans>
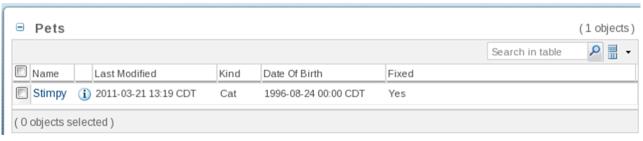
8. 通过启动/重新启动 Windchill,然后附加到基本 Windchill URL /app/#ptc1/comp/acme.pet.table 来验证表是否正常工作。应显示下表: