新建宠物
新建宠物涉及为宠物构建一个对话框并在表格中显示该宠物。
1. 创建 create.jsp 向导来创建宠物。
a. 导航到 > > > > ,然后单击“下一步”。
|
|
如果选项 > > 不可用,请安装网页编辑器。使用 Helios 软件站点时,可在 Web、XML 和 Java EE 开发类别下找到此选项。另外,还可以创建常规文件 ( > > )
|
b. 文件夹为 cust_Windchill_src/src/netmarkets/jsp/acme/pet,文件名为 create.jsp。
c. 单击“完成”,然后将内容替换为下列内容:
<%@taglib prefix="jca" uri="http://www.ptc.com/windchill/taglib/components"%>
<%@taglib prefix="attachments"
uri="http://www.ptc.com/windchill/taglib/attachments"%>
<%@include file="/netmarkets/jsp/components/beginWizard.jspf"%>
<%@include file="/netmarkets/jsp/components/includeWizBean.jspf"%>
<jca:initializeItem baseTypeName="com.acme.Pet" operation="${createBean.create}"
attributePopulatorClass="com.ptc.core.components.forms.DefaultAttributePopulator"/>
<jca:wizard>
<jca:wizardStep action="petDefineItemAttributesWizStep" type="pet"/>
<jca:wizardStep action="attachments_step" type="attachments"/>
</jca:wizard>
<attachments:fileSelectionAndUploadApplet/>
<%@include file="/netmarkets/jsp/util/end.jspf"%>
2. 定义 petDefineItemAttributesWizStep 操作。
a. 在 config.actions 中创建 Pet-actions.xml 以及 Pet-actionmodels.xml。
b. 如下所示分配其内容:
<?xml version="1.0" encoding="UTF-8"?>
<!DOCTYPE listofactions SYSTEM 'actions.dtd'>
<listofactions>
<objecttype name="pet" class="com.acme.Pet"
resourceBundle="com.acme.jca.acmeActionResource">
<action name="petDefineItemAttributesWizStep" afterVK="setAttributesWizStep"
preloadWizardPage="true" required="true">
<command url="netmarkets/jsp/acme/pet/defineItemAttributesWizStep.jsp"
windowType="wizard_step"/>
</action>
</objecttype>
</listofactions>
c. 在 site.xconf <AddToProperty name="com.ptc.netmarkets.util.misc.defaultActions" value="config/actions/Pet-actions.xml"/> 中注册 Pet-actions.xml
d. 再次运行 xconfmanager 以传播更改
3. 使用以下内容创建 defineItemAttributesWizStep.jsp JSP 页面以及 create.jsp:
<%@taglib uri="http://www.ptc.com/windchill/taglib/mvc" prefix="mvc"%>
<%@include file="/netmarkets/jsp/util/begin_comp.jspf"%>
<jsp:include page="${mvc:getComponentURL('acme.pet.SetAttributesPanel')}"/>
<%@include file="/netmarkets/jsp/util/end_comp.jspf"%>
<%@include file="/netmarkets/jsp/util/begin_comp.jspf"%>
<jsp:include page="${mvc:getComponentURL('acme.pet.SetAttributesPanel')}"/>
<%@include file="/netmarkets/jsp/util/end_comp.jspf"%>
4. 定义组件 (acme.pet.SetAttributesPanel)
a. 使用如下内容创建 PetSetAttributesPanelBuilder。
package com.acme.mvc.builders;
import wt.util.WTException;
import com.acme.Pet;
import com.ptc.core.ui.resources.ComponentType;
import com.ptc.jca.mvc.components.AbstractAttributesComponentBuilder;
import com.ptc.jca.mvc.components.JcaAttributeConfig;
import com.ptc.jca.mvc.components.JcaGroupConfig;
import com.ptc.mvc.components.AttributePanelConfig;
import com.ptc.mvc.components.ComponentBuilder;
import com.ptc.mvc.components.ComponentConfigFactory;
import com.ptc.mvc.components.ComponentId;
import com.ptc.mvc.components.ComponentParams;
import com.ptc.mvc.components.TypeBased;
@ComponentBuilder("acme.pet.SetAttributesPanel")
@TypeBased("com.acme.Pet")
public class PetSetAttributesPanelBuilder extends
AbstractAttributesComponentBuilder {
@Override
protected AttributePanelConfig buildAttributesComponentConfig
(final ComponentParams params) throws WTException {
final ComponentConfigFactory factory = getComponentConfigFactory();
final AttributePanelConfig panel; {
panel = factory.newAttributePanelConfig
(ComponentId.ATTRIBUTE_PANEL_ID);
panel.setComponentType
(ComponentType.WIZARD_ATTRIBUTES_TABLE);
final JcaGroupConfig group; {
group = (JcaGroupConfig) factory.newGroupConfig();
group.setId("setAttributes");
group.setLabel("Set Attributes");
group.setIsGridLayout(true);
group.addComponent(getAttribute(Pet.NAME, factory));
group.addComponent(getAttribute(Pet.KIND, factory));
group.addComponent(getAttribute(Pet.DATE_OF_BIRTH, factory));
group.addComponent(getAttribute(Pet.FIXED, factory));
}
panel.addComponent(group);
}
return panel;
}
JcaAttributeConfig getAttribute(final String id, final ComponentConfigFactory
factory) {
final JcaAttributeConfig attribute = (JcaAttributeConfig)
factory.newAttributeConfig();
attribute.setId(id);
return attribute;
} }
b. 将以下内容添加到 Pet-configs.xml 以注册构建器 <bean id="acme.pet.SetAttributesPanel" class="com.acme.mvc.builders.PetSetAttributesPanelBuilder"/>
5. 使用如下内容创建 petDefineItemAttributesWizStep 参考的 resourceBundle (请注意,createPackage.gif 重用为用于创建宠物的图标):
package com.acme.jca;
import wt.util.resource.*;
@RBUUID("com.acme.jca.acmeActionResource")
public final class acmeActionResource extends WTListResourceBundle {
@RBEntry("New Pet")
public static final String PET_CREATE_TITLE = "pet.create.title";
@RBEntry("New Pet")
public static final String PET_CREATE_TOOLTIP = "pet.create.tooltip";
@RBEntry("New Pet")
public static final String PET_CREATE_DESCRIPTION = "pet.create.description";
@RBEntry("createPackage.gif")
public static final String PET_CREATE_ICON = "pet.create.icon";}
6. 将创建操作纳入 PetTable 中。
a. 将以下模型添加到 Pet-actionmodels.xml (恰好位于 petDetails 模型上方)。
<model name="pets list">
<action name="create" type="pet" shortcut="true"/>
</model>
<action name="create" type="pet" shortcut="true"/>
</model>
b. 将创建操作添加到 Pet-actions.xml 中的宠物 (恰好位于 petDefineItemAttributesWizStep 上方)。
<action name="create">
<command class="com.ptc.core.components.forms.CreateObjectFormProcessor"
url="netmarkets/jsp/acme/pet/create.jsp" windowType="popup"/>
</action>
<command class="com.ptc.core.components.forms.CreateObjectFormProcessor"
url="netmarkets/jsp/acme/pet/create.jsp" windowType="popup"/>
</action>
c. 将操作模型 (pets list) 合并到 PetTable 中 (添加到 table.setSelectable(true); 之前)。示例:table.setActionModel("pets list");
7. 启动/重新启动 Windchill。
a. 验证“新建宠物”图标在表中是否可用
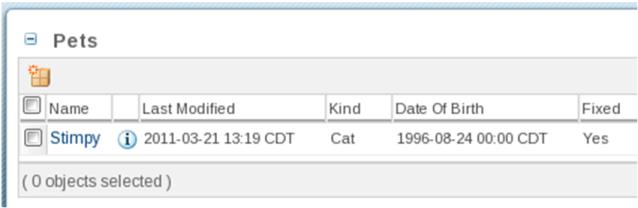
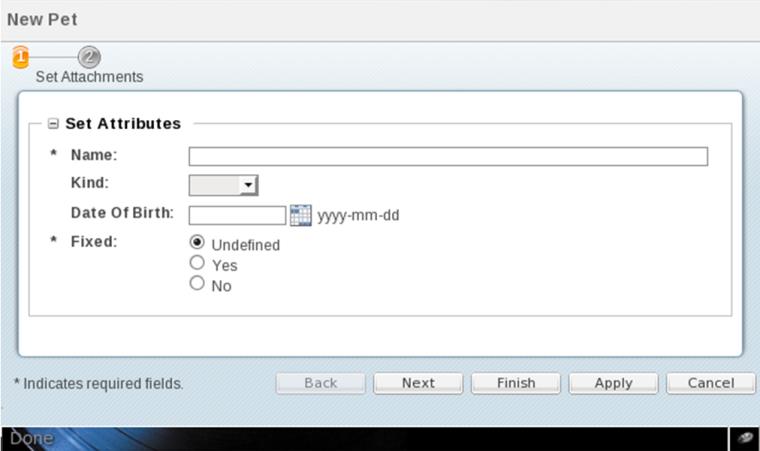
c. 单击 New Pet,然后验证由两步向导组成的弹出窗口。
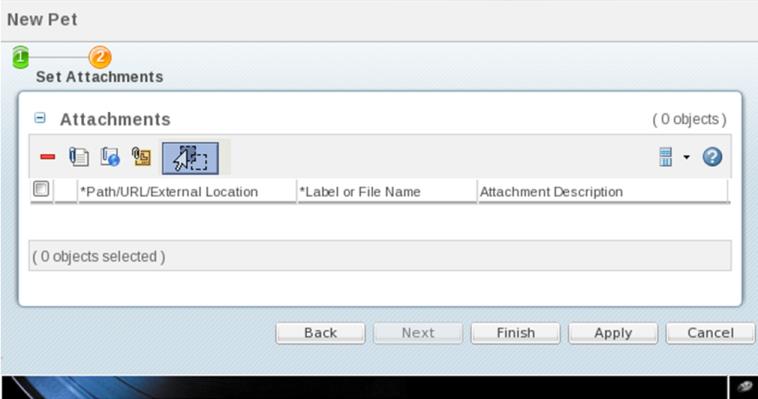
d. 创建一个宠物。确保上载内容。
e. 转至新宠物的“信息”页,然后验证内容是否显示,以及是否可查看/可下载。