SSO 配置的电子签名验证
以下主题与下列用户相关:
• 您的站点将在其工作流进程中使用电子签名。有关详细信息,请参阅电子签名设置。
• 您希望要求用户在提交电子签名之前提供凭据。
• 您的站点通过单一登录 (SSO) 配置和标识提供工具 (IdP) 提供身份验证。
|
|
PTC 建议在使用 SSO 配置中的 eSignature 功能和使用基于证书的身份验证 (CAC/PKI) 时,设置第二身份验证策略 (即多重身份验证)。由于浏览器缓存了证书,因此不能强制进行所需的重新验证。因此,可能需要使用第二身份验证策略 (如多重身份验证) 才能确保向用户显示重新验证。
|
|
|
以下说明假设已经为 Windchill 配置基本的 SSO 配置。有关详细信息,请参阅安全声明标记语言 (SAML) 身份验证。
|
配置 Apache
1. 将以下文本添加到 <APACHE_HOME>/conf/conf.d/30-app-Windchill-1Auth.conf:
<LocationMatch ^/+Windchill/reauthsecure?>
AuthType shibboleth
ShibRequestSetting applicationId reauthsecure
ShibUseHeaders on # mod_jk doesn't pass environment, so useHeaders is required
require shib-session
</LocationMatch>
AuthType shibboleth
ShibRequestSetting applicationId reauthsecure
ShibUseHeaders on # mod_jk doesn't pass environment, so useHeaders is required
require shib-session
</LocationMatch>
2. 导航到 <APACHE_HOME>/conf/conf.d/00-1mod_shib.conf。
查找 <Location /Shibboleth.sso>。紧接在结束标记之后,添加以下内容:
<Location /reauthsecure/Shibboleth.sso>
AuthType None
require shib-session false
</Location>
AuthType None
require shib-session false
</Location>
3. 将以下文本添加到 00-1mod_shib.conf 的末尾:
Alias /Windchill/reauthsecure/ "/reauthsecure/Shibboleth.sso/Login"
<Location /reauthsecure>
AuthType shibboleth
ShibRequestSetting applicationId reauthsecure
require shib-session
</Location>
<Location /reauthsecure>
AuthType shibboleth
ShibRequestSetting applicationId reauthsecure
require shib-session
</Location>
4. 重新启动 Apache 服务器。
配置 Shibboleth
导航到 <SHIBBOLETH_INSTALL_DIRECTORY>/etc/shibboleth/shibboleth2.xml。
1. 在 <HOST> 元素内部添加以下标记。目标功能的行为与新应用程序相同,因此服务器强制用户重新进行身份验证:
<Path name="reauthsecure" authType="shibboleth" requireSession="true" forceAuthn="true" applicationId="reauthsecure" />
例如:
<Host name="sp.example.org">
<Path name="secure" authType="shibboleth" requireSession="true"/>
<Path name="reauthsecure" authType="shibboleth" requireSession="true" forceAuthn="true" applicationId="reauthsecure" />
</Host>
<Path name="secure" authType="shibboleth" requireSession="true"/>
<Path name="reauthsecure" authType="shibboleth" requireSession="true" forceAuthn="true" applicationId="reauthsecure" />
</Host>
2. 在 <ApplicationDefaults> 元素内添加以下标记。这将覆盖默认应用程序:
<ApplicationOverride id="reauthsecure" entityID="SP_CONNECTION_NAME" REMOTE_USER="uid eppn persistent-id targeted-id" cipherSuites="ECDHE+AESGCM:ECDHE:!aNULL:!eNULL:!LOW:!EXPORT:!RC4:!SHA:!SSLv2" >
<Sessions lifetime="1" timeout="1" checkAddress="false" relayState="ss:mem" handlerURL="/reauthsecure/Shibboleth.sso" maxTimeSinceAuthn="2" >
<SSO entityID="PTC-Capricorn-PingFederate" discoveryProtocol="SAMLDS" discoveryURL="https://ds.example.org/DS/WAYF" forceAuthn="true" >
SAML2 SAML1
</SSO>
<!-- SAML and local-only logout. -->
<Logout>SAML2 Local</Logout>
<!-- Extension service that generates "approximate" metadata based on SP configuration. -->
<Handler type="MetadataGenerator" Location="/Metadata" signing="false"/>
<!-- Status reporting service. -->
<Handler type="Status" Location="/Status" acl="127.0.0.1 ::1"/>
<!-- Session diagnostic service. -->
<Handler type="Session" Location="/Session" showAttributeValues="true"/>
<!-- JSON feed of discovery information. -->
<Handler type="DiscoveryFeed" Location="/DiscoFeed"/>
</Sessions>
</ApplicationOverride>
|
|
网络延迟可能会导致会话超时提早过期。PTC 建议您根据需要调整超时值,以确保操作可完成。
|
3. 重新启动 Shibboleth 服务。
配置 IdP
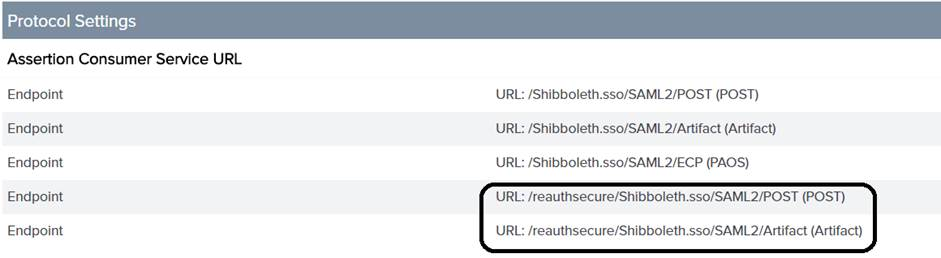
配置 IdP 以将以下端点添加到现有服务提供者 (SP) 连接中:
/reauthsecure/Shibboleth.sso/SAML2/POST
/reauthsecure/Shibboleth.sso/SAML2/Artifact
例如,如果使用 PingFederate,则需执行以下步骤:
1. 在管理控制台的 > 下,单击 SP 名称。
2. 在 SP Connection 页面中,选择 Browser SSO,然后单击 Configure Browser SSO。
3. 在 Configure Browser SSO 页面中,选择 Protocol Settings,然后单击 Configure Protocol Settings。
4. 在 Assertion Consumer Service URL 下,添加以下端点并保存配置:
/reauthsecure/Shibboleth.sso/SAML2/POST
/reauthsecure/Shibboleth.sso/SAML2/Artifact
更新 wt.properties
更新 wt.properties,以将 wt.org.electronicIdentification.class 特性的值更改为 wt.workflow.engine.SSOConfiguredSignatureEngine:
wt.org.electronicIdentification.class=wt.workflow.engine.SSOConfiguredSignatureEngine