Custom Change Process Transitions
First, you must create a new enumerated type to represent your custom transition. Follow the steps outlined under “Use the enumcustomize Utility” in Defining Custom Life Cycle Transitions.
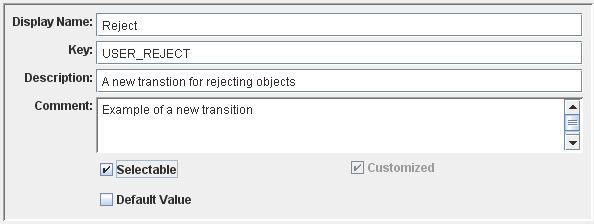
For example, you add the following custom transition:

Before you can use the custom transition as part of a change management process, you must complete the following steps:
1. From a Windchill shell, run the following command:
xconfmanager -s wt.change2.changeTransitions=CHANGE,PRODUCTION_RELEASED,OBSOLESCENCE,<KEY> -t codebase\wt.properties -p
Where <KEY> is the value entered in the Key field of the Enumerated Type Customization Utility. For example, referencing the screenshot above:
xconfmanager -s wt.change2.changeTransitions=CHANGE,PRODUCTION_RELEASED,OBSOLESCENCE,USER_REJECT -t codebase\wt.properties -p
This allows you to use the Reject transition as part of a change management process.
Regardless of the configuration of wt.change2.changeTransitions, the Change transition is always available as a release target. The Change transition is the default release target. |
2. (Optional) Next, run the following command:
xconfmanager -s wt.change2.showAllChangeTransitions=true -t codebase\wt.properties -p
When set to true, the new transition is displayed in the Release Target column of the Resulting Objects table regardless of whether it is valid.
3. Restart the Windchill server.
4. Edit the life cycle template of the resulting object to include the new transition as a valid transition. For more information, see Life Cycle Template Editor and Phase Transitions.