Delaying Windchill Auto-numbering for Creo Elements/Direct Modeling Objects
You can set a preference to assign Windchill numbers to Creo Elements/Direct Modeling objects only when you save the objects and not when you create the objects. This ensures that Windchill numbers are not assigned to transient objects that are created in a Modeling session but are not saved.
Delaying Windchill auto-numbering also improves performance in operations, such as Sheet Metal, that create a large number of transient objects. It prevents the need to contact the Windchill server to assign each transient object with a Windchill number.
Delaying Windchill Auto-numbering
To delay auto-numbering, perform the following steps:
1. At the site or organization level, click Utilities.
2. Under Business Administration, click Preference Management.
Alternatively, click > > .
The Preference Management window appears.
3. Under Workgroup Manager Client, right-click Delay Autonumber Generation and select Set Preference in the right-click actions menu.
You can also search for Delay Autonumber Generation in Find in Tree field.
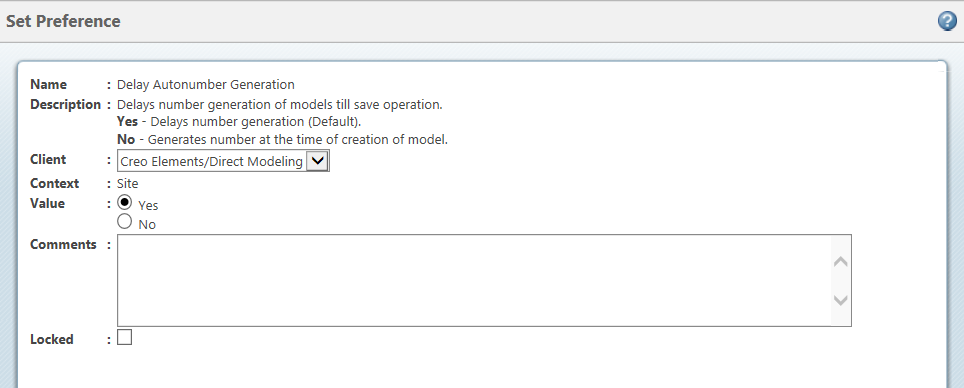
The following window appears:

Ensure that Client is Creo Elements/Direct Modeling. |
4. The default option is Yes – Delays number generation. This ensures that the Windchill Number is generated only when an object is saved in Creo Elements/Direct Modeling.
Select No to generate Windchill number for every object that is created in Modeling. In this case, Windchill numbers are created for all objects including transient objects.
You can also set this option in the wgmclient.ini file, which is located in your Windchill Workgroup Manager home directory. The option in wgmclient.ini file overrides the option in Preference Management utility. |
In wgmclient.ini file, set the following option:
delay.autonumber.generation=Yes (Default)
delay.autonumber.generation=No
For general information about setting options in wgmclient.ini file, see Setting or Modifying Preferences in the wgmclient.ini File.
5. Click OK to complete the action.