Installing Critical Patch Sets
A Critical Patch Set (CPS) is a Windchill update that is released by PTC at regular intervals. During the installation of Windchill you must download this patch set into your staging area so that it can be included in the installation process. Critical patch sets can be found on PTC’s support page, located here:
|
|
The Critical Patch Set is a self-contained download. While this download should be sufficient for most updates, in some cases you may need to download separate product installation media if those products are also being updated with the CPS. For more information on the products that are being updated with the CPS refer to the Critical Patch Set Release Notes.
|
Critical Patch Sets are installed in the same way as a typical Maintenance Release, though some of the screens and options may vary slightly.
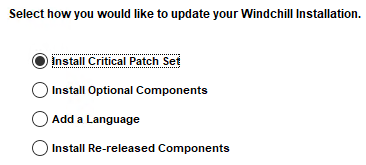
To install the Critical Patch Set use the following procedure:
1. Download the Critical Patch Set and extract it to a staging directory, ensuring that all extracted files maintain the same directory structure.
2. Stop Windchill and the HTTP Server.
3. Within the staging directory navigate to ptc_solution_installer_11.xx and click setup.vbs to launch the PSI.
4. Accept the license agreement.
5. When prompted, select Update Existing Installation.
6. Select the instance to apply the Critical Patch Set to and click Next.
7. Select Install Critical Patch Set.
8. Ensure that both the Critical Patch Set Staging Directory and the original Install Staging Directory are selected and click Next.
9. Complete the install as normal, and then restart HTTP Server.
| When installing a Critical Patch Set on a cluster apply the Critical Patch Set to one node, and then clone the node to the other systems. |