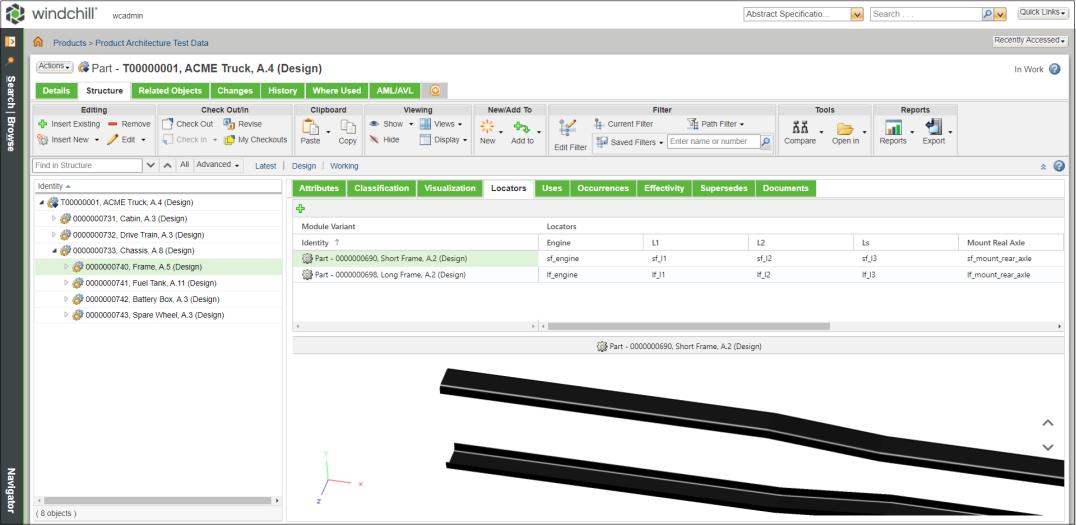
Within the part structure browser for a configurable product, the Locators tab is available that allows you to view and manage locators for a configurable module and map locators to module variant coordinate systems exposed from the CAD design.
Refer the video for more details. To view the video in a larger window, click on the video title. This opens the video in YouTube in a new tab.
Locators Table
When a configurable module is selected in the part structure browser for a configurable product, the Locators tab displays a table that includes the module variants and locators defined for the configurable module. The Locators table has two main columns:
• Module Variants: For a selected configurable module, only the module variant children, also known as non-configurable parts, are displayed in the Locators table with a type icon and part identity (number, name, version).
• Locators: You can add a new locator for a configurable module by clicking in the Locators table and providing a name. You can map a locator to a module variant coordinate system by double clicking a cell in the Locators column and selecting from the list of coordinate systems exposed from the CAD design.
Visual Representation in the Locators Tab
When you select a module variant in the Locators table, a visual representation of the module variant is displayed in the visualization panel below the table. Within the visualization panel, you can update the selected module variant in the Locators table by using the previous and next actions displayed as up and down arrows.
Creating a Locator for a Configurable Module
Prerequisite:
• To create a locator for a configurable module, you must have the modify access to the configurable module.
• The configurable module must not be checked-out by other users.
To create a locator for a configurable module, follow these steps:
1. Click in the Locators table. A New Locator dialog opens.
• If the configurable module is checked-in and you click New Locator action, the configurable module is checked-out automatically.
• If you cancel the New Locator dialog, the configurable part remains in the checked-out state.
2. Add a name for the locator.
3. Click OK. The locator is displayed as a new column in the table.
You can display the name of the New Locator action in the toolbar by setting the Toolbar Action Descriptions preference to Yes. By default, this preference is set to No.
Renaming a Locator for a Configurable Module
Prerequisite:
• To rename a locator for a configurable module, you must have the modify access to the configurable module.
• The configurable module must not be checked-out by other users.
To rename a locator for a configurable module, follow these steps:
1. In the locator column you want to rename, select the Rename action from the column header actions menu. A Rename dialog opens.
• If the configurable module is checked-in and you click Rename action, the configurable module is checked-out automatically.
• If you cancel the Rename dialog, the configurable part remains in the checked-out state.
2. Update the name for the locator.
3. Click OK. The name in the column header is updated.
Deleting a Locator for a Configurable Module
Prerequisite:
• To delete a locator for a configurable module, you must have the modify access to the configurable module.
• The configurable module must not be checked-out by other users.
To delete a locator for a configurable module, follow these steps:
1. In the locator column you want to delete, select the Delete action from the column header actions menu. A Delete confirmation dialog opens.
• If the configurable module is checked-in and you click Delete action, the configurable module is checked-out automatically.
• If you cancel the Delete dialog, the configurable part remains in the checked-out state.
2. Click OK. The locator is deleted, and the column is removed from the table.
Mapping Module Variant Coordinate Systems to Locators
To map the coordinate systems to a module variant, the coordinate systems must be designated as locators in the CAD design to be used in Windchill. This allows Creo View Adapters to convert the coordinate systems information and expose it to Windchill when publishing the representation and viewing the module variants. For more information, see the Converting the Locator for the Platform Structure Visualization section in Creo View Help Center.
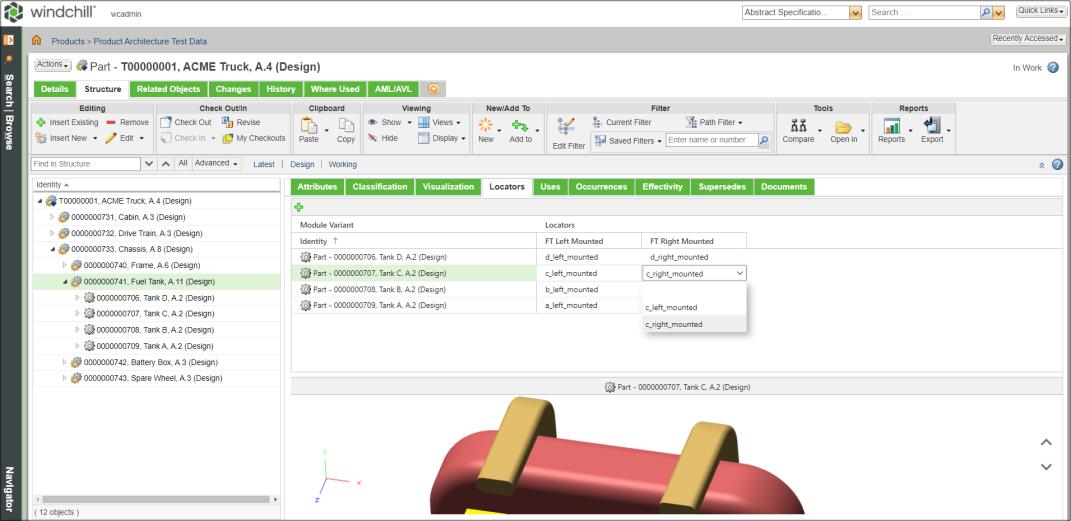
You can map a locator to a module variant coordinate system by double-clicking the intersecting cell for a module variant row and locator column in the Locators table. This will put the cell in edit mode, where you can select from a list of coordinate systems defined in module variant representation exposed from the CAD design.
When viewing the assigned coordinate systems in the Locators table:
• If you select a cell with a selected coordinate system, the corresponding coordinate system is highlighted in the visual representation for the module variant.
You cannot select multiple cells at a time in the Locators table.
• If you select a coordinate system in the visual representation, the cells with the same selected coordinate systems are highlighted in the Locators table.
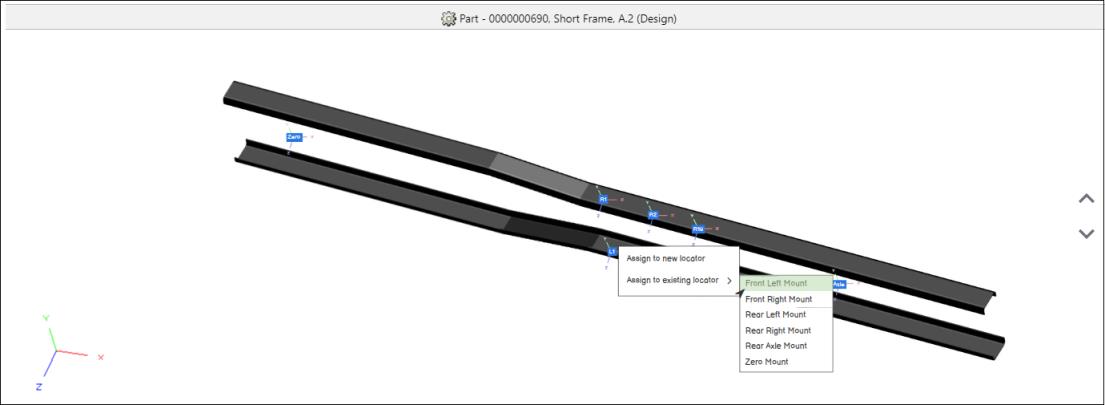
Within the visual representation, you can select and map a coordinate system to an existing locator or a new locator. To do this, follow these steps:
1. In the visual representation for a module variant, right-click on a coordinate system. A right-click action menu is displayed.
2. Select either Assign to new locator action or Assign to existing locator action.
◦ Assign to new locator: Allows you to create a new locator and map the selected coordinate system to it. When you select this action, a New Locator dialog box opens, where you can define the locator name. The new locator is displayed as a new column in the Locators table and the selected coordinate system will be mapped to the locator.
◦ Assign to existing locator: Allows you to map the selected coordinate system to an existing locator. When hovering over the action, a list of existing locators is displayed. After selecting a locator, the coordinate system will be mapped to the locator and appear in the intersecting cell between the module variant row and locator column in the Locators table.
In the visual representation, if you select a locator in the action menu and the configurable module is not checked-out, the system automatically checks out the configurable module.
Editing the Visualization Preference from the Locator Tab
You can view and edit the visualization preference in the Locators tab by pressing Shift + P key. This opens the viewer preference window. Make changes in this window as needed and click OK. When the 3D view of the configurable part is rendering, a progress indicator is displayed in the visualization panel.
The Pre-selection functionality, available in the Creo View WebGL Preferences window and part selection, is not supported in the visualization panel on the Locators tab.
 in the Locators table and providing a name. You can map a locator to a module variant coordinate system by double clicking a cell in the Locators column and selecting from the list of coordinate systems exposed from the CAD design.