Collecting Baseline Objects
The Collect Objects table allows you to gather related objects, filter for specific object types, and perform actions on selected objects.
To collect baseline objects:
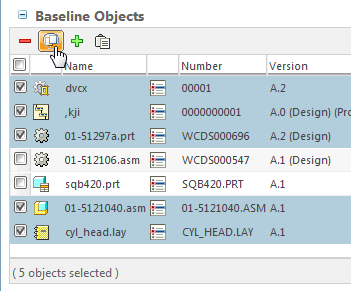
2. Select one or more objects in the
Baseline Objects table. Click the collect related objects

icon on the table toolbar.
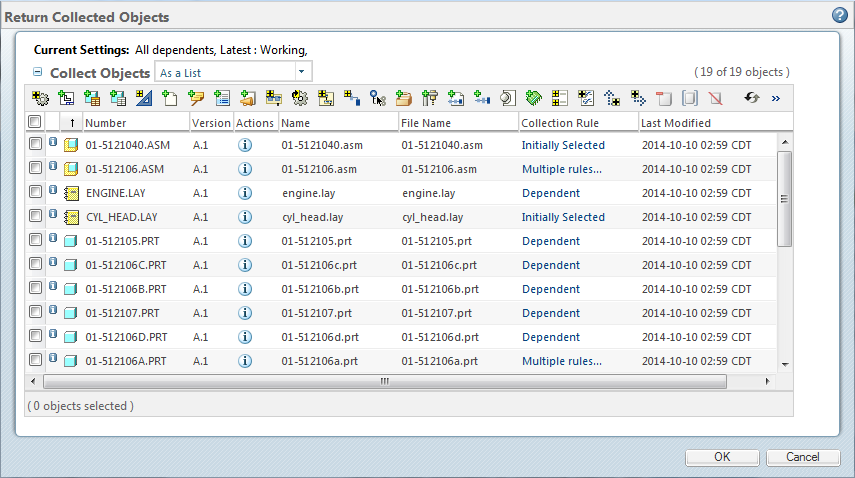
3. A new window opens to display the Collect Objects table:
For more information on collecting objects, see
About the Collector.
Collect Objects Table
The objects, information, and actions that appear in the Collect Objects table vary depending on the following factors:
• Your individual user access and permissions.
• The initially selected object type.
• The action you are performing.
For example, the Collection Rule column and the Status Messages indicators are only available when you collect objects using the Add to Baseline action.
• The collection rules set for your site.
Collection rules determine what objects are automatically added to the
Collect Objects table. You can customize the collection rules using the
Preference Management utility.
For example, you can specify that whenever you collect baseline objects, then all dependent parts, dependent documents, and related change notices are also collected. To set the collection rules, navigate to the
Utilities page for the context, organization, or site and click
Preference Management. Expand the > preference groups. For more information, see
Configuring the Initial Collection of Objects for Actions.
• The Windchill solutions installed at your site.
For example, the Share Status indicators only apply to users who have both Windchill ProjectLink and Windchill PDMLink installed.
Table View and Columns
The Collect Objects table includes the following table view and columns:
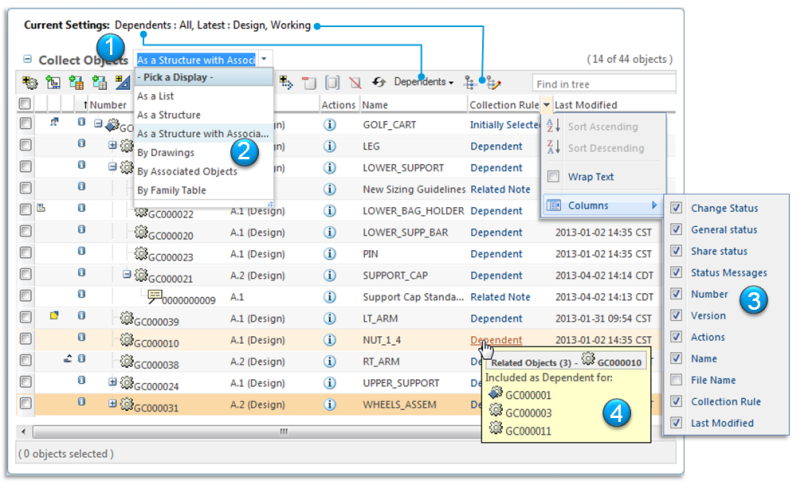
1. Current Settings
The Current Settings status appears above the Collect Objects table with the following information:
◦ Dependents—Indicates whether dependent objects are included in the table. Possible values are All, Required, or None.
◦ Filter settings—You can use a configuration specification to limit what appears in the table. Use the filter actions available on the table toolbar to manage this setting.
Action | Description |
Dependents | Use the Dependents drop-down menu to change the table values or hide objects based on their collection rule type. |
| Return the table to its original state. When you reset the table, any related objects you have collected are removed. Objects that you previously removed are returned. |
| View the filter settings currently applied to the table. |
| |
| Only the objects visible in the Collect Objects table are included in the final collection action. If you use table actions to hide certain objects to make viewing the table easier, those objects are not included when you click OK. This does not apply to objects hidden within collapsed structure nodes. |
2. Table View
Use the drop-down menu above the table to change how objects are displayed. For example, you can view dependent objects as a structure below the initially selected object.
| The default view is set using the > preferences in the Preference Management utility. |
3. Table Columns
The attribute columns in the Collect Objects table provide basic information about the selected objects.
Typically, multiple attribute columns are available in addition to those visible in the default table view. You can add and remove columns when you create a custom view. For more information about creating custom table views, hiding or adding columns, and setting column spacing, see
Personalizing Tables and Table Views.
Column | Description |
Change Status | A status indicator appears if the object is part of a change process: • Approved variance  • Resulting change  • Pending change  • Superseded part  |
General Status | A status indicator appears if the object is checked out to you or another user: • Checked out to you  • Checked out by another user  • Another iteration is checked out to another user  • Another iteration is checked out to you  |
Share Status | A status indicator appears if the object has been shared to a project: • Shared to a project  • Shared from PDM  • Checked out from PDM  • Checked out to a project  |
Status Messages | A status indicator appears to alert you about potential conflicts with the server: • Critical error  • Error  • Warning  • Information  Hover over the status indicator to view a message providing additional information. |
4. Collection Rules Column
This column specifies the collection rule that applies to each object. For example,
Initially Selected objects are the objects that you select before clicking the collect object icon
.
Hover over the collection rule to view a message that provides information about additional object relationships.
Objects that are not initially selected are either dependent or related:
◦ Dependent objects are objects that are included as lower-level objects in a structure.
◦ Related objects are objects that are not included in the structure but have been associated to the selected object.
The collection rule preferences for the action determine whether an object is initially included in the table.
| The default view is set using preferences. |
Actions
You can use the collection actions on the table toolbar to manually add related objects to the baseline.
Whether a collection action icon is enabled depends on the following factors:
• The selected object type.
Some collection options are only relevant for certain object types. For example, you can associate note objects with parts but not with documents. Therefore, if you click the checkbox next to a document in the
Collect Objects table, the add note icon

is disabled. If you select a part, then the add note icon
is enabled.
• Whether you have previously attempted an action for the selected object.
If you click a collection icon and nothing is added, this indicates that there are no associated objects of that type available. The collection icon is disabled for that object until you reset the table.
To add objects, select the checkboxes next to objects in the table and then click the collection actions on the table toolbar:
Icon | Action |
| Collect related parts. |
| Collect related drawings. |
| Collect related family table objects. |
| Collect related family table generics. |
| Collect related CAD and dynamic documents. |
| Collect related documents. |
| Collect related notes. |
| Collect related affected data. |
| Collect related change objects. |
| Collect related specifications. |
| Collect upstream linked objects. |
| Collect downstream linked objects. |
| Collect upstream equivalent part | This action is specific to Windchill MPMLink. |
|
| Collect downstream equivalent part | This action is specific to Windchill MPMLink. |
|
| Collect related Extended Data objects | This action is specific to Windchill MPMLink. |
Use this action to collect extended data for parts, EPM documents, WT documents. |
| Collect related Department Data objects | This action is specific to Windchill MPMLink. |
Use this action to collect department data for parts, EPM documents, WT documents. |
| | This action is specific to Windchill Service Information Manager. |
|
Once the table has been populated with objects, you can use the following actions to refine what objects to add to the baseline:
Icon | Action |
| Remove selected objects from the table. |
| Exclude selected objects from the Add to Baseline action. A strikethrough line appears across the table row containing the excluded object. |
| Restore any objects that you have excluded. |
For more information on collecting objects, see
About the Collector.