WVS Adobe Experience Manager Server Integration
The Adobe Experience Manager Assembler is a server-based application that processes a set of instructions defined in a DDX file - a declarative markup language used to define PDF output files. The purpose of WVS Adobe Experience Manager server integration is to allow an Adobe Experience Manager server to modify PDF files that are stored in a Representation. For example, publishing of CAD drawings can be configured to create representations with a PDF file of the drawing as content. Using this integration, the drawing PDF can be processed by an Adobe Experience Manager server. There are two distinct uses for this integration with Windchill Visualization Services:
• To add Acrobat Reader extensions to PDF files, allowing markup capabilities within Creo View and Adobe Reader.
• To add watermarks to PDF files using instructions defined in a DDX template, which adds the watermark directly into the PDF file. This is in contrast to the Creo View watermarks feature, which adds watermarks at the time of viewing or printing.
You can also customize the PDF document cover sheet. For further information about customizing cover sheets, see the WTDocument Coversheets Configuration and Customization Guide.
Configuring an Adobe Experience Manager Server
To configure Windchill Visualization Services with an Adobe Experience Manager server, make the following property changes on the Master Site, either with the xconfmanager command, or by manually editing the <Windchill>/site.xconf file, and then propagating the file with xconfmanager -p
|
|
• The Adobe Experience Manager server is configured using two WVS properties, edrload.livecycle.assembler.serviceurl and edrload.livecycle.assembler.credentialalias. See Windchill Visualization Service Properties for a complete description of these and other wvs.properties files.
• Beginning at Windchill 10.2, PTC has changed the location of the wvs.properties and wvs.properties.xconf files. These files have been moved from the <Windchill>/codebase directory to the <Windchill>/codebase/WEB-INF/conf directory. Be sure to make any necessary changes to your code to reflect this location change.
|
1. Set the property value as follows:
◦ If using the xconfmanager command, set the value as:
xconfmanager -t <Windchill>/codebase/WEB-INF/conf/wvs.properties -s “edrload.livecycle.assembler.serviceurl= http://your_adobe_livecycle_server_host_name/soap/services/AssemblerService”
◦ If editing the site.xconf file manually, add the value:
<Property name="edrload.livecycle.assembler.serviceurl" overridable="true" targetFile="codebase/WEB-INF/conf/wvs.properties"
value="your_adobe_livecycle_server_host_name/soap/services/AssemblerService"/>
2. Optional- Configure a credential alias used to apply Acrobat Reader extensions to a PDF.
◦ If using the xconfmanager command, set the value as:
xconfmanager -t <Windchill>/codebase/WEB-INF/conf/wvs.properties -s “edrload.livecycle.
assembler.credentialalias=your_credential_alias_name”
◦ If editing the site.xconf file manually, add the value:
<Property name="edrload.livecycle.assembler.credentialalias"
overridable="true" targetFile="codebase/WEB-INF/conf/wvs.properties"
value=your_credential_alias_name”/>
3. Create a file called livecycleauth.properties and add the username and password that is used for authenticating with the Adobe Experience Manager server. WVS looks for this properties file in the default directory <Windchill>; however an administrator can specify a different location by setting a different directory location using the WVS property edrload.livecycle.authfile. The contents of the livecycleauth.properties file must be:
auth=<livecycle_username>:<livecycle_password>
◦ To specify a different location for the livecycleauth.properties file, if using the xconfmanager command, set the value as:
xconfmanager -t <Windchill>/codebase/WEB-INF/conf/wvs.properties -s
“edrload.livecycle.authfile=full_directory_path_location”
◦ To specify a different location for the livecycleauth.properties file, if editing the site.xconf file manually, add the value:
<Property name="edrload.livecycle.authfile" overridable="true"
targetFile="codebase/WEB-INF/conf/wvs.properties"
value="full_directory_path_location"/>
Adobe Reader Extensions
To enable Adobe Reader extensions in order to allow markup capabilities with Creo View and Adobe Reader, perform the following steps:
1. Log in to Windchill as the Site Administrator or as an Organization Administrator.
2. Navigate from
Site or
Organizations to > . Expand the
Visualization and
Adobe Experience Manager server sections by clicking the

icon. Set the
Reader Extensions Enabled preference to
Yes.
3. To verify that Adobe Reader extensions are being applied to PDF files when Representations are created, navigate to a WTDocument and display the Representation Listing. Create a new representation and select a PDF on your local disk that currently does not have markup capabilities with Adobe Reader. Submit the file to the Create Representation wizard, and go to the WVS Job Monitor and review the Job Details. The Job Details should contain a message similar to the following:
Oct 15, 2015 3:47:41 AM: Calling Adobe Experience Manager server to process "My_Document.pdf"
When the publish job completes, open the new representation in Creo View from the Representation Listing. Assuming that the client machine has Adobe Reader installed, Creo View displays the PDF file using Adobe Reader. Enable he markup capabilities, allowing markups to be created and saved into Windchill.
Applying DDX Instructions Defined in a Template
A DDX file is a declarative language file that contains a set of instructions that an Adobe Experience Manager server performs on a PDF file. Using the Visualization Configuration Administration, an administrator can upload a DDX template containing a watermark definition to apply to PDF files. This DDX template is applied to all PDF files during the publishing process. Perform the following steps to set up a DDX template.
1. Log in to Windchill as the Site Administrator or as an Organization Administrator.
2. Navigate from
Site or
Organizations to > . Expand the
Visualization and
Adobe Experience Manager server sections by clicking the
icon. Set the
DDX Template Enabled preference to
Yes.
3. There are two ways to define a DDX template:
◦ The sample DDX template called LiveCycleServerTemplate.ddx – located in <Windchill>/codebase/com/ptc/wvs/server/xml – can be used as a starting point for defining a watermark to be applied to PDF files. This sample demonstrates the use of Creo View properties used in a watermark definition, in which the value of the property is applied to the DDX at runtime before being sent to the Adobe Experience Manager server for processing.
◦ Creo View provides a command line tool for generating a DDX file from a Creo View watermark file (.INI). This command, wmini2ddx.exe, is located in the bin directory under the Creo View Client installation. Invoke the following command to view help information regarding the utility:
C:\Program Files\PTC\ProductView Client\bin\wmini2ddx.exe -help
| See the Creo View MCAD Adapter Installation and Configuration Guide for more information about wmini2ddx.exe. |
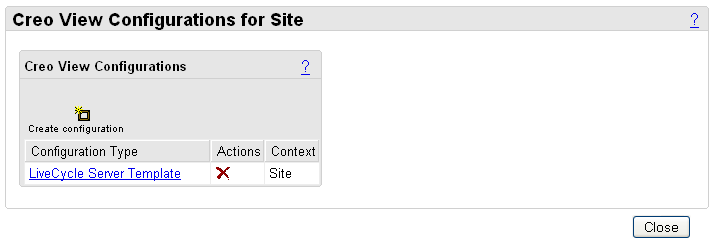
4. Perform the following steps to upload the DDX template to the WVS configuration template.
◦ Log in to Windchill as the Site Administrator or as an Organization Administrator.
◦ Navigate from
Site or
Organizations to > . Click the
Create configuration icon

. You are prompted to enter a Configuration Type. In this example, enter
LiveCycle Server Template as the configuration name and click
Create.
| This process adds the configuration to the current container context, such as products, projects, organizations, or site. For example, a configuration added at the product level is used in preference to a configuration added at the organizational level, which in turn is used in preference to a configuration added at the site level. |
◦ Click the configuration type LiveCycle Server Template link to display the Files table.
◦ Click the
Add file to configuration icon
. Browse to select the
LiveCycleServerTemplate.ddx file. The DDX template file must be named
LiveCycleServerTemplate.ddx in order for the WVS infrastructure to recognize it.
◦ To verify that the watermark definition defined in the DDX is applied to PDF files during the publishing process, navigate to a WTDocument and display the Representation Listing. Create a new representation and select a PDF on your local disk that does not have a watermark. Submit the file to the Create Representation wizard, and go to the WVS Job Monitor and review the Job Details. The Job Details should contain a message similar to the following:
Oct 15, 2015 3:47:41 AM:Calling Adobe Experience Manager server to process "My_Document.pdf"
When the publish job completes, open the new representation in Creo View from the Representation Listing. Assuming that the client machine has Adobe Reader installed, Creo View displays the PDF file with the watermark.
Using Adobe Reader Extensions with the Creo View Adapter for Documents
The Creo View Adapter for Documents can also be configured to add Adobe Reader extensions. When the Documents Adapter adds the Adobe Reader extensions to a PDF file, it communicates back to the WVS infrastructure not to apply Adobe Reader extensions, since it already has been done by the Documents Adapter. If using a DDX template to add watermarks is enabled, the Reader Extensions Enabled preference should be set to Yes, so that Adobe Reader extensions can be reapplied when adding a watermark. See the “Configuring the Creo View Adapter for PDF” chapter of the Creo View MCAD Adapter Installation and Configuration Guide for more information.
When Adobe Reader extensions are enabled in the Documents Adapter, and not set on the Windchill Server (i.e., the Reader Extension Enabled Preference is set to “No”), the system displays the following warning message while creating a representation for a local PDF file when the DDX Template Enabled Preference is set to “Yes” in the Job Details:
Warning: The Reader Extensions may have already been applied to "<your PDF file name>.pdf" Contact your system administrator to enable the Reader Extensions preference when using a DDX template.
In the above instance, when a user tries to launch the representation in Creo View, the system displays the following message:
"This document has enabled extended features in Adobe Reader. The document has been changed since it was created and the use of extended features is no longer available. Please contact the author of the original version of this document."
Adobe Experience Manager PDF Conversion Utility
The Adobe Experience Manager PDF Conversion Utility is a bulk conversion utility that allows you to add Reader Extensions to PDF files associated to Representations in Windchill. To begin using the utility, Windchill Visualization Services must be configured with an Adobe Experience Manager server (see Configuring an Adobe Experience Manager Server, above). Before you begin, invoke the command line help for the utility and review all the available options. To display the help, execute the following command in a Windchill shell:
windchill com.ptc.wvs.server.util.livecycle.LiveCyclePDFConversionUtility -help
Running the utility consists of performing the “Mark” and “Process Marked” operations.
Mark – The first step is to perform a marking process that stores a marking indicator on specific PDF files in the system. The marking indicator identifies the PDF to be processed by an Adobe Experience Manager server to have Reader Extensions applied when performing the “Process Mark” operation. This step marks PDF files in the system that is processed by an Experience Manager Server to have Reader Extensions applied when performing the second step, Process Marked. To mark all PDF files associated to a Representation in the Windchill system, invoke the following command in a Windchill shell:
windchill com.ptc.wvs.server.util.livecycle.LiveCyclePDFConversionUtility -mark
-username=<site username> -password=<site password>
The Mark operation supports additional command line arguments for marking PDF files in specific containers, or to mark PDF files based on the modification timestamp. For example, to mark all PDF files associated to a Representation in the “Demo Organization,” invoke the following command in a Windchill shell:
windchill com.ptc.wvs.server.util.livecycle.LiveCyclePDFConversionUtility -mark
-username=<site username> -password=<site password>
-cont_path=”wt.inf.container.OrgContainer=Demo Organization”
To mark all PDF files in the <my_product> product under the “Demo Organization,” invoke the following command in a Windchill shell:
windchill com.ptc.wvs.server.util.livecycle.LiveCyclePDFConversionUtility -mark
-username=<site username> -password=<site password>
-cont_path=”wt.inf.container.OrgContainer=Demo Organization\
wt.pdmlink.PDMLinkProduct=MY_PRODUCT”
To mark all PDF files in the Windchill system that have a modification timestamp between a range, invoke the following command in a Windchill shell:
windchill com.ptc.wvs.server.util.livecycle.LiveCyclePDFConversionUtility -mark
-username=<site username> -password=<site password>
-from=08/12/2012 -to=11/12/2012
Process Marked – The second step is to have the utility send all marked PDF files in the system to a configured Adobe Experience Manager server to be processed. The end result is a PDF file with Reader Extensions enabled, and the marker indicator removed from the converted PDF file. The Process Marked operation supports multiple threads sending PDF files to a configured Adobe Experience Manager server. The Adobe Experience Manager server needs to be tuned appropriately to support multiple requests to convert PDF files simultaneously. To have all marked PDF files processed by a configured Adobe Experience Manager server, invoke the following command in a Windchill shell:
windchill com.ptc.wvs.server.util.livecycle.LiveCyclePDFConversionUtility
-process_marked-username=<site username> -password=<site password>
When processing marked PDF files, log messages appear in the Method Server log showing the overall progress of the conversion. If a conversion fails, a message is displayed in the Method Server log describing all the information necessary to identify the PDF file in the Windchill system. The following is an example of a failed conversion displayed in the Method Server log in which the PDF file did not allow for page modification:
[Begin processing batch #1] - Size=10
Exception: ApplicationData=wt.content.ApplicationData:118012 (Cant_Modify_Set.pdf)
DerivedImage=wt.viewmarkup.DerivedImage:118010 (cant_modify)
Representable=wt.part.WTPart:118006 (0000000099, cant_modify, A.1)
Container=wt.pdmlink.PDMLinkProduct:84802 (ProductView Demo)
…
Caused by: javax.xml.ws.soap.SOAPFaultException: com.adobe.livecycle.assembler.client.ProcessingException: ALC-ASM-S00-002:
Failed to execute the DDX - error messages provided.
Caused by: com.adobe.internal.pdfm.content.FormXObjectServiceException: PDFM_S06016:
Apply Watermark operation failed due to permissions on document "inDoc".
Caused by: com.adobe.internal.pdfm.util.PDFMPermissionException: PDFM_S00014: PAGE_MODIFY permission is required for this operation.;
…
The Process Marked operation can be aborted by performing Ctrl + C in the Windchill shell that executed the conversion. After executing Ctrl + C, it takes about 30 seconds for the conversion to abort. After the conversion aborts, the utility displays some general statistics, listing how many PDF files were processed during that time period. This information can be useful in determining how much of an increase in file size occurs, and how long it takes to process a number of PDF files. The following is an example of what is displayed when aborting a conversion:
*****************************************
Interrupting conversion - please wait
*****************************************
The LiveCycle PDF Conversion Utility has been interrupted. Conversions currently
executing have been interrupted and awaiting conversions have been aborted.
LiveCycle PDF Conversion has completed.
Total execution time: 1.248 minutes(s)
Average time to perform a single conversion: 14.762 second(s)
Number of PDFs successfully converted: 14
Number of failed conversions: 5
Number of timed out conversions: 0
Total file size of all PDFs before conversion: 2659.06 KB
Total file size of all PDFs after conversion: 3358.94 KB
Total file size increase: 699.88 KB
Percentage of total file size increase: %20.84
Average filesize increase per PDF: 49.99 KB
There are 18 remaining marked PDF file(s).
Custom Experience Manager Delegate
The Adobe Experience Manager Delegate Customization Hook allows you to define a Class/Method that provides a custom implementation to dynamically generate DDX instructions and a map of associated content, that is sent to a configured Adobe Experience Manager Assembler service for processing. This call to the Adobe Experience Manager Assembler service takes place before any watermarks or Reader Rights are applied.
Refer to the “Customization Hook: Experience Manager Delegate” entry in the wvs.properties.xconf file for information on how to configure an Experience Manager Delegate hook. A sample implementation of this hook can be found in <Windchill> /prog_examples/wvs/com/ptc/wvs/LiveCycleDelegate.java. The property edrload.livecycle.delegate must be set to a Class/Method in which the Method must match the following signature:
package ext.customhooks;
class MyCustomClass {
public static LiveCycleInvocationParams getLiveCycleInvocationParams
(final Representable _representable, final File _pdf,
final Map _properties, final EDRLogger _logger) {
// Put custom code here. See example hook for Java Doc description of
inputs and outputs.
}
}
<Property name="edrload.livecycle.delegate" default="ext.customhooks.MyCustomClass/
getLiveCycleInvocationParams" />
Updating a PDF file with a Configured Adobe Experience Manager Server
Beginning at Windchill 10.1 M010, WVS supports a new customization delegate that is responsible for generating all necessary parameters for updating a PDF file with a configured Adobe Experience Manager server. The custom delegate is responsible for generating the DDX instructions on what modifications to do to a PDF, and for providing any supporting content (such as PDF cover sheets). Existing Reader Rights and a DDX Template (adding watermarks) functionality can be used in conjunction with the new delegate. The PDF is processed with instructions defined by the delegate first; then, if enabled, watermarks and/or applying Reader Rights takes place
When generating a PDF Representation for a given primary (or secondary) content of a Representable, WVS invokes an optional delegate to generate input and then, using that input, to call a configured Adobe Experience Manager Assembler service to perform certain updates to the PDF file before storing it into Windchill.
Use the edrload.livecycle.delegate property to configure the example delegate to the site.xconf file. This property defines a Class/Method to provide a custom implementation to dynamically generate DDX instructions and a map of associated content, to be sent to a configured Adobe Experience Manager Assembler service for processing. This call to the Adobe Experience Manager Assembler service takes place before any watermarks or Reader Rights are applied.
A sample delegate is provided out-of-the-box, and after configuration, is deployed to <Windchill>/codebase. The sample delegate is located at
<Windchill>/prog_examples/wvs/com/ptc/wvs/LiveCycleDelegate.java
Sample Configuration Steps for Creating a Document Cover Sheet
To configure the Adobe Experience Manager server with WVS to create a PDF document cover sheet, perform the following steps:
1. Use the xconfmanager utility (located in the <Windchill>/bin directory) to edit the wvs.properties.xconf file to set the following properties:
◦ Set the Adobe Experience Manager Server information:
<Property default=" http\://adobelc-host\:8080/soap/services/
AssemblerService " name="edrload.livecycle.assembler.serviceurl"/>
<Property default="$(edrload.livecycle.assembler.serviceurl)?WSDL&
lc_version=9.0.0" name="edrload.livecycle.assembler.wsdlurl"/>
<Property default="PRODUCTVIEW R&D" name="edrload.livecycle.
assembler.credentialalias"/>
<Property default="$(wt.home)$(wvs.dir.sep)livecycleauth.properties"
name="edrload.livecycle.authfile"/>
| Use the fourth property above in Step #3. |
Set the Adobe Experience Manager Delegate and its method for the document cover sheet:
<Property name="edrload.livecycle.delegate"
default="com.ptc.coversheet.wvs.LiveCycleDelegate/getLiveCycleInvocationParams" />
◦ Republish the document upon change
<Property default="true" name="publish.republishondocumentchange"/>
2. Add the following properties in Windchill\codebase\WEB-INF\conf\wvs.properties.xconf:
<Property default="OFFICE" name="worker..DOC">
<Property default="OFFICE" name="worker..PDF">
<Property default="OFFICE" name="worker..PPT">
<Property default="OFFICE" name="worker..XLS">
<Property default="OFFICE" name="worker..DOCX">
<Property default="OFFICE" name="worker..PPTX">
<Property default="OFFICE" name="worker..XLSX">
3. Create the livecycleauth.properties file (shown in Step #1) in the <Windchill> directory, adding the line below. This is the username and password for authenticating to the Experience Manager server. For more configuration information, see the Configuring an Adobe Experience Manager Server section of this topic.
4. Configure the OFFICE worker. See the Creo View MCAD Adapters Installation and Configuration Guide for worker configuration guidelines.
5. Install xconf as follows: xconfManager -i <Windchill>\codebase\com\ptc\coversheet\template.properties.xconf
6. Propagate all properties: xconfManager -p.
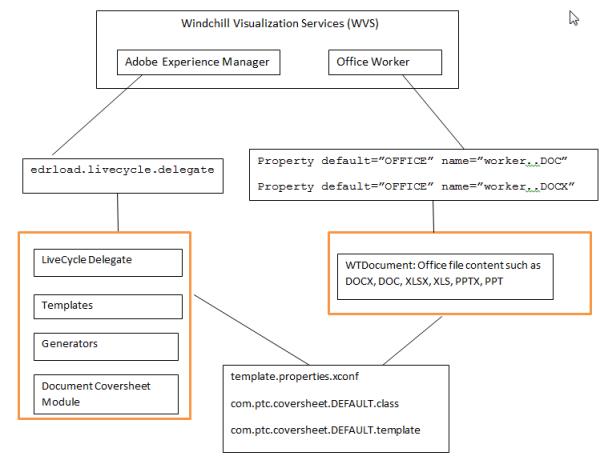
The following figure provides a conceptual illustration of the interaction between the Experience Manager Delegate and the Worker.