Install the Target System
This section provides the order in which you must install your target system. For specifics on installing the target system, see the Windchill Installation and Configuration Guide.
|
|
The design and implementation of the desired target Windchill architecture is driven by customer requirements. Design your target Windchill system based on your individual business objectives. The design impacts the following steps that install the target system for upgrade.
|
1. PTC requires that you use the same operating system (OS) platform, if it is supported. Set up your hardware using your existing OS or upgrade your OS.
2. The source database version may also need to be updated. Verify by checking the Windchill Software Matrix for the target:
◦ If the target release supports the source database, then no data migration is required.
◦ For most upgrades, the exported source data need to be migrated to a database version compatible with the target Windchill. Refer to the procedures specific to your database version.
◦ After the Windchill upgrade, additional database updates or migrations can be performed if it was not possible to directly migrate the data to the desired database version.
If you are migrating from Oracle to SQL Server, see the Windchill Database Migration Guide for supported paths.
3. Install any other third party applications such as JSDK, Solr (Windchill Indexing), Cognos (Windchill Business Reporting), or TIBCO (Windchill ESI).
4. Install all of the necessary Windchill solutions and optional products on the target system that are installed on the source system. The Windchill solution installation must include a supported web server. This must also include Windchill Information Modeler if you are deploying modeled customizations. If your source system uses multibyte characters, select the multibyte character option when configuring the Windchill database.
During the target installation of Windchill, be aware of the following considerations:
|
|
• The target system must be fresh installation. It must not be updated from previous maintenance release.
• The source system as a single-byte configuration and the target installation as a multi-byte configuration is also supported.
|
a. Windchill Directory Server (WDS)—Be aware of the following considerations when installing and configuring Windchill Directory Server (WDS):
▪ If you migrated from Aphelion during this upgrade, target Windchill Directory Server has already been installed. During the target Windchill installation, use the PTC Solution Installer’s (PSI) option to Configure to an existing installation for Windchill Directory Server.
▪ If the source system is configured using Windchill Directory Server, ensure the following steps are performed:
▪ Uninstall the source system’s Windchill Directory Server.
▪ During the target Windchill installation, use one of the following PTC Solution Installer (PSI) options:
▪ Install and configure—create a new instance for Windchill Directory Server
▪ Configure to an existing installation—install a standalone instance of the Windchill Directory Server. For more information, see the Windchill Installation and Configuration Guide.
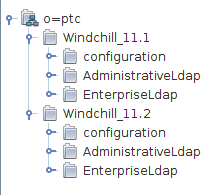
If you are configuring to an existing instance of Windchill Directory Server, your Base DN (or top-level node) is the same for your source and target systems. However, your source and target instances must be set up in different child nodes. In the following example, the Base DN is o=ptc, the source instance is Windchill_11.1, and the target instance is Windchill_11.2. Notice that the source and target instances are child nodes of the Base DN:
The Base Distinguished Name for each instance is a combination of the Base DN (the top-level node) and the location of the source or target instance below the Base DN. In the example above, the Base Distinguished Names are as follows:
▪ Source Base Distinguished Name—cn=Windchill_11.1,o=ptc
▪ Target Base Distinguished Name—cn=Windchill_11.2,o=ptc
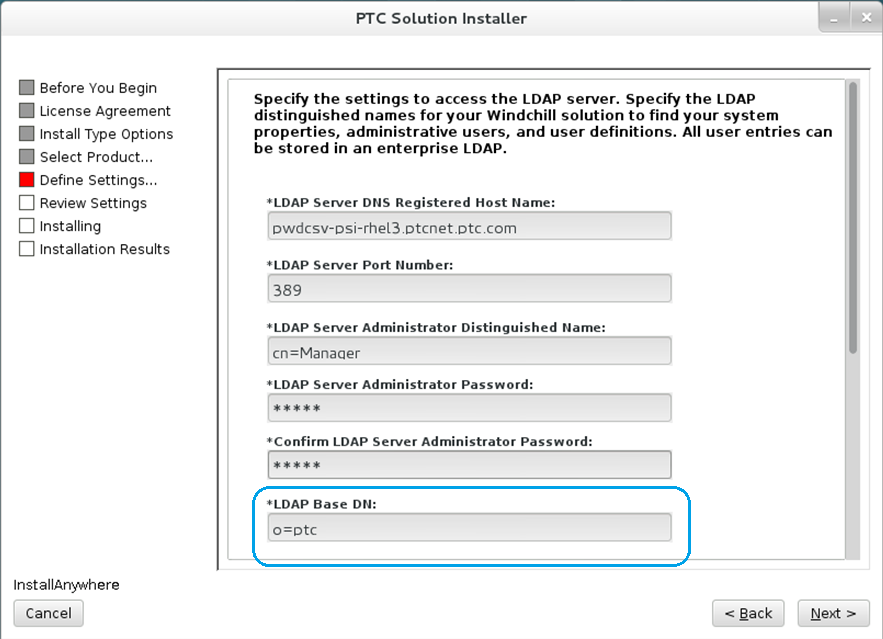
The PSI field LDAP Base DN appears if Install and configure option is chosen. This is the top-level node of the Windchill Directory Server instance (for example, o=ptc in the example above).
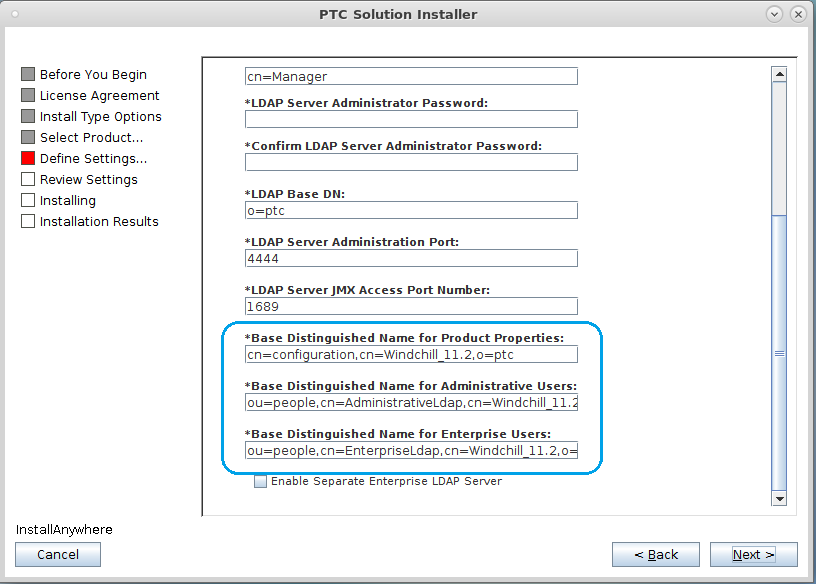
There are three PSI fields that specify the target Base Distinguished Name for a sub-tree of entries for product properties, administrative users, or enterprise users. These are listed as follows, with values based on the above example. These values must be different between the source and target systems, even if they use the same top-level node, as in the values below (o=ptc):
▪ Base Distinguished Name for Product Properties—cn=configuration,cn=Windchill_11.2,o=ptc
▪ Base Distinguished Name for Administrative Users—ou=people,cn=AdministrativeLdap,cn=Windchill_11.2,o=ptc
▪ Base Distinguished Name for Enterprise Users—ou=people,cn=EnterpriseLdap,cn=Windchill_11.2,o=ptc
If you are not sure about your source system’s Base DN, refer to the value of the ie.ldap.propertyBaseDN property in the <Windchill>/site.xconf file on your source Windchill installation.
b. Target database installation options—You can create a new database or use an existing database. You must create a new database installation user or use an existing database installation user. If you chose to create a new database installation user, you must create the database installation user for the target installation before running the PTC Solution Installer (PSI).
c. Organization Internet Domain Name—When specifying the administrative settings, the value of the Organization Internet Domain Name in PSI during the target Windchill installation must be the same as the Organization Internet Domain Name of the source system. To find this value, refer to the value of the property wt.inf.container.SiteOrganization.internetDomain in the <Windchill>/site.xconf file on your source Windchill installation.
d. Base Data Language—The value of the Base Data Language field in PSI during the target Windchill installation must be the same as the value of the Base Data Language of the source system.
e. Multibyte support—the configuration for multibyte support on the target Windchill installation must be the same as the configuration for multibyte support of the source system.
| The source system as a single-byte configuration and the target installation as a multi-byte configuration is also supported. |
5. When installing target system for upgrade, you must select the Import license from a file option to manually initiate the license activation process.
The details of importing a license manually using
License Management utility is described in the section “Retrieving License Using Windchill License Management Utility” in
Windchill Licensing.
6. Apply the latest maintenance releases and patches, if applicable. If you are doing multiple upgrade passes, check for and install the latest maintenance releases, if applicable, before each upgrade pass. For more information, see
Overview of the Upgrade Procedure for Windchill Products.
7. If your target solution implements a cluster configuration, install and configure hardware cluster nodes.
8. If the system you are upgrading uses Windchill File Server, you must install the Windchill File Server software on the remote file servers before the upgrade. When installing the target system with the PTC Solution Installer, select the option Enable Remote File Server Support. After the upgrade is complete, the Windchill server will re-broadcast out to the remote Windchill file servers and replication and vaulting will work as it did prior to the upgrade. For a test upgrade, cloning of a remote file server is recommended, but not required, unless your test upgrade has content mastered on file server sites and you would like to upgrade vault content during the upgrade. Follow the steps below to install and configure file servers before the upgrade. This set up is required if you want to update file server configuration during upgrade by selecting Update File Server Configuration for the file server drop down in the gather upgrade properties phase in the Upgrade Manager.
| You can choose to install the target file server on the same host where the production (source) file server is installed for a production upgrade. However, for a test upgrade, install the target file server on a different host than the production file server host as content is modified during the upgrade and you do not want to modify production content during a test upgrade. |
b. Get the public key and the secret key from the source server found at <Windchill>\CCSTools\key.
c. Copy the public key and the secret key found in the previous step to the target master site at <Windchill>\CCSTools\key.
d. Copy the public key to all the file server sites in the location specified by the following property in the wt.properties file on the file server:
wt.intersvrcom.masterSite.1=masterurl,<location_of_master.pubkey>
The key needs to be copied to the location indicated by <location_of_master.pubkey>
e. Start the target Windchill server.
f. Import the secret key by executing the following command from Windchill shell:
windchill wt.fv.tools.PreUpgradeUtility -u=
<username> -p=<password> -t=<16 character token> -i
where <username> and <password> are the site administrator’s login credentials. Use the same 16 character token that you used for exporting the secret key from the source server. For more details, refer to
Exporting the Secret Key.
h. Verify that the method server is running on the file servers before you begin the upgrade on the master site.
9. Run the Windchill version to confirm that all the required components are reported as installed.
10. Verify the installation was successful by checking the method server log for any errors or warnings.