Customized Configurable Link Collection
To add collection definitions in addition to the definitions provided in the SampleConfigurableLinksCollectionDefinitions.xml file, follow the steps as mentioned below:
|
|
If you want to use an existing collection definition and collection tool, skip the following steps and see Step 4 - Add configurable link collection definition to Windchill UI.
|
1. Define Configurable Link Collection
2. Specify Configurable Link Collection Execution Order
3. Create Custom Collection Tool
4. Add Configurable Link Collection Definition to Windchill UI
Step 1: Define Configurable Link Collection
1. Open the SampleConfigurableLinksCollectionDefinitions.xml file from {install_home}/codebase/com/ptc/core/collectionsrv/config location.
|
|
To avoid data corruption, create a backup of the SampleConfigurableLinksCollectionDefinitions.xml file before editing it.
|
2. Add a new CollectionDefinition section by copying an existing CollectionDefinition section.
3. Edit the following tags in the Declare sub-section of CollectionDefinition:
a. CollectionDefinition name – Identifier for the collection definition.
b. CollectionDefinition type – Unique numeric value. To avoid number conflict, it is recommended to use numbers in sequence.
c. Description – About the collection definition.
d. ClassAttribute name – Identifier for the attribute.
e. ClassAttribute class – Windchill internal name of the attribute obtained from the Type and Attribute Management utility in Windchill.
An example is as follows:
| Each attribute defined in the Declare must be linked in Retrieve within CollectionDefinition. |
Step 2: Specify Configurable Link Execution Order
1. Open the SampleConfigurableLinksCollectionExecutionOrder.xml from {install_home}/codebase/com/ptc/core/collectionsrv/config location.
2. Add the newly created collection definition name in the SampleConfigurableLinksCollectionExecutionOrder.xml file. The values in the collection reference_to_collection_name tag must match the value specified for the CollectionDefinition name in the SampleConfigurableLinksCollectionDefinitions.xml file.
An example is as follows:
| If there are no specific collection priorities for the newly added collection definition, adding it to the end of the list is recommended. |
Step 3: Create Custom Collection Tool
1. Open the CollectionComponentConfig.xml file from {Install_Home}/codebase/com/ptc/core/htmlcomp/collection.
2. Copy the content under the CollectionTool tag.
An example of CollectionTool tag is as follows:
3. Open the CustomCollectionComponentConfig.xml file located at {Install_Home}/codebase/com/ptc/core/htmlcomp/collection/.
4. Paste the copied content from the CollectionComponentConfig.xml file in under the CollectionToolsDefinition tag of the CustomCollectionComponentConfig.xml file.
5. In the CustomCollectionComponentConfig.xml file, edit the value of CollectionTool id to have a unique name. For example, My_New_COLLECT_CONFIG_MASTERS_LINK_PARENTS.
6. Notice that the CollectionTool section has multiple tags for collection. Create a copy of one of the Collection tags and edit the values for collectionServiceKey and collectedAsKey.
An example is as follows:
| The values specified for collectionServiceKey and collectedAsKey must match the values of the CollectionDefinition name and type in the SampleConfigurableLinksCollectionDefinitions.xml file. |
7. Save the file. Your custom collection tool is now created.
Step 4 - Add configurable link collection definition to Windchill UI
After the collection tool is created, the changes must be pushed to Windchill for it to appear in the user interface.
To push the changes,
1. Open the CustomCollectionComponentConfig.xml file.
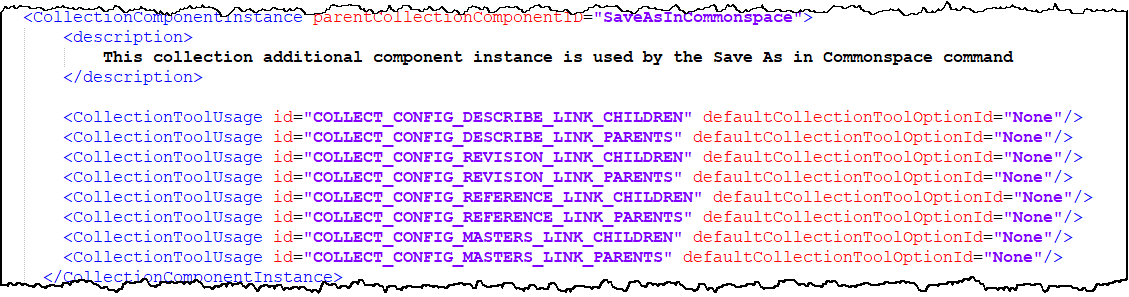
2. Under the CollectionInstances section, create a new CollectionComponentInstance section by copying an existing.
An example is as follows:
3. Update the following values:
◦ parentCollectionComponentID – collection tool instance ID. This is the ID of the Windchill UI where you want to add the custom tool. Open the Windchill UI and press the F12 key to get the ID.
| To verify your custom tool without pushing your changes to Windchill, specify the value of parentCollectionComponentID as ConfigLinksCollectionCompExample. On a successful verification, replace the value of parentCollectionComponentID with the value of the user interface that you wish to add the collection tool on. |
◦ CollectionToolUsage id – The ID of the existing collection tool (button). You can find these IDs in the CollectionComponentConfig.xml file located at {Install_Home}/codebase/com/ptc/core/htmlcomp/collection. For example, under ConfigLinksCollectionCompExample section, you can find the IDs of eight CollectionToolUsage IDs of the sample UI.
◦ defaultCollectionToolOptionId - By default, the value for defaultCollectionToolOptionId is None. To collect the objects automatically, you can change it to InitiallySelected.