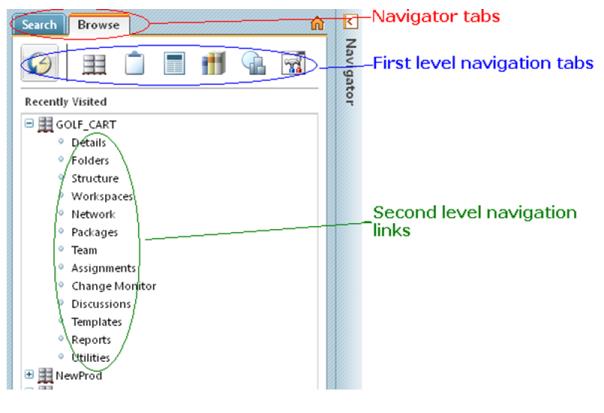
Procedure - Adding Tabs in the Navigator at Different Levels
The tabs in the red circle are the navigator tabs, the tabs in the blue circle are the first level navigation tabs, and the items in the green circle are the second level navigation. The following sections will detail how to add tabs at different levels.
Adding navigator tab
The following sections detail how to add custom navigator tab.
Adding navigator tab - Create an action in custom-actions.xml
Create an action for your new tab in
custom-actions.xml. You can create any type of action for a first level tab. In this example we will create an action that maps to the JSP. See
Action Framework for Windchill Client Architecture for further details.
<objecttype name=" myType " class="com.ptc.myTabClass">
<action name=" myNavigatorTabAction1" >
<command windowType="page"/>
</action>
<action name=" myNavigatorTabAction2" >
<command windowType="page"/>
</action>
…
</objecttype>
Create an entry in resource file
Create localization strings for your action in your own resource file. See the
Action Framework for Windchill Client Architecture for more detailed information.
Create and define action model
Create an action model using newly defined actions as below in custom-actionModels.xml. Define rbinfo entries for this action model.
<model name=”myNavigatorTab navigation”>
<action name=”myNavigatorTabAction1” type=”myType” />
<action name=”myNavigatorTabAction2” type=”myType” />
</model>
Add action model to navigator action model
Copy definition of navigator tab action model (model name= “navigator”) from navigation-actionModels.xml <model name=”navigator”> to custom-actionModels.xml. Add the new action model entry to it.
<submodel name=”search navigation” />
<submodel name=”main navigation” />
<submodel name=” myNavigatorTab navigation” />
</model>
Adding first level tab in navigator
This section details how to add custom first level tab in navigator.
Create an action in custom-actions.xml
Create an action for your new tab in custom-actions.xml. If your action requires stickiness you should use the navigation servlet for your action.
<objecttype name="navigation" class="">
<action name="mytab" renderType="GENERAL">
<command class="netmarkets" method="servlet/Navigation?tab=mytab"
windowType="page"/>
</action>
…
</objecttype>
Add your action to the main navigation action model in custom-actionModels.xml
Copy the “main navigation” action model from navigation-actionModels.xml to custom-actionModels.xml.
Add above created action “mytab” to the action model.
<!-- Main navigation -->
<model name="main navigation">
<action name="home" type="navigation"/>
<action name="product" type="navigation"/>
<action name="project" type="navigation"/>
<action name="change" type="navigation"/>
<action name="library" type="navigation"/>
<action name=”mytab” type=”navigation”/>
<action name="org" type="navigation"/>
<action name="site" type="navigation"/>
</model>
Create an entry in a rbinfo file
Create localization strings for your action in
action.properties or your own rbInfo file. See
Action Framework for Windchill Client Architecturefor more detailed information.
Adding second level navigation links in navigator
This section details how to add custom second level navigation link in navigator.
Create a new sub model for your tab in custom-actionModels.xml
Your new first level tab will need a sub model to define second level navigation. In order for the navigation to find the sub model it must be named after the main tab that it belongs to. For sub models the parameters defaultActionType and defaultActionName are required. These parameters tell the system which action is the default when the user has never visited this tab before.
In our example we will need to create a new action model called “mytab navigation” like this:
<model name="mytab navigation" defaultActionType="mytab"
defaultActionName="list">
</model>
You can now add second level navigation links to your new action model following the instructions in Adding second level navigation links in navigator. You must create at least one second level navigation link whose name and type match the defaults specified in the action model tag.
| Custom second level navigation links can be added only on the Browse tab. They are not supported on Search tab or any custom tabs. |