Creating a New Pet
Creating a new Pet involves building a dialog for it and making it visible on the table.
1. Create create.jsp, a wizard for creating pets.
a. Navigate to > > > > and then click Next.
|
|
If the option > > is not available, install Web Page Editor. This is available under the Web, XML, and Java EE Development category when working with the Helios software site. As an alternative you can also create a general file ( > > )
|
b. The folder is cust_Windchill_src/src/netmarkets/jsp/acme/pet, file name is create.jsp.
c. Click Finish and replace content with the following:
<%@taglib prefix="jca" uri="http://www.ptc.com/windchill/taglib/components"%>
<%@taglib prefix="attachments"
uri="http://www.ptc.com/windchill/taglib/attachments"%>
<%@include file="/netmarkets/jsp/components/beginWizard.jspf"%>
<%@include file="/netmarkets/jsp/components/includeWizBean.jspf"%>
<jca:initializeItem baseTypeName="com.acme.Pet" operation="${createBean.create}"
attributePopulatorClass="com.ptc.core.components.forms.DefaultAttributePopulator"/>
<jca:wizard>
<jca:wizardStep action="petDefineItemAttributesWizStep" type="pet"/>
<jca:wizardStep action="attachments_step" type="attachments"/>
</jca:wizard>
<attachments:fileSelectionAndUploadApplet/>
<%@include file="/netmarkets/jsp/util/end.jspf"%>
2. Define the petDefineItemAttributesWizStep action.
a. Create Pet-actions.xml alongside Pet-actionmodels.xml in config.actions.
b. Assign its content as follows:
<?xml version="1.0" encoding="UTF-8"?>
<!DOCTYPE listofactions SYSTEM 'actions.dtd'>
<listofactions>
<objecttype name="pet" class="com.acme.Pet"
resourceBundle="com.acme.jca.acmeActionResource">
<action name="petDefineItemAttributesWizStep" afterVK="setAttributesWizStep"
preloadWizardPage="true" required="true">
<command url="netmarkets/jsp/acme/pet/defineItemAttributesWizStep.jsp"
windowType="wizard_step"/>
</action>
</objecttype>
</listofactions>
c. Register Pet-actions.xml in site.xconf <AddToProperty name="com.ptc.netmarkets.util.misc.defaultActions" value="config/actions/Pet-actions.xml"/>
d. Run xconfmanager again to propagate the change
3. Create the defineItemAttributesWizStep.jsp JSP page alongside create.jsp with the following content:
<%@taglib uri="http://www.ptc.com/windchill/taglib/mvc" prefix="mvc"%>
<%@include file="/netmarkets/jsp/util/begin_comp.jspf"%>
<jsp:include page="${mvc:getComponentURL('acme.pet.SetAttributesPanel')}"/>
<%@include file="/netmarkets/jsp/util/end_comp.jspf"%>
4. Define the component (acme.pet.SetAttributesPanel)
a. Create PetSetAttributesPanelBuilder with content.
package com.acme.mvc.builders;
import wt.util.WTException;
import com.acme.Pet;
import com.ptc.core.ui.resources.ComponentType;
import com.ptc.jca.mvc.components.AbstractAttributesComponentBuilder;
import com.ptc.jca.mvc.components.JcaAttributeConfig;
import com.ptc.jca.mvc.components.JcaGroupConfig;
import com.ptc.mvc.components.AttributePanelConfig;
import com.ptc.mvc.components.ComponentBuilder;
import com.ptc.mvc.components.ComponentConfigFactory;
import com.ptc.mvc.components.ComponentId;
import com.ptc.mvc.components.ComponentParams;
import com.ptc.mvc.components.TypeBased;
@ComponentBuilder("acme.pet.SetAttributesPanel")
@TypeBased("com.acme.Pet")
public class PetSetAttributesPanelBuilder extends
AbstractAttributesComponentBuilder {
@Override
protected AttributePanelConfig buildAttributesComponentConfig
(final ComponentParams params) throws WTException {
final ComponentConfigFactory factory = getComponentConfigFactory();
final AttributePanelConfig panel; {
panel = factory.newAttributePanelConfig
(ComponentId.ATTRIBUTE_PANEL_ID);
panel.setComponentType
(ComponentType.WIZARD_ATTRIBUTES_TABLE);
final JcaGroupConfig group; {
group = (JcaGroupConfig) factory.newGroupConfig();
group.setId("setAttributes");
group.setLabel("Set Attributes");
group.setIsGridLayout(true);
group.addComponent(getAttribute(Pet.NAME, factory));
group.addComponent(getAttribute(Pet.KIND, factory));
group.addComponent(getAttribute(Pet.DATE_OF_BIRTH, factory));
group.addComponent(getAttribute(Pet.FIXED, factory));
}
panel.addComponent(group);
}
return panel;
}
JcaAttributeConfig getAttribute(final String id, final ComponentConfigFactory
factory) {
final JcaAttributeConfig attribute = (JcaAttributeConfig)
factory.newAttributeConfig();
attribute.setId(id);
return attribute;
} }
b. Add the following to Pet-configs.xml to register the builder <bean id="acme.pet.SetAttributesPanel" class="com.acme.mvc.builders.PetSetAttributesPanelBuilder"/>
5. Create the resourceBundle referred to by petDefineItemAttributesWizStep, with content as follows (note the reuse of createPackage.gif as the icon for creating pets):
package com.acme.jca;
import wt.util.resource.*;
@RBUUID("com.acme.jca.acmeActionResource")
public final class acmeActionResource extends WTListResourceBundle {
@RBEntry("New Pet")
public static final String PET_CREATE_TITLE = "pet.create.title";
@RBEntry("New Pet")
public static final String PET_CREATE_TOOLTIP = "pet.create.tooltip";
@RBEntry("New Pet")
public static final String PET_CREATE_DESCRIPTION = "pet.create.description";
@RBEntry("createPackage.gif")
public static final String PET_CREATE_ICON = "pet.create.icon";}
6. Wire the create action into PetTable.
a. Add the following model to Pet-actionmodels.xml (just above the petDetails model).
<model name="pets list">
<action name="create" type="pet" shortcut="true"/>
</model>
b. Add the create action to pet in Pet-actions.xml (just above petDefineItemAttributesWizStep).
<action name="create">
<command class="com.ptc.core.components.forms.CreateObjectFormProcessor"
url="netmarkets/jsp/acme/pet/create.jsp" windowType="popup"/>
</action>
c. Incorporate the action model (pets list) into PetTable (add before table.setSelectable(true);). Example: table.setActionModel("pets list");
7. Start/restart Windchill.
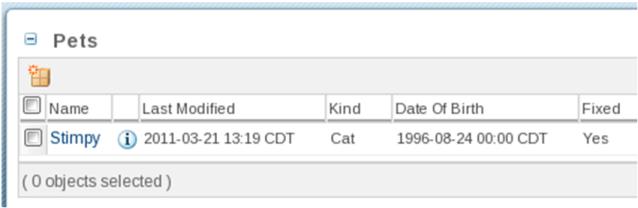
a. Verify the New Pet icon is available on the table
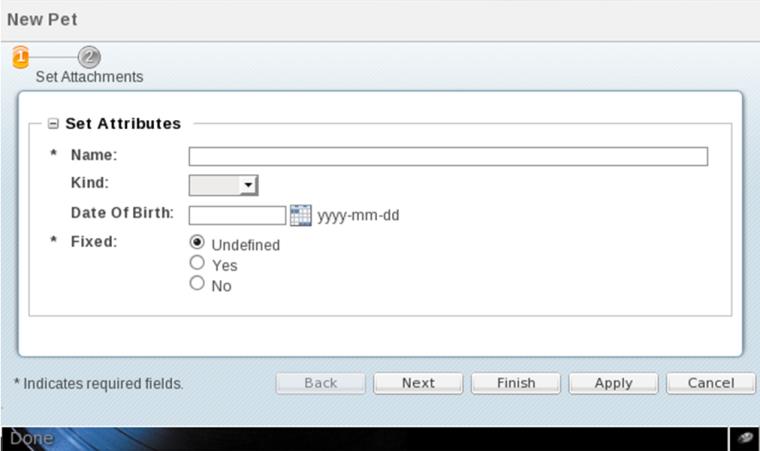
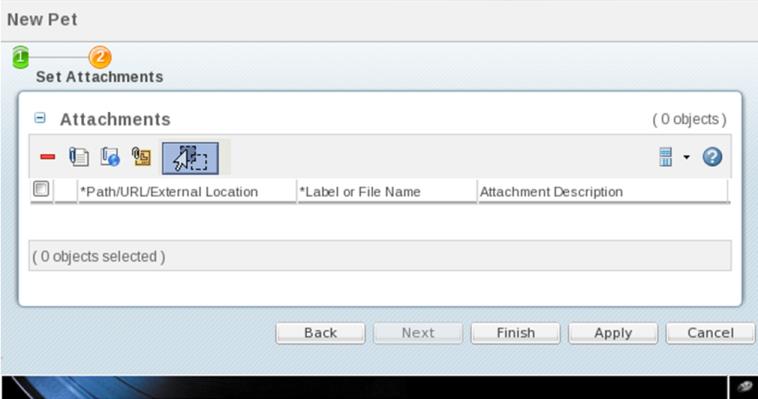
c. Click New Pet and verify a pop-up consisting of a wizard with two steps.
d. Create a pet. Be sure to upload the content.
e. Go to the new pet’s “info” page and verify that the content shows and is viewable/downloadable.