Process Overview
Configuring the workflow task page consists of the following steps:
1. Identify the PBO object type that you want to customization.
2. Identify the Workflow task type that you want to customize.
3. Identify the tables which should be rendered in the workflow task and their sequence.
4. Identify the PBO actions that need to be rendered in the task info page and their sequence.
5. Identify the PBO attributes that must be rendered.
6. Identify the tabs to be on the workflow task page and where the tables and actions must be rendered.
7. Create the load file for the task form template object in the proper format and load the file.
8. Configure the workflow task to use the loaded task form template.
Identify PBO
Identify the PBO object type that you want to customize. Any lifecyclemanaged object can be used as a PBO. Hard types and soft types are supported (WTPart, WtDocument, Agenda, Meeting, EPMDocument, etc). You need to identify the full class name of the PBO.
Identify Workflow Task Type
Determine the workflow task type for which you want to create a task page.
You can configure a task for a combination of PBO and workflow task types. This gives you the flexibility to have different configurations for two different workflow task types (for example; Review and Promote).
For more information about task types, see
Activity Tab.
Identify Tables to Render and Configure
The steps below will explain how to add the Affected Objects Table and Maturity History Table
1. Identify the PBO-related tables which should be rendered on task details page. It could be OOTB or your own customized tables.
◦ Identify table component id along with its type-based information.
▪ To identify the component id and
componentConfigBuilder used by the component, refer to the debugging section of
Information Pages.
▪ Refer to the JavaDoc for the builder of the component to check if the builder is defined with TypeBased annotation or not. Consider that the component id for the component is ‘changemanagement.affecteddatatable’ and the builder is configured to be a TypeBased.
2. Configure the identified tables above into a workitem task action model.
Define a new action in a custom actions file for the component (e.g. Affected Data table) to display in the configurable workflow pages. The component name needs to be "workflowTask.pbo", the component id needs to be passed as pboCompId in the urlParams and the useTypeBased needs to have the value based on the finding in previous step.
For example:
<action name="TestAffectedData"
resourceBundle="wt.workflow.worklist.worklistResource" >
<component name="workflowTask.pbo"
urlParams="pboCompId=changemanagement.
affecteddatatable&useTypeBased=true"/>
<includeFilter name="configurableTypeBaseFilter"/>
</action>
◦ The includeFilter tag provides the filtering mechanism. The filter framework is applicable for table components/actions where includeFilter tag is used.
◦ In the TaskFormTemplate UI, table actions display based on the PBO class selected for task form template.
◦ In the code soft types are already supported. However, if you have applied filter for hard types (supported as true) and through UI if any soft type instance is provided as its owns type, but it does not exist it checks for its super class.
◦ In the Customized tab on the Workitem Info page, actions displayed in the Customized menu is filtered based on the work items PBO type.
3. Create an action validator for the new action (TestAffectedData) created in the previous step. OOTB an abstract validator (WorkFlowTaskPBOComponentValidator class) and an override method (isComponentValidFor) is provided by the framework that filters the component based on PBO object type. The action validator for the new action need to override isComponentValidFor that defines whether PBO object type is valid or not for the given component.
package com.ptc.windchill.enterprise. workitem.validators;
import com.ptc.core.ui.validation.DefaultUIComponentValidator;
import com.ptc.core.ui.validation.UIValidationCriteria;
import com.ptc.core.ui.validation.UIValidationKey;
import com.ptc.core.ui.validation.UIValidationResult;
import com.ptc.core.ui.validation.UIValidationResultSet;
import com.ptc.core.ui.validation.UIValidationStatus;
import com.ptc.netmarkets.util.beans.NmCommandBean;
import com.ptc.core.meta.common.TypeIdentifier;
import com.ptc.windchill.enterprise.history.validators.
LifecycleHistoryNavValidator;
public class TestAffectedDataValidator extends
WorkFlowTaskPBOComponentValidator {
@Override
protected boolean isComponentValidFor(UIValidationKey validationKey,
UIValidationCriteria validationCriteria, WTReference pboRef) {
if (pboRef != null && pboRef.getObject() instanceof
LifeCycleManaged))
return true;
return false;
}
}
4. Configure the validators in the appropriate .properties files. The following code sample continues the example about PboMaturityHistory. Add these actions in the Workitem-service-properties.xconf file.
...
<Option cardinality="singleton" requestor="java.lang.Object"
serviceClass="com.ptc.windchill.enterprise.workitem.validators.
WorkflowTaskPboMaturityHistoryValidator"
selector="PboMaturityHistory"/> [Option cardinality="singleton"
requestor="java.lang.Object" serviceClass="com.ptc.windchill.enterprise.workitem.
validators.TestAffectedDataValidator" selector="TestAffectedData"/>
◦ All these actions should be part of model “workitem third nav configurable” which is added to the Netmarkets-actionmodels.xml file.
...
<model name="workitem third nav">
<action name="attributes" type="workitem"/>
<action name="routingStatus" type="workitem"/>
<action name="notebook" type="workitem"/>
<action name="discussions" type="workitem"/>
<action name="setupParticipant" type="workitem"/>
<action name="adhocActivities" type="workitem"/>
<action name="workflowTaskPboAttributes" type="object"/>
<action name="saveComplete" type="workitem"/>
<action name="workflowTaskPboAction" type="workitem"/>
<action name="PboMaturityHistory" type="history"/>
<action name="TestAffectedData" type="change"/>
</model>
◦ All the above actions are validated in super set defined in the configuration file (ConfigurableWorkflowTask-typeBasedActionFiler.properties.xconf).
Actions which are displayed on task details page should be present in the super set. If they do not exist then the task form template won’t be loaded and it will not be configurable from the TaskForm template UI.
In the configuration file you must make entries in following pattern:
<Property name="actionType.actionName.configurablePbo.supportedTypes/ nonSupportedTypes” overridable="true" default="object Type<comma separated fully qualified class names will be acceptable>"/>
Filtering is not applied for workitem actions. It should be applicable for the PBO type which is associated with workitem.
Identify PBO Actions
1. Identify the PBO actions such as checkin, check out, edit, or view info page.
2. Add identified actions in “ConfigurableTask.<Fully Qualified ClassName>” model (Netmarkets-actionmodels.xml). If it is not specified, then the OOTB action model for the PBO type is used.
...
<model name="TaskFormTemplateWizardButtons" resourceBundle="com.ptc.netmarkets.workflow.taskformtemplates.taskformtemplatesResource">
<action name="editButton" type="taskformtemplates"/>
<action name="checkinButton" type="taskformtemplates"/>
<action name="cancelButton" type="object"/>
</model>
<model name="ConfigurableTask.wt.part.WTPart">
<submodel name="more part actions"/>
</model>
<model name="ConfigurableTask.wt.change2.WTChangeIssue">
<action name="view" type="object"/>
<action name="edit" type="problemReport"/>
<action name="editModifyContentOnly type="problemReport"/>
</model>
</actionmodels>
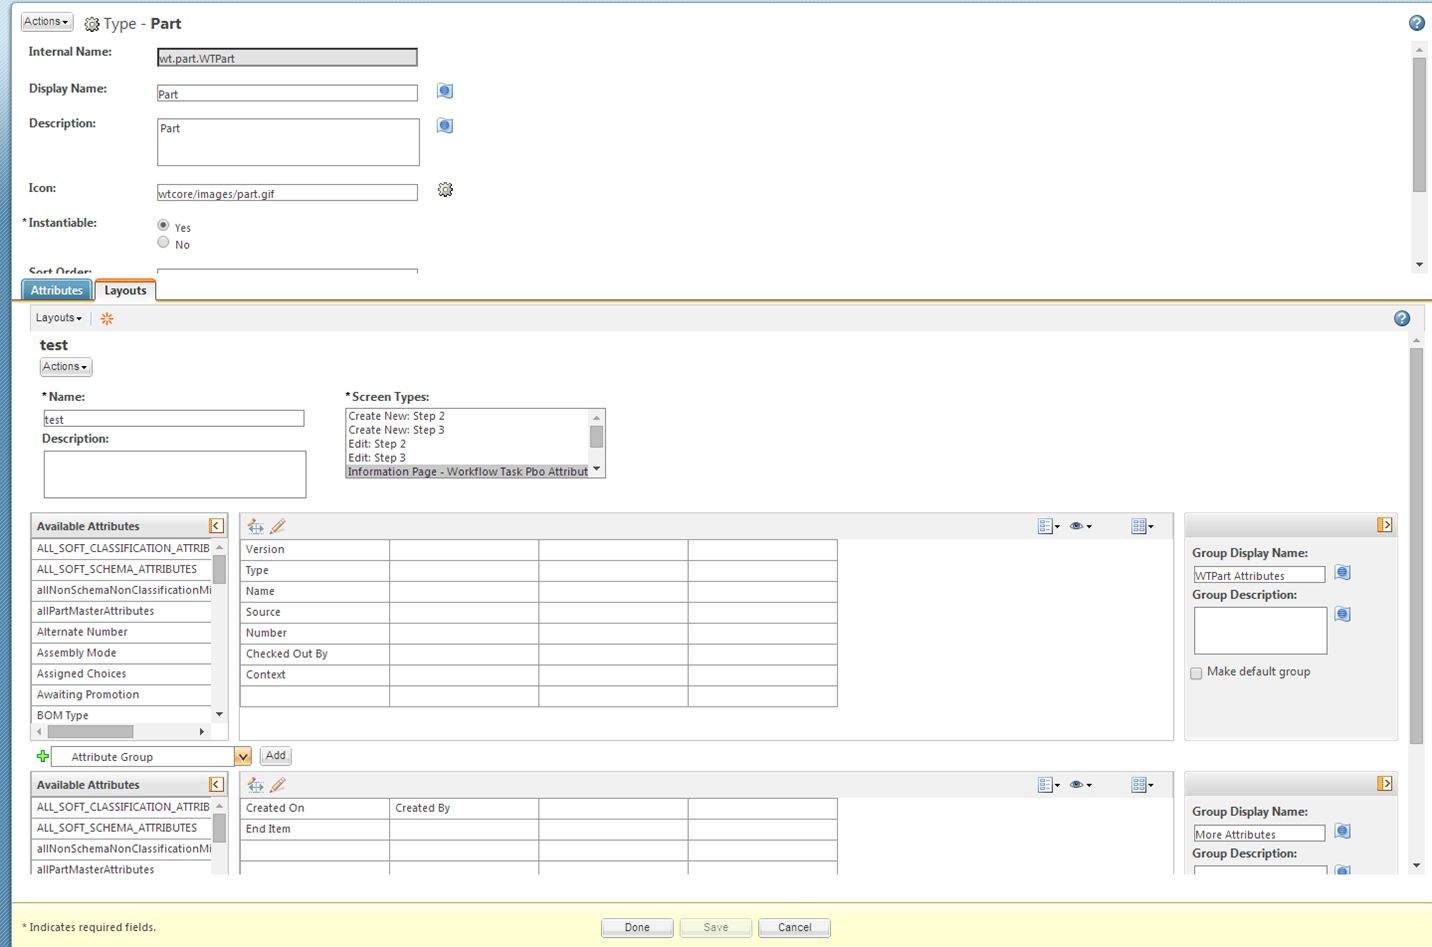
PBO Attribute Rendering
This functionality supports rendering the PBO attribute defined in a specific layout. Configuration of the layout is as follows
• The workflowTaskPboAttributes action is associated with new screen definition created for lifecycle managed object in which you are able to render PBO attributes on task page. This action is created in the EnterpriseUI_actions.xml file and configured under “workitem third nav configurable”.
...
<!-- MULTI OBJECT EDIT ACTIONS -->
<action name="editMultiObjects" id="editMultiObjects" multiselect="true"
selectRequired="true" resourceBundle="com.ptc.core.ui.tableRB">
<command class="com.ptc.windchill.enterprise.object.forms.
EditMultiObjectsFormProcessor"
method="execute" windowType="popup"
url="netmarkets/jsp/object/editMultiObjects.jsp"/>
<includeFilter name="disableForAdminLocked"/>
</action>
<action name="workflowTaskPboAttributes"
resourceBundle="wt.workflow.worklist.worklistResource">
<component name="workflowTask.pbo"
urlParams="pboCompId=workflow.pbo.attributes" />
<includeFilter name="configurableTypeBaseFilter"/>
</action>
</objecttype>
<!-- MULTI OBJECT EDIT ACTIONS END-->
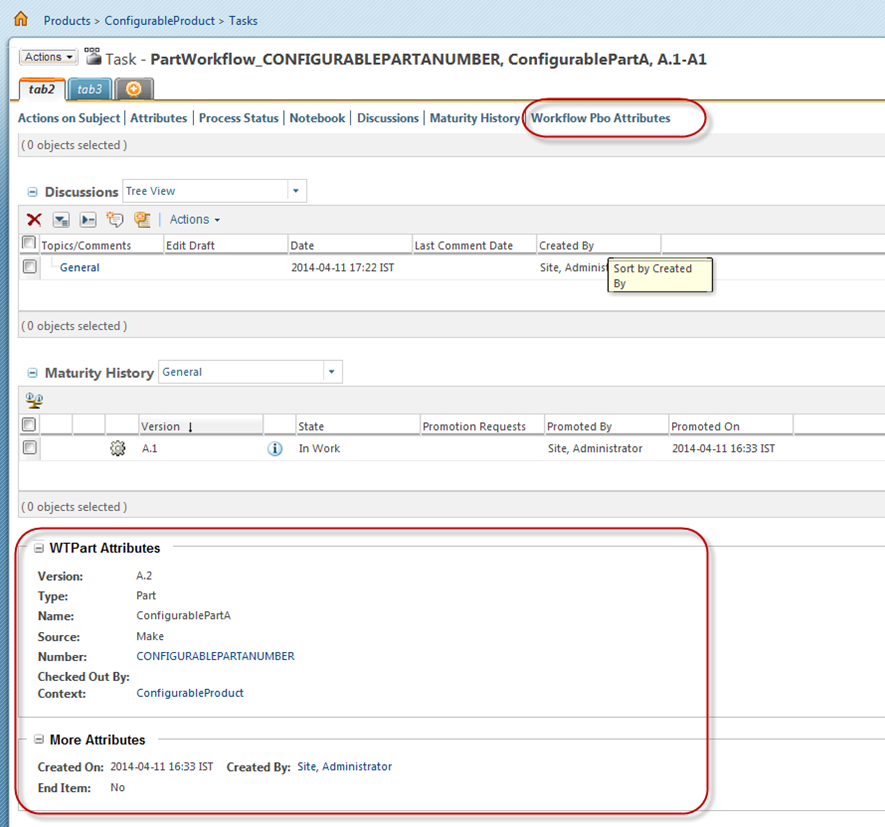
To view this action you must create the layout by selecting “Information Page – Workflow Task attribute” and “workflowTaskPboAttributes“ to render this layout on the task details page.
It renders the information within the work item info page.
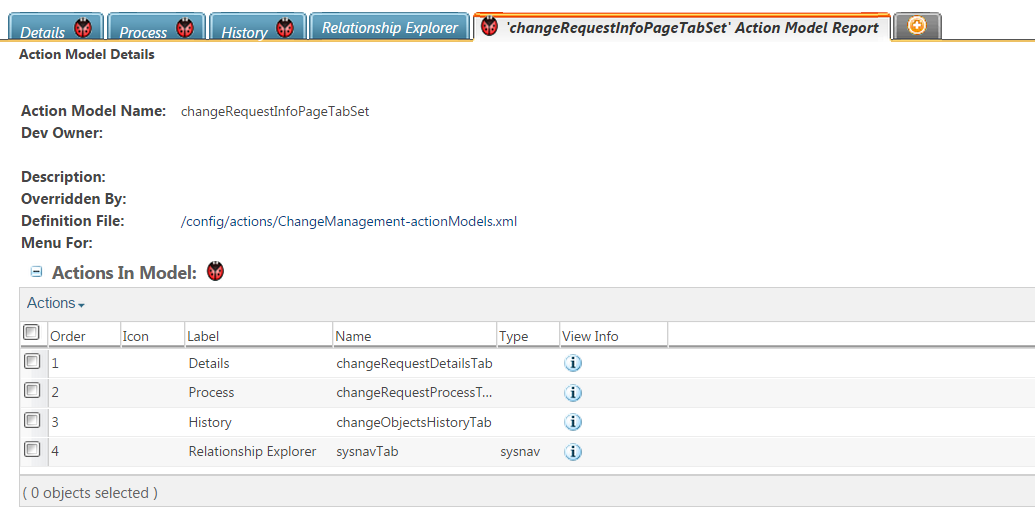
Multiple Tabs Support
Using multiple tabs and defining their sequence is supported. Each tab can render a set of tables and PBO actions. The mechanism to configure this is available through a load file and the task form template wizard. For more information, see
Creating a Task Form Template.
Using multiple tabs and defining their sequence is supported. Each tab can render a set of tables and PBO actions. The mechanism to configure this is available through a load file and the task form template wizard. For more information, see
Creating a Task Form Template.
Load File Format
1. Create the Task Form template of a configurable type.
This is the loader format for creating a task form template.
<?xml version="1.0" encoding="UTF-8"?>
<!DOCTYPE TaskFormTemplate SYSTEM "standardX24.dtd">
<TaskFormTemplate>
<name>test</name>
<filePath></filePath>
<taskType>WfTask</taskType>
<pboClass>wt.part.WTPart</pboClass>
<typeFormat>Native</typeFormat>
<description>Out Of The Box configurable workflow Template</description>
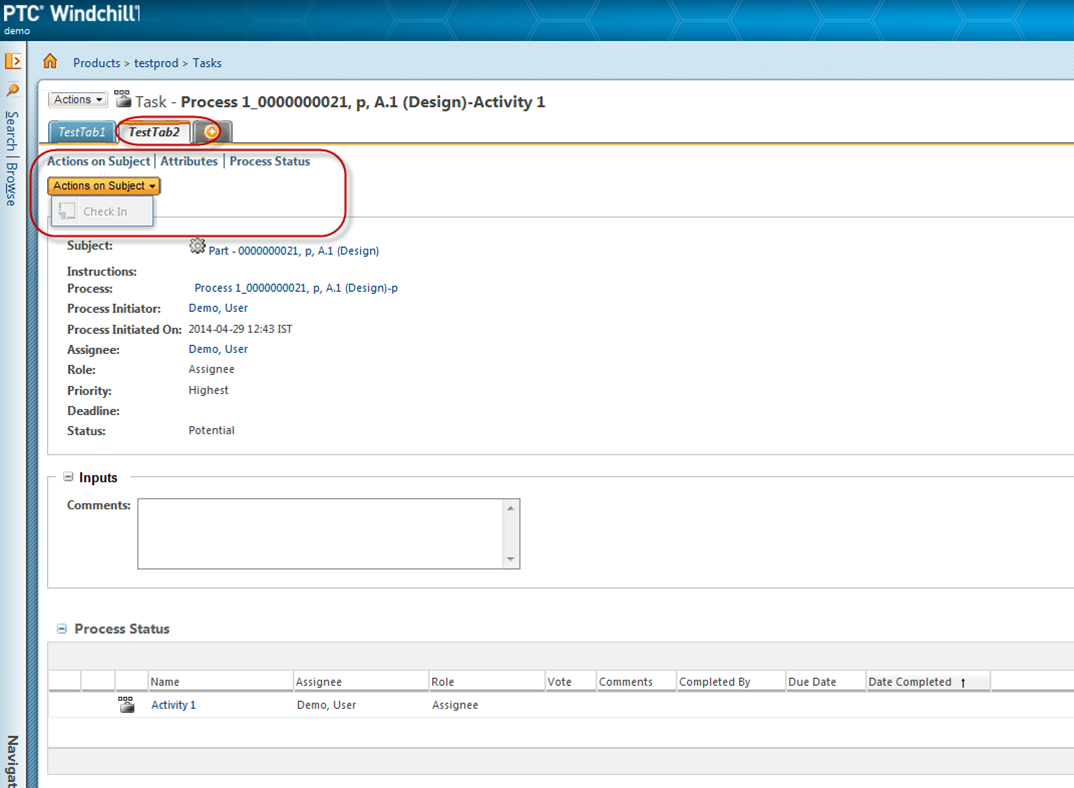
<WorkflowTaskTab>
<tabName>TestTab1</tabName>
<tabSetKey>infopage</tabSetKey>
<components>[{"name":"workflowTaskPboAction","type":"workitem"},{"name":"attributes","type":"workitem"},
{"name":"routingStatus","type":"workitem"},{"name":"notebook","type":"workitem"},{"name":"discussions","type":"workitem"},
{"name":"setupParticipant","type":"workitem"},{"name":"adhocActivities","type":"workitem"}]</components>
<pboAction>[{"name":"checkout","type":"wip"},{"name":"REVISEITEMS","type":"pdmObject"}]</pboAction>
<sequence>1</sequence>
</WorkflowTaskTab>
<WorkflowTaskTab>
<tabName>TestTab2</tabName>
<tabSetKey>infopage</tabSetKey>
<components>[{"name":"workflowTaskPboAction","type":"workitem"},{"name":"attributes","type":"workitem"},
{"name":"routingStatus","type":"workitem"}]</components>
<pboAction>[{"name":"checkin","type":"wip"}]</pboAction>
<sequence>2</sequence>
</WorkflowTaskTab>
</TaskFormTemplate>
◦ <WorkflowTaskTab> is used to create the tab which has following tags
◦ <tabName> specifies the tab name
◦ <tabSetKey> is always infopage because the tabs are displayed on the Workitem info page
◦ <components> is the Json of the tables/actions displayed on task details page
◦ <pboAction> is the Json of the actions performed on the primary business object which is associated with workitem displayed on task details page
◦ <sequence> is the order in which the tabs display
2. Load into Windchill system and verify.
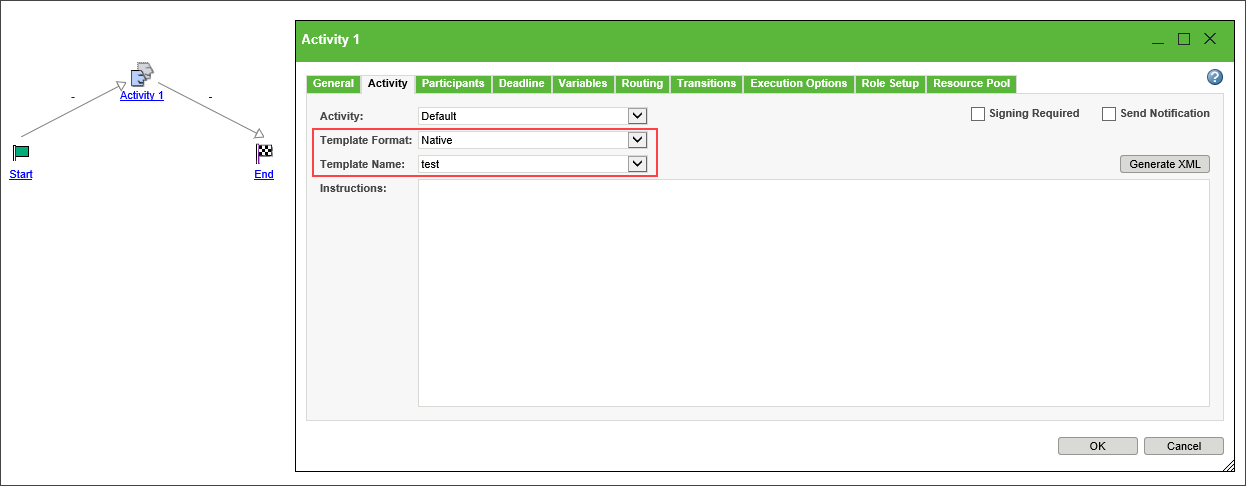
Workflow Template Configuration
The newly created task form template needs to be referenced in the workflow template as an activity template to be picked up for rendering.
1. Initiate a workflow and go to the activity you want to configure.
2. To use the task form template to generate the task detail page, a preference must be set.
Navigate to > > > .
3. Verify that the tabs are available.