Creating a Custom Filter
Follow these steps to create a custom filter.
Defining Attributes
To define attributes for the custom filter, perform these steps:
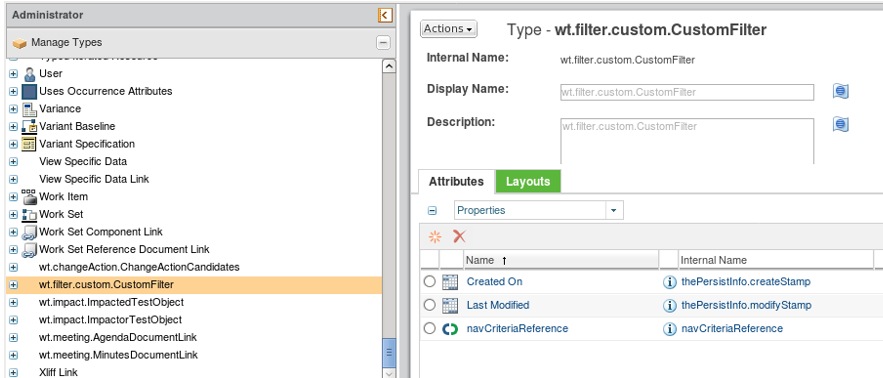
1. From the Type and Attributes Manager user interface, go to the Manage Types tab and search for the wt.filter.custom.CustomFilter type.
2. From a Windchill shell, run the following command to load the wt.filter.custom.CustomFilter type representing the custom filter in the Type and Attributes Manager user interface:
windchill wt.load.LoadFromFile -d %WT_HOME%\loadFiles\type\CustomFilter.xml
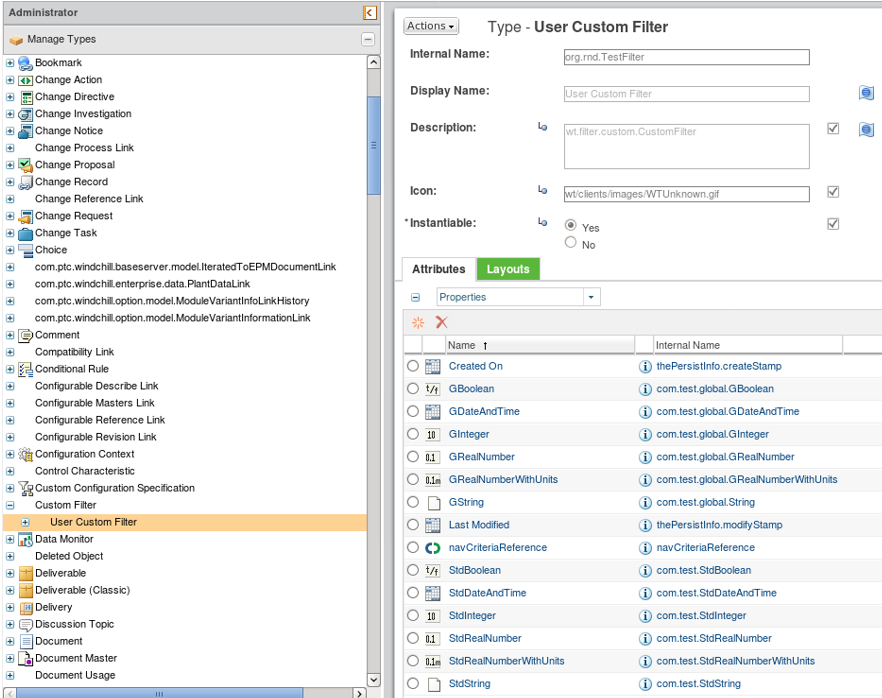
3. in the Type and Attribute Management user interface, search for the wt.filter.custom.CustomFilter type and create its subtype. For example, org.rnd.TestFilter. Se the Instantiable check box to Yes.
4. In the Atrributes tab, add the required attributes to the newly created type org.rnd.TestFilter.
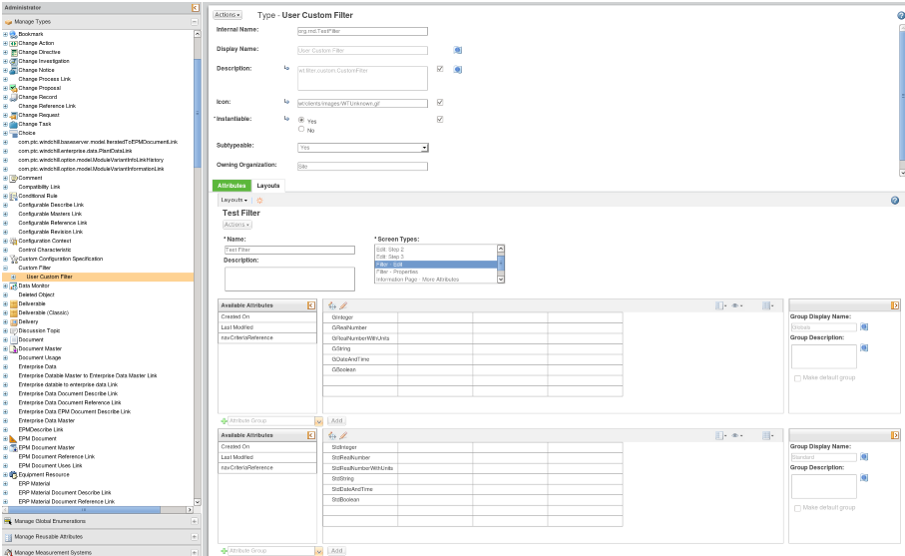
5. In the Layout tab, create a default layout for org.rndTestFilter and assign it to All from Screen Types.
6. Add a new layout and assign it to Filter – Edit screen type.
7. Add the required attributes to the layout created in the previous step. In case of standard attributes, run the AddColumns tool from Windchill shell to allocate the space in the database for attribute types.
8. (Optional) Add a localized group display name.
Implementing the Logic
To implement the logic, perform these steps:
1. Create a new class that implements NavigationCriteriaTabValidator and override the doValidation method to provide your custom logic responsible for validating the Custom Filter tab. For example, ExampleCustomFilterTabValidator.
2. Create a new class that extends TypeDefinitionPanelConfigBuilder. For example, ExampleCustomFilterPanelConfigBuilder. Override getAdditionalTypesToMetaData and getId that generates panel configuration builder from Type Manager and meta data for custom filter and its subtypes.
3. Create a new class that extends AbstractNavigationCriteriaRenderer. For example, ExampleCustomFilterRenderer. Override the getTabItem method to define how the configuration panel is built. Override getMiniInfoiFromJSON to define how the filter information is displayed in the Current Filter panel.
4. Create a new class that implements FilterPopulator. For example, ExampleCustomFilterPopulator. Override getFilterBean to define a filter bean that contains the translated filter name.
5. Create a new class that extends AbstractNavigationFilterDelegate2. For example, ExampleCustomFilterDelegate.
a. Override getFilterFromJSON that is used to construct the filter instance from the attributes passed as a JSON string.
b. Override updateFilterFromJSON that is used to update the filter values based on the JSON string provided and NavigationFilter2 instance (or CustomFilter).
c. Override getJSONFromFilter that is used to construct the JSON from the saved filter and to further pass the values to the form when the saved filter is used.
d. Override deepCopy that can be used to refresh the attributes stored on the saved filter, either soft (IBAs) or standard.
e. Override filter methods that contain specific logic to filter out the structure based on the attributes defined in the filter.
Plugging In the Logic
1. Add entries in the ModuleName-service.properties.xconf file and change the name of the subtype of wt.filter.custom.CustomFilter to the one defined in step 2 of “Defining Attributes” section above (org.rnd.TestFilter). Replace the example file names with the names appropriate to your customization.
a. Define the delegate:
<Service context="default" name="wt.filter.NavigationFilterDelegate2">
<Option cardinality="singleton" requestor="null" serviceClass="com.example.ExampleCustomFilterDelegate" selector="WCTYPE|wt.filter.custom.CustomFilter|org.rnd.TestFilter"/>
</Service>
b. Define the renderer:
<Service context="default" name="NavigationCriteria.renderer">
<Option requestor="null" cardinality="singleton" serviceClass="com.example.ExampleCustomFilterRenderer" selector="WCTYPE|wt.filter.custom.CustomFilter|org.rnd.TestFilter" />
</Service>
c. Define the validator:
<Service context="default" name="NavigationCriteria.validator">
<Option requestor="null" cardinality="singleton" serviceClass="com.example.ExampleCustomFilterTabValidator" selector="WCTYPE|wt.filter.custom.CustomFilter|org.rnd.TestFilter" />
</Serviec>
d. Define the populator:
<Service context="default" name="NavigationCriteria.populator">
<Option requestor="null" cardinality="singleton" serviceClass="com.example.ExampleCustomFilterPopulator" selector="WCTYPE|wt.filter.custom.CustomFilter|org.rnd.TestFilter" />
</Service>
2. Add entry in the ModuleName-wt.properties.xconf file for the following:
<Property name="NavigationCriteria.filters.order.XX" default="WCTYPE|wt.filter.custom.CustomFilter|org.rnd.TestFilter"/>
Change XX in the property name to valid filter order (see ExpansionCriteriaCore-wt.properties.xconf file as an example and filter order).
3. Propagate the changes by running the following command from Windchill shell:
xconfmanager -Fp
Example
This example displays how to get the custom filter working.
Defining the Attributes
1. Initially the custom filter must be loaded to Windchill by default. From the Manage Types tab in the Type and Attribute Management user interface, search for wt.filter.custom.CustomFilter. If the type is not loaded, default custom filter type can be loaded to Windchill by navigating to Windchill shell and running the following command:
windchill wt.load.LoadFromFile -d %WT_HOME%\loadFiles\type\CustomFilter.xml -u wcadmin -p wcadmin
2. Restart the Method Server.
3. From Windchill shell, run the AddColumns tool to define additional columns on the database CustomFilter for more standard attributes:
AddColumns.sh wt.filter.custom.CustomFilter String=5 Double=3 Timestamp=2 Long=3 Boolean=2
4. Restart the Method Server.
5. Navigate to $WT_HOME/prog_examples/CustomFilter/loadFiles. Load all of the files by running the following command:
windchill wt.load.LoadFromFile -d CustomFilter_TestFilter_LoadSet.xml -u wcadmin -p wcadmin
Optionally, you can load each file individually:
windchill wt.load.LoadFromFile -d <File Location> \CustomFilter_TestFilter_0.xml -u wcadmin -p wcadmin
windchill wt.load.LoadFromFile -d <File Location> \CustomFilter_TestFilter_1.xml -u wcadmin -p wcadmin
windchill wt.load.LoadFromFile -d <File Location> \CustomFilter_TestFilter_2.xml -u wcadmin -p wcadmin
windchill wt.load.LoadFromFile -d <File Location> \CustomFilter_TestFilter_3.xml -u wcadmin -p wcadmin
These steps create Custom Filter type with Test Filter subtype. Additional attributes must be added to TestFilter with some constraints defined. Ensure that the Default and Filter – Edit layouts are already defined.
CustomFilter Loaded
User Custom Filter Soft Type Loaded
Layout Defined for Filter – Edit of User Custom Filter Soft Type
Implementing the Logic
1. Launch Windchill shell and navigate to $WT_HOME/prog_examples/CustomFilter/src folder.
2. Launch ant command to compile and create jar files ready for deployment of the example.
3. Copy files from $WT_HOME/prog_examples/CustomFilter/codebase to $WT_HOME/codebase folder and jar files from $WT_HOME/prog_examples/CustomFilter/bin to $WT_HOME/srclib/wnc by running the following commands:
cp -r $WT_HOME/prog_examples/CustomFilter/codebase/* $WT_HOME/codebase/
cp -r $WT_HOME/prog_examples/CustomFilter/bin/* $WT_HOME/srclib/wnc/
4. In the Windchill shell, go to $WT_HOME/bin and run the following command to compile GWT code deployed with the example:
Ant -f gwt.xml
5. Restart the Method Server.
Plugging In the Logic
1. Create the ModuleName-service.properties.xconf file (or use the existing one) in the $WT_HOME and add the following service options:
<?xml version="1.0" encoding="utf-8"?>
<!DOCTYPE Configuration SYSTEM "xconf.dtd">
<Configuration targetFile="codebase/service.properties"?
<Service context="default" name="wt.filter.NavigationFilterDelegate2">
<Option cardinality="singleton" requestor="null" serviceClass="wt.filter.custom.ExampleCustomFilterDelegate"
selector="WCTYPE|wt.filter.custom.CustomFilter|org.rnd.TestFilter"/>
</Service>
<Service context="default" name="NavigationCriteria.renderer">
<Option requestor="null" cardinality="singleton" selector="WCTYPE|wt.filter.custom.CustomFilter|org.rnd.TestFilter"
serviceClass="com.ptc.expansionui.client.ui.renderer.ExampleCustomFilterRenderer" />
</Service>
<Service context="default" name="NavigationCriteria.validator">
<Option requestor="null" cardinality="singleton" selector="WCTYPE|wt.filter.custom.CustomFilter|org.rnd.TestFilter"
serviceClass="com.ptc.expansionui.server.validator.ExampleCustomFilterTabValidator"/>
</Service
<Service context="default" name="NavigationCriteria.populator">
<Option requestor="null" cardinality="singleton" selector="WCTYPE|wt.filter.custom.CustomFilter|org.rnd.TestFilter"
serviceClass="com.ptc.expansionui.server.populator.ExampleCustomFilterPopulator" />
</Service>
</Configuration>
2. In the $WT_HOME/codebase/com/ptc/expansionui/ExpansionCriteriaCore-wt.properties.xconf file, uncomment the following line:
<Property name="NavigationCriteria.filters.order.xx" default="WCTYPE|wt.filter.custom.CustomFilter|org.rnd.TestFilter"/>
3. Propagate the xconf changes by running the following command from the windchill shell:
xconfmanager -fp
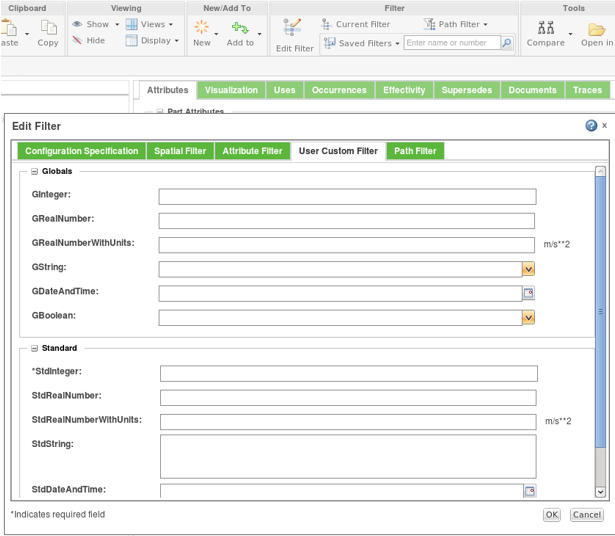
Result
After launching Edit Filter user interface, you can view and select “User Custom Filter” tab: