Creating a Custom Navigation Criteria Filter
Follow this procedure to add a custom filter tab in the Edit Filter window:
1. Open a Windchill Shell and execute the following command to load a type representing the custom filter:
windchill wt.load.LoadFromFile -d %WT_HOME%\loadFiles\type\CustomFilter.xml
This loads the wt.filter.custom.CustomFilter in the Type and Attributes Management UI.
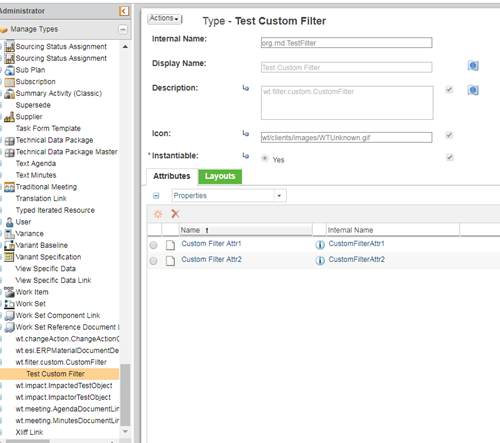
2. Using the Type and Attributes Management UI, create a subtype of wt.filter.custom.CustomFilter with an internal name, for example org.rnd.TestFilter, and set the instantiable attribute to Yes.
3. Add attributes to the org.rnd.TestFilter type created in step 2, from the Attributes tab. These attributes represent the custom filter as required. Also, add these attributes to one or more groups as appropriate and to the default layout from the Layouts tab. Provide a name to the group and optionally a description, using the Localize option for each of the groups created.
4. Add the entries in the ModuleName- service.properties.xconf file and change the internal name of the subtype of wt.filter.custom.CustomFilter as defined in step 2.
<!-- Uncomment to enable using a Custom Filter
<Option requestor="null" cardinality="singleton"
selector="WCTYPE|wt.filter.custom.CustomFilter| |<<Custom Filter Subclass>>"
serviceClass="com.ptc.expansionui.client.ui.renderers.DefaultCustomFilterRenderer"/> -->
<!-- Uncomment to enable using a Custom Filter
<Option requestor="null" cardinality="singleton"
selector="WCTYPE|wt.filter.custom.CustomFilter| |<<Custom Filter Subclass>>"
serviceClass="com.ptc.expansionui.server.validators.DefaultCustomFilterTabValidator"/> -->
5. The DefaultCustomFilterTabValidator is the default validator. Use this validator or override your validator by using NavigationCriteriaTabValidator or DefaultCustomFilterTabValidator.
6. Add the entry in the moduleName-wt.properties.xconf file to the following entry and replace xx with the number specifying the order in which the filters are displayed.
<!-- Uncomment to enable using a Custom Filter
<Property name="NavigationCriteria.filters.order.xx"
default="WCTYPE|wt.filter.custom.CustomFilter|<<Subtype Name>> "/> -->
7. After making the above changes, run the following command from the Windchill shell:
xconfmanager –Fp
8. Restart the Method Server.
Configuring a Custom Filter Delegate
Windchill provides a delegate for handling custom filter attributes while filtering. This DefaultCustomFilterDelegate performs the filtering based on the IBA values. It is only when a filter object, in this case, part, contains the value of the soft attribute, that the delegate checks for filtering. You can use the DefaultCustomFilterDelegate or override this delegate to provide a custom one. Configure this delegate using a service property. Create or modify the XCONF file that contains the appropriate new value for the property:
<?xml version="1.0" encoding="utf-8"?>
<!DOCTYPE Configuration SYSTEM "xconf.dtd">
<Configuration targetFile="codebase/typedservices.properties">
<Service context="default" name="wt.filter.NavigationFilterDelegate2">
<Option cardinality="singleton" requestor="null"
serviceClass="wt.filter.custom.DefaultCustomFilterDelegate"
selector="WCTYPE|wt.filter.custom.CustomFilter|<<Custom Filter Subclass>>"/>
</Service>
Use the xconfmanager utility to update Windchill services properties. The following command registers the new file and its contents:
xconfmanager -i codebase/custom/myServiceXconfFile.properties.xconf -p
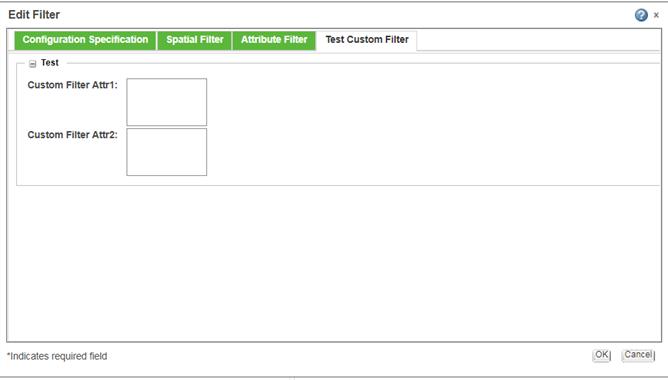
Launch the Edit Filter UI for a WTPart structure from the Part Information page. The UI now displays a new filter tab called org.rnd.TestFilter: