Step 16: Display Individual Security Labels in Table Views - Optional
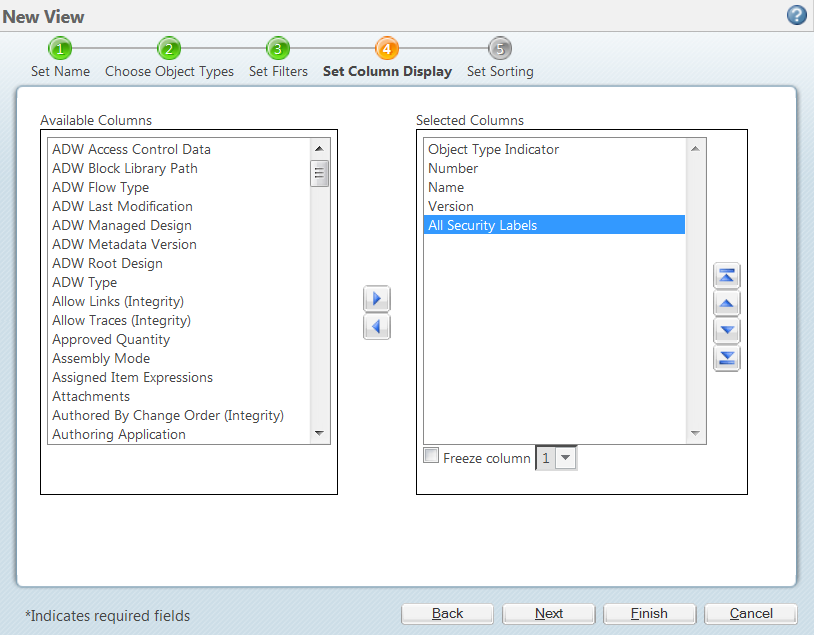
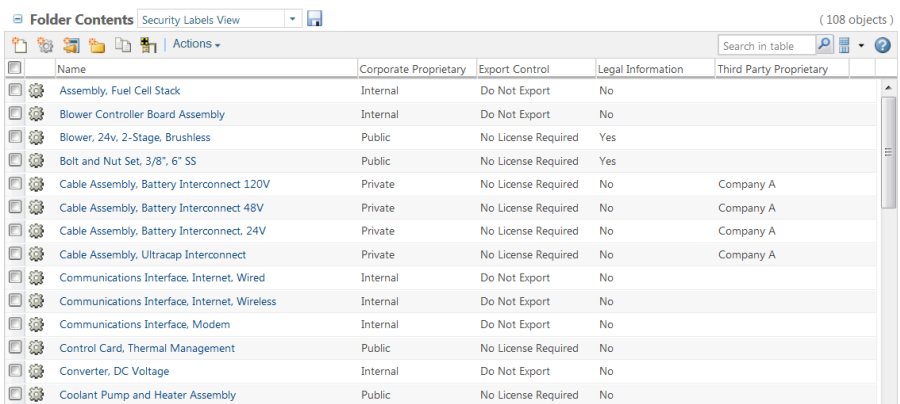
By default, you can add the All Security Labels column to a table view. Adding this column to a table displays individual columns for all enabled security labels when the view is applied to a table. If a security label is disabled, the column no longer appears in the custom table view.
You can configure your system so that individual security labels and their values can be added to Windchill tables as optional columns. The optional columns can be added to the table when you create or edit your table view. First, you must configure the security labels as available attributes for any object type that you want to include in your table view. After completing the following steps, the optional security label columns can be added to custom table views for the object types configured with the security label attributes. The optional security label columns can be rearranged or hidden within the table view and the changes saved to the existing view or as a new view. If you do not configure the optional security label columns, but instead use the out-of-the-box All Security Labels column, changes to the security label columns inserted as part of the All Security Labels column are not saved.
| Certain tables may restrict which attributes are available for selection when creating custom table views. |
For more information about creating custom table views, see
Customizing Table Views.
1. If it does not exist at your site, create an AvailableAttributesSite.xml file in the following location:
<Windchill>/wtSafeArea/siteMod/codebase
where <Windchill> is the installed location of your Windchill solution.
The AvailableAttributesSite.xml file should contain the following:
<?xml version="1.0" standalone="no"?>
<AvailableAttributes>
</AvailableAttributes>
If an AvailableAttributesSite.xml file exists in the <Windchill>/codebase directory, copy the existing file to the following locations:
<Windchill>/wtSafeArea/ptcOrig/codebase
and
<Windchill>/wtSafeArea/siteMod/codebase
2. Open the <Windchill>/wtSafeArea/siteMod/codebase/AvailableAttributesSite.xml file in a text editor.
3. Add the appropriate Class elements within the AvailableAttributes element to display security label values for the object types for which you want security label values to be displayed in custom table views. When you specify a Class element, the security label attribute is available for the type specified in the name attribute and all subtypes of that type when creating a new view. In the following example, security labels can be added to table views for parts, documents, dynamic documents, CAD documents, agreements, and their subtypes.
<Class name="wt.enterprise.RevisionControlled">
<Include name="wt.access.SecurityLabeled"/>
</Class>
<Class name="wt.access.SecurityLabeled">
</Class>
The following provides the general syntax to use for specifying a particular object type and its subtypes:
<Class name="INTERNAL_OBJECT_TYPE">
<Include name="wt.access.SecurityLabeled"/>
</Class>
<Class name="wt.access.SecurityLabeled">
</Class>
where INTERNAL_OBJECT_TYPE matches the Internal Name of the object type as displayed in the Type and Attribute Management utility or the class name of the object type.
4. In the Class element for wt.access.SecurityLabeled, add an Attribute element for each security label that you want to appear as a table column. Use the following format for each security label:
<Attribute id="<SECURITY_LABEL>"/>
where <SECURITY_LABEL> is the logical form of the security label as specified in the LogicalAttributesSite.xml file. The value can only contain alphanumeric characters and the underscore character.
| You can also use the external form of the security label, but PTC recommends using the logical form. |
For example, after adding the lines necessary for each security label for the example configuration, the elements in the previous example would appear as follows:
<Class name="wt.enterprise.RevisionControlled">
<Include name="wt.access.SecurityLabeled"/>
</Class>
<Class name="wt.access.SecurityLabeled">
<Attribute id="CORPORATE_PROPRIETARY"/>
<Attribute id="EXPORT_CONTROL"/>
<Attribute id="LEGAL_INFORMATION"/>
<Attribute id="THIRD_PARTY_PROPRIETARY"/>
</Class>
5. Save and close.
6. Navigate to the following location:
<Windchill>/codebase/com/ptc/core/security
where <Windchill> is the installed location of your Windchill solution.
7. Copy the access.dataUtilities.properties.xconf file to the following locations:
<Windchill>/wtSafeArea/ptcOrig/codebase/com/ptc/core/security
and
<Windchill>/wtSafeArea/siteMod/codebase/com/ptc/core/security
8. Open the <Windchill>/wtSafeArea/siteMod/codebase/com/ptc/core/security/access.dataUtilities.properties.xconf file in a text editor.
9. Add the following lines for each security label you want to appear as a table column.
<Service name="com.ptc.core.components.descriptor.DataUtility">
<Option serviceClass="com.ptc.core.security.factory.datautilities.
SecurityLabelsDataUtility" requestor="java.lang.Object" selector=
"<SECURITY_LABEL>" cardinality="duplicate"/>
</Service>
where <SECURITY_LABEL> matches the value specified in the AvailableAttributesSite.xml file.
For example, the Export Control security label would appear as follows:
<Service name="com.ptc.core.components.descriptor.DataUtility">
<Option serviceClass="com.ptc.core.security.factory.datautilities.
SecurityLabelsDataUtility" requestor="java.lang.Object" selector=
"EXPORT_CONTROL" cardinality="duplicate"/>
</Service>
10. Save and close.