Username Authentication with Symmetric Keys Example
This example illustrates how to author a C# Web Services client that digitally signs its requests and embeds credentials used for authentication.
This example client was authored on a Windows Server with .NET 4.5 and Visual Studio 2013.
1. Generate the Client/Server and Truststore/Keystore Pairs
In order for a server and a client to communicate using digitally signed SOAP requests, the client and server are required to trust one another by trading certificate information. An example utility is provided with Windchill that can be used to generate certificates, Java keystores, and truststores using OpenSSL. Use a windchill shell to invoke the following:
% cd <windchill>/prog_examples/jws
% ant -f jws-stores.xml
During invocation of this script you are prompted to enter values for certificate aliases, subjects, and passwords. The default values are typically sufficient. If you alter any of these values while running this script you may need to account for those differences later.
Of particular importance is the keystore alias for the server. The default value presented by the script above is the value of wt.rmi.server.hostname from your wt.properties file. If this is not the hostname where your web server is running, then you can change this value. From a Java perspective this alias can be any basic string identifier, but .NET prefers that these aliases reflect real host names that can be resolved through DNS. If you decide to use an alias that does not reflect your server’s hostname then you must use additional configuration on the client side.
If you do not accept the default values when running this script then you should review the contents of the security.properties file to make sure it matches the information provided when running the script. This file is located in:
<Windchill>/bin/adminTools/WebServices/security.properties
When this script has completed running, a directory named <Windchill>/prog_examples/jws/stores is created, which contains a file named server.p12 (a personal information exchange file) with the server’s public key, which is used later in this process.
The jws-stores.xml ant script generates both server and client keypairs. This example, however, only requires the server’s public certificate.
2. Deploy the Web Service
Once you have run the
jws-stores.xml script you can create and deploy your web service. Here the simple Java web service example that comes with Windchill is used, and which performs basic addition. In this case the service must be secured using user authentication with symmetric keys. For more information, see
Understanding the Security Requirements.
Execute the following to compile and deploy the example web service:
% cd <Windchill>/prog_examples/jws/JavaService/src
% ant
When the script completes, restart Windchill to finish the deployment of the web service. After it has been restarted, the web service’s WSDL is accessible at a URL such as:
http://<host>/Windchill/servlet/ExampleJavaService?wsdl
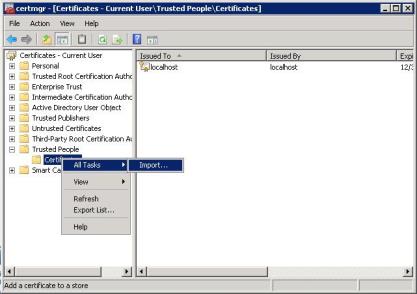
3. Import the Server’s Public Key into the Client's Certificate Store
1. Transfer the server.p12 file created in the first step to the client’s machine.
2. Start the Certificate Manager by navigating to > and entering the following command:
C:\Windows\System32\certmgr.msc
3. Next, import server.p12 into the “Trusted People” store:
4. When the Import Wizard runs, browse to the location of the server.p12 file, select it, and then supply the password you chose when generating the certificate. The default password is “changeit.”
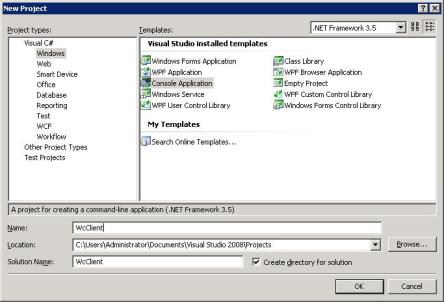
4. Write the Web Services Client
1. Start Visual Studio and select > > to create a new project.
2. In the New Project window, select Console Application from the Templates pane.
Enter a name for your application (“WcClient” is used in this example):
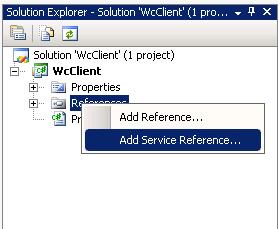
3. Once your project is created, the base .cs file opens in the main editor window. In the Solution Explorer pane, right-click the References folder and select Add Service Reference:
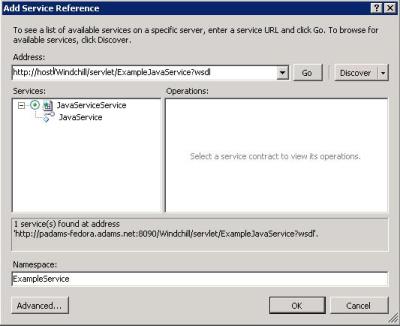
4. In the Add Service Reference window, enter the URL of the service’s WSDL in the Address field, and click Go to fetch the WSDL document.
5. Enter a Namespace (“ExampleService” is used in this example) and click OK:
6. In the Solution Explorer pane, right-click again on the References folder, and this time select Add Reference.
7. In the window that opens, scroll down and add the System.Net reference. Repeat this process to add the System.Security reference.
8. Now you must write the client source code to access the web service. For example:
using System;
using System.Collections.Generic;
using System.Linq;
using System.Text;
using System.Security.Cryptography.X509Certificates;
namespace WcClient
{
class Program
{
static void Main(string[] args)
{
ExampleService.JavaServiceClient client = new ExampleService. JavaServiceClient();
client.ClientCredentials.UserName.UserName = "demo";
client.ClientCredentials.UserName.Password = "demo";
client.ClientCredentials.ServiceCertificate.SetDefaultCertificate(
StoreLocation.CurrentUser,
StoreName.TrustedPeople,
X509FindType.FindBySubjectName,
"host.company.com");
Console.WriteLine("1+2=" + client.add(1, 2));
}
}
}
9. Update the subject name when fetching the X509 certificate to match your hostname (in the example above it’s written as “host.company.com”).
10. Select > or press F6 to build your client.
11. Test your client by pressing Ctrl+F5 or by selecting > > .
5. Use a Certificate Alias that Does Not Reflect the Hostname of Your Server
As mentioned previously, .NET prefers that the certificate alias match the true hostname where your service resides. If for some reason your alias does not match your server’s hostname and you attempt to run your client, you receive a DNS-related error. You can work around this problem by editing your client’s app.config file by adding a DNS alias to your service reference. For example, if your certificate alias is “ws-server” you might update app.config to make “ws-server” an alias for your web service endpoint:
<endpoint address="http://host.company.com/Windchill/servlet/ExampleJavaService"
binding="customBinding" bindingConfiguration="JavaServicePortBinding"
contract="ExampleService.JavaService" name="JavaServicePort">
<identity>
<dns value="ws-server" />
</identity>
</endpoint>