Using the Info*Engine Task Editor
The Info*Engine Task Editor provides a streamlined method for creating tasks and JSPs without having to do a lot of typing. By selecting menu options in a Windows interface and entering information in data fields, or even by typing partial webject names, you can easily create formatted scripts that take advantage of all the current Info*Engine webjects.
Starting and Stopping the Task Editor
With Windchill running, start the Info*Engine Task Editor. You can start the Task Editor in one of the following ways:
• For Windows, if you accepted the defaults during installation, you can select InfoEngine Task Editor from the Start menu.
• You can also use the platform-appropriate startup script:
◦ Windows:<Windchill>/taskeditor/bin/modeler.bat
◦ Unix:<Windchill>/taskeditor/bin/modeler
Once started, the Info*Engine Task Editor attempts to look up service information.
If an Info*Engine Server and Naming Service are available, they are used to remotely invoke tasks on available task processors. The task editor can invoke tasks to supply more advanced functionality such as introspection of JDBC database tables and storage of task source in LDAP.
If more than one Info*Engine Server or Naming Service is found, you are prompted to select the ones you want to use.
To stop Info*Engine Task Editor, simply close its window.
Navigating the Task Editor
The following sections are brief descriptions of the user interface in the Info*Engine Task Editor.
Panels
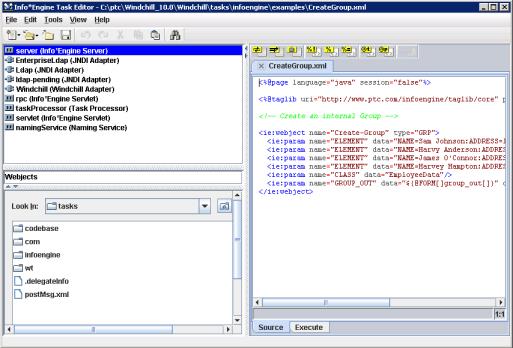
The Info*Engine Task Editor consists of four panels: editor, browse, services, and webjects.
Editor
The editor is the large panel at the right, and contains the source for the active task or JSP. The tabs along the top of the panel indicate the open editor for either a task or JSP. You can switch from one editor to another by clicking the corresponding tab. The tabs at the bottom of the panel allow you either to view the source code or run the task or JSP.
Services
Webjects
The services and webject panels are to the left of the editor panel, with the services on top and their corresponding webjects below.
The services panel displays the services and adapters that are available to the current configuration you chose during setup. Services are labeled with the receptacle icon

. Adapters are labeled with the plug-in icon

.
Browse
The browse panel is located in the lower left, and helps you navigate to saved tasks.
| You can customize the size and availability of panels by clicking and dragging the panel borders. |
Menus
The following menus appear:
File Menu |
New | Create a new Info*Engine task or JSP. The new file appears in the editor panel. (Keyboard shortcuts: press CTRL+T for a new task or CTRL+J for a new JSP.) |
Open | Open an Info*Engine task or JSP from the local file system. The file appears in the editor panel. (Keyboard shortcut: press CTRL+O.) |
Close | Close the Info*Engine task or JSP currently being edited. (Keyboard shortcut: press CTRL+F4.) |
Close all | Close all Info*Engine tasks or JSPs currently being edited. |
Save | Save the Info*Engine task or JSP currently being edited to their source location. (Keyboard shortcut: press CTRL+S.) |
Save All | Save all Info*Engine tasks or JSPs currently being edited to their source location. (Keyboard shortcut: press CTRL+SHIFT+S.) |
Save as | Save the active Info*Engine task or JSP in the editor panel to a new location on the local file system. |
Exit | Exit the Info*Engine Task Editor |
Edit Menu |
Undo | Undo the last edit action. (Keyboard shortcut: press CTRL+Z.) |
Redo | Redo the last undone edit action. (Keyboard shortcut: press CTRL+Y.) |
Cut | Remove the currently selected text and place it in the system clipboard. (Keyboard shortcut: press CTRL+X.) |
Copy | Copy the currently selected text to the system clipboard. (Keyboard shortcut: press CTRL+C.) |
Paste | Paste information from the system clipboard into the active Info*Engine task or JSP in the editor panel. (Keyboard shortcut: press CTRL+V.) |
Select all | Select all the text of the active Info*Engine task or JSP in the editor panel. (Keyboard shortcut: press CTRL+A.) |
Find | Open the Find/Replace window to locate text within the active Info*Engine task or JSP in the editor panel. (Keyboard shortcut: press CTRL+F.) |
Go to | Open a Go To Line window to move the cursor to a specific line within the active Info*Engine task or JSP in the editor panel. (Keyboard shortcut: press CTRL+G.) |
Match braces | If the cursor is adjacent to a brace character, this action moves the cursor to the corresponding open or close brace character. (Keyboard shortcut: press CTRL+].) If no corresponding open or close brace is found, then a beep sounds. If the cursor is not adjacent to a brace character, then this action does nothing. The following are considered brace characters: (), [], {}, and <>. |
Tools Menu |
Edit tag | Open the Editor window for the tag in which the cursor is placed in the editor panel. |
Preferences | Open the Preferences window, where you can modify how text appears in the editor and control tag insight preferences. |
View Menu |
Toolbars | Show or hide the editor, File, Edit, or Find toolbars. |
Services/Webjects | Show or hide the services and webjects panel. |
Help Menu |
Contents | Open the Help window. (Keyboard shortcut: press F1.) |
About | Open the About window. |
Toolbar Icons
Icon | Action | Description |
| Insert a forEach block | Click this icon to insert a forEach block into your Info*Engine task or JSP source. When dropping a forEach block into your source, a window opens allowing you to enter values for the groupIn and groupOut attributes. |
| Insert a parallel block | Click this icon to insert a parallel block into your Info*Engine task or JSP source. |
| Insert a task tag | Click this icon to insert a task tag into your Info*Engine task or JSP source. When dropping a task into your source, a window opens allowing you to enter values for the URI and processor attributes. You are also able to add parameters to be sent along with the request to execute the task. |
| Insert a declaration block | Click this icon to insert a declaration block into your Info*Engine task or JSP source. |
| Insert a scriptlet block | Click this icon to insert a scriptlet block into your Info*Engine task or JSP source. |
| Insert a JSP expression block | Click this icon to insert an expression block into your Info*Engine task or JSP source. |
| Insert JSP taglib directive | Click this icon to insert a taglib directive into your Info*Engine task or JSP source. |
| Insert JSP page directive | Click this icon and then click in the editor panel to insert a page directive into your Info*Engine task or JSP source. |
| Edit tag | Clicking the edit icon  with the cursor in a tag displays the associated tag editor for you to make the desired changes. When finished, click OK to apply the changes. Tag editors are available for several different types of tags, such as webject, task, param, forEach, JSP page directive, and JSP taglib directive. |
Opening an Existing Info*Engine Task or JSP
You can use the Info*Engine Task Editor to open and edit existing task and JSP files, regardless of whether they were created with the Task Editor.
Use the browse panel to navigate to an existing task. If necessary, click and drag the panel borders to view the browsing toolbar options.
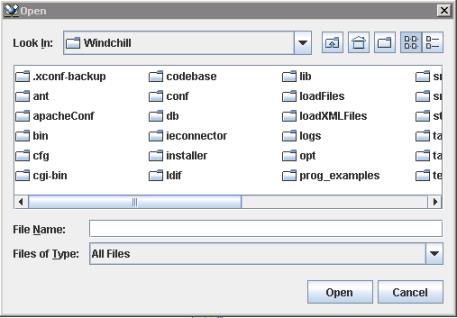
Alternatively, select > > . The Open window opens, where you can browse for task and JSP files:
Select the file you want and click Open, and the selected file appears in the editor panel.
Creating an Info*Engine Task or JSP
With the Info*Engine Task Editor, you can create tasks and JSPs that meet the same criteria as explained in
Info*Engine JSP Pages with minimal code entry.
New Task
To create a new task, select > > . This opens an editor panel for a new task. Scriptlets for page and taglib directives are already added according to settings chosen in Preferences.
You can change the content of editable tags or directives by placing the cursor anywhere in the scriptlet and clicking the edit icon
.
For example, placing the cursor in the
taglib directive and clicking
opens the
taglib window:
New JSP
To create a new JSP, select > > . This opens the New JSP window, with fields and drop-down menus for you to enter and select page and taglib directives:
Click OK and the appropriate coding is placed at the top of a new JSP editor:
Entering and Editing Info*Engine and JSP Tags
The Info*Engine Task Editor also helps you to customize several aspects of your Info*Engine tasks and JSP tags.
Webjects and the Webject Editor
When a service or adapter is selected in the top panel, the lower panel displays the webjects it supports (if any). The webjects are organized by type. If an editor panel is open, you can browse to the desired webject, select it, and then click in the editor panel to insert that webject.
A window specific to that webject opens and displays the parameters supported by that webject. The parameters are organized on two tabs: Required/Select and Optional:
Fill in the desired parameter values and click OK to insert the webject into your Info*Engine task or JSP source.
Tag and Webject Editors
There are three ways to open a tag editor window:
• Right-click anywhere within a tag, webject, or directive. If the selected element has editing functionality available, an Edit message appears. Click the message to open an editor window.
• Click anywhere within a tag, webject, or directive, and then open the Tools menu. If the selected element has editing functionality available, the Edit tag option is clickable and opens an editor window.
• Click anywhere within a tag, webject, or directive, and click the edit icon
.
For some tags and webjects, there is a second level of editing available. When working with webjects, you can double-click the name of a parameter and a window opens, allowing you to edit some parameter attributes. Doing so displays a parameter editor where you can edit other parameter attributes such as default, delim, elementSeparator and valueSeparator:
Similarly, when working with a task tag editor window, you can double-click within the Name field and a new window opens to edit parameters:
Editor windows are available for several different types of tags, such as: webject, task, param, forEach, the JSP page directive, and the JSP taglib directive. They are also available for most webjects.
Tag Insight
The text editor can make suggestions relative to the text you are typing. If you are typing the start of a tag that it recognizes, it displays a drop-down list of possible tags from which you can select.
By default, Tag Insight is available for several types of tags, such as JSP tags and Info*Engine core, supplied, and directory tags. You can create your own Tag Insight on the Tag Insight tab of the Preferences window: