Vault Migration to Azure Blob Storage
This section explains how to migrate an existing file-based vault to Azure Blob Storage. For information on how to set up Azure Blob Storage in
Windchill, see the topic
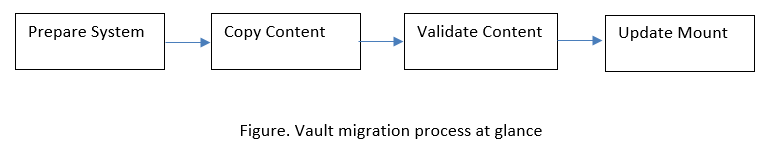
Configuring Windchill File Vaults to Use Azure Blobs. The following workflow illustrates how to migrate a single vault at a time. This process is applicable for all types of vaults that are Master, Replica, or Cache vault and for vaults at master as well as file server site.
|
|
This process works for a vault only if the Automatic folder creation flag is set to true.
|
The process of migrating a vault is split into four top level steps as illustrated above. For ease of explaining the migration process, the following procedure is based on a sample scenario where
defaultuploadrootfolder is the root folder name and has the mount path as:

Prepare system for migration
Perform the following steps to complete the preparatory work such as performing re-vaulting, synchronizing, removing unreferenced files, and mark Root Folder read-only.
1. Run re-vaulting schedule for Vault, if vault is Master vault.
2. Cancel and disable content replication schedules for Vault, if vault is Replica vault.
3. Using a JMX client such as JConsole, perform the CacheVaultSynchronizer MBean sysForceSync operation.
4. Perform Remove Unreferenced Files and > operations for Vault, so that only valid content is migrated to Azure Blob Storage.
5. To retain the new content while the vault migration is in progress, create a new root folder and mount it on Azure Blob. This way the new content will be directed to the Azure Blob. For more information, see the topic
Configuring Windchill File Vaults to Use Azure Blobs.
6. Set the property wt.fv.faultTolerantVaultsAutoRestore=false.
7. Set the file system based root folders that you plan to migrate, as READ_ONLY from the vault configuration user interface. This ensures that no new content is uploaded to file system based root folders, while its contents are migrated.
Copy content from source system
Perform the following steps to copy content from source system to target system. For example, copy content from file system to the target Azure Blob Storage.
Copy the directory structure corresponding to root folders on the file system to Azure portal.
• If you wish to copy the Azure root folder content on container of Azure Blob in Azure VM, use the Microsoft command line utility AzCopy for Windows. For more details, refer to Microsoft documentation.
• If you wish to copy the vault content from on-premises
Windchill installation to the new Azure VM, you can use Azure Data Box or Data Box Disc. PTC has used Azure Data Box for testing. For more information, refer to the topic
Transferring Data To Azure Blobs using Azure Data Box.
Validate the copied content
This step is required to make sure the previous step of copying content is successful and accurate.
1. Run the data validation utility, DataMigrationVerificationTool, to validate the copied contents on Azure Blob. This tool allows you to compare contents of existing vault to file structure on Azure Blob. You can run the tool on master Windchill and for remote installations. Run the following at the Windchill shell:
windchill wt.fv.tools.datamigration.DataMigrationVerificationTool
validateMigratedData --userName USER --password PASSWORD --
srcRootFolderName ROOT_FOLDER_NAME --targetMountType MOUNT_TYPE--folderName FOLDER_NAME
--targetMountPath MOUNT_PATH –skipSizeValidation
2. On execution, the tool provides the location at which the report is saved. In this report, you can view a list of all the missing files or information about file size mismatch for each folder. The report always gets generated on master installation. You can choose to run validation, on the whole root folder or only selected sub-folder by specifying -- rootFolderName or -- folderName. You can skip performing file size validation, by adding –skipSizeValidation.
For examples:
◦ To validate all data in root folder named defaultuploadrootfolder:
windchill wt.fv.tools.datamigration.DataMigrationVerificationTool validateMigratedData --userName <username> --password <password> --targetMountType azureBlob --srcRootFolderName defaultuploadrootfolder --targetMountPath storageaccountname/testcontainer/defaultuploadvault
◦ To validate data in folder named defaultuploadrootfolder and not to check file sizes
windchill wt.fv.tools.datamigration.DataMigrationVerificationTool validateMigratedData --userName <username> --password <password> --targetMountType azureBlob --srcRootFolderName defaultuploadrootfolder --targetMountPath storageaccountname/testcontainer/defaultuploadvault -–skipSizeValidation
Update mount
The system starts using the content in target system after the mounts are updated. Perform the following steps to update mounts:
1. Run the following command from Windchill shell to change the mount type and mount path for all the root folders:
windchill wt.fv.tools.datamigration.MountMigrationTool migrate -u <username> -p <password> -r <RootFolder name> -m <mount path on Azure Blob Storage Container> -t azureBlob
For example:
windchill wt.fv.tools.datamigration.MountMigrationTool migrate -u <username> -p <password> -r defaultuploadfolder1 -m storageaccountname/testcontainer/defaultuploadvault -t AzureBlob
Alternatively, you can unmount the root folder and mount it for Azure Blob from Vault Configuration user interface. But while performing these operations from user interface, end users must not access content in the root folder.
2. Remove the migrated root folder’s READ_ONLY flag from vault configuration user interface. The newly created root folder in the “Prepare system for migration” section may contain files which are not required to move out of the root folder as part of this vault migration process.
3. After vault migration process, re-establish the re-vaulting and content replication schedules, and configure the property wt.fv.faultTolerantVaultsAutoRestore.