Configuration required for publishing the Annotation (Marked as Control Characteristics) from Creo Parametric to Windchill
File Synchronization is needed to run the adapters on a Windchill machine. This is because the worker needs the CAD files from the Windchill server. They are pulled into the workspace and downloaded. If the worker is on the Windows machine and the server is on a VM then they will need to be synchronized.
The WVS Worker Agent service manages the conversion of CAD data from Windchill to Creo View viewable files using the respective Creo View Adapter and related CAD application, configured as a CAD Worker.
The CAD Worker, in turn, employs the Windchill integrated Workgroup Manager client (WWGM, bundled in the case of Creo Parametric) to perform the download and synchronization of raw Windchill CAD data with the latest Windchill CAD Document metadata in the CAD application.
Perform the following configuration as an administrator:
1. Install Creo Parametric on a Windows machine.
2. Install Creo View Adapters on a Windows machine.
◦ Select the PRO E options in the installation process.
◦ Install daemon and set port to 601.
3. After the completion of the installation process for Creo View Adapters, create a folder named proe_setup at the Creo View Adapters installed location.
For example, the location of the proe_setup folder can be: D:\ptc\creo_view_adapters\proe_setup.
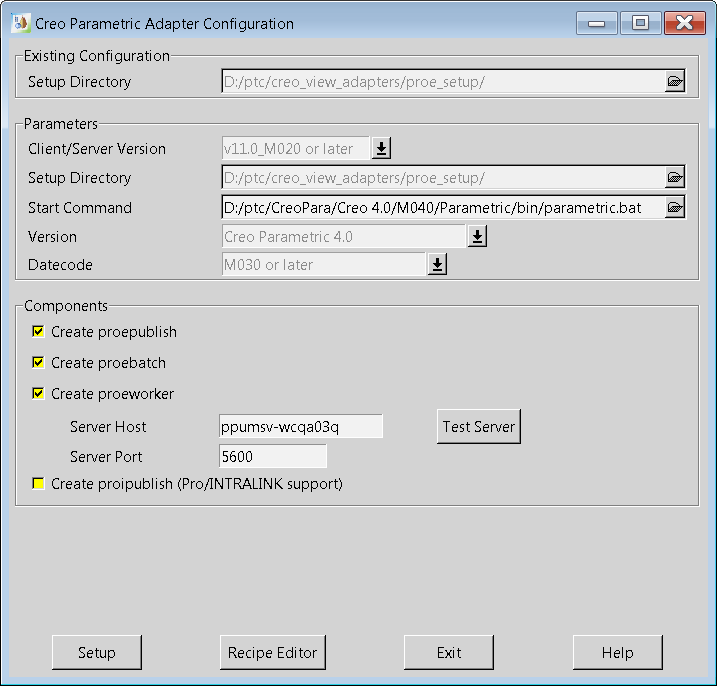
4. Run <install directory of Creo view adapter>\bin\proe2pv_config.exe.
The Creo Parametric Adapter Configuration dialog box opens.
5. In the Existing Configuration section, specify the location of the proe_setup folder. For example, D:\ptc\creo_view_adapters\proe_setup.
6. In the Parameters section, set the values as described for the following attributes:
◦ Client/Server Version: Select an appropriate value from the dropdown list. The list of values will vary based on the Creo Parametric version installed on your system. For example, v11.0_M020 or later.
◦ Setup Directory: Specify the location of the proe_setup folder. For example, D:\ptc\creo_view_adapters\proe_setup.
◦ Start Command: Specify the location of the parametric.bat file in the Creo Parametric folder. For example, D:/Program Files/PTC/Creo 4.0/M040/Parametric/bin/parametric.bat.
◦ Version: Specify the version of Creo Parametric installed on your system. For example, Creo Parametric 4.0.
◦ Datecode: Select the M030 or later release datecode of Creo Parametric.
7. In the Components section, set the values as described for the following attributes:
a. Server Host: Specify the host name. For example, ppumsv-wcqa03q. The server host location is available in the Windchill server url: ppumsv-wcqa03q.ptcnet.ptc.com.
b. Server Port: Specify the port. By default, the value is 5600. However, user can change that value in configuration.
8. Click Test Server to test the server status.
| Test Server may still report a failure. |
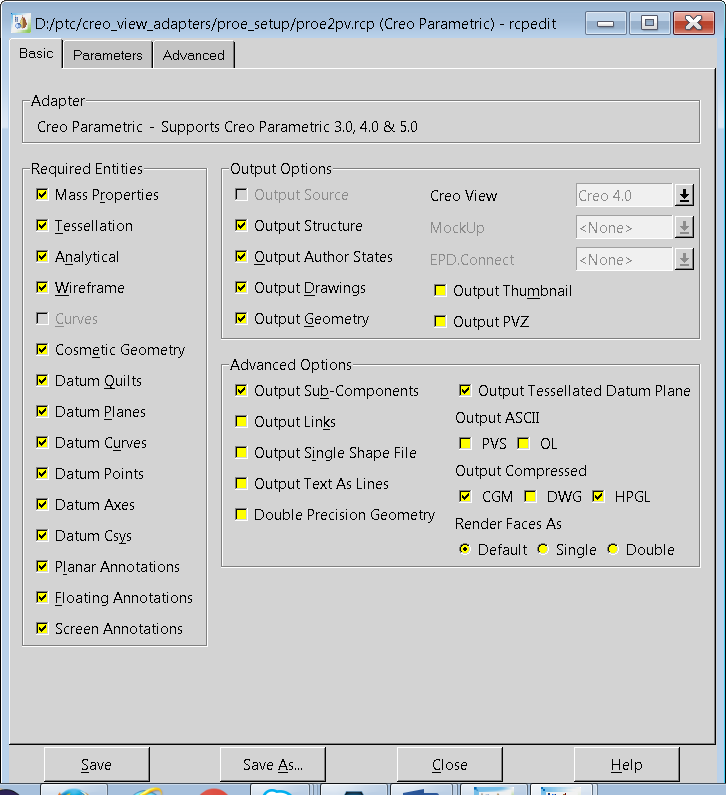
9. Click Recipe Editor.The rcpedit dialog box opens.
Ensure that the checkboxes for the following features under the Required Entities section are selected.
◦ Planer Annotations
◦ Floating Annotations
◦ Screen Annotations
10. In the rcpedit dialog box, click Save. Click Close.
11. In the Creo Parametric Adapter Configuration dialog box, click Setup. The proe2pv_config – Question dialog box opens.
12. Click Yes. The proe2pv_config – Message dialog box opens.
13. Click Ok.
14. In the Creo Parametric Adapter Configuration dialog box, click Exit. The Exit proe2pv_config dialog box opens.
15. Click Yes.
16. Configuration steps to be performed in Windchill:
a. Verify that auth.properties is present at <server_location>/Windchill/ in Windchill. If it’s not, create a auth.properties file with the text and save it at the specified location:
auth=admin credentials (username:password).
For example, auth=wcadmin:wcadmin
b. Verify that the worker.exe.whitelist.prefixes property is added to site.xconf of server. If it’s not, add the property details given below to site.xconf and propagate the update using the Xconf utility in Windchill.
<Property name="worker.exe.whitelist.prefixes" overridable="true" targetFile="codebase/WEB-INF/conf/wvs.properties" value=" C:\|D:\|E:\|G:\|/|nohup /"/>
c. Verify that the WVS.VisualNavigation property is added to site.xconf of server. If it’s not, add the property details given below to site.xconf and propagate the update using the Xconf utility in Windchill. That property ensures the availability of the Visualization tab.
<Property name="WVS.VisualNavigation" overridable="true" targetFile="codebase/installed.properties" value="true"/>
d. Verify that the publish.copyrepresentationsforward.restrict property is added to site.xconf of server. If it’s not, add the property details given below to site.xconf and propagate the update using the Xconf utility in Windchill. That property ensures that the representation is carried forward when a part is checked out.
<Property name="publish.copyrepresentationsforward.restrict" overridable="true" targetFile="codebase/WEB-INF/conf/wvs.properties" value="false"/>
17. Remove existing publishing rules as described below:
a. Log in as a Windchill administrator and navigate to > .
b. Go to Visualization Configuration Administration.
c. Remove any existing site publishing rule files.
d. On completion of these configurations, propagate the changes by running the following command in Windchill shell: xconfmanager –pF
e. Restart Windchill server for the changes to take effect.
18. Install FileZilla FTP server on your local Windows machine.
a. Set up a folder that can be shared via the FTP. For example, the location of the folder can be D:\ftproot
b. Create a sub folder in the shared folder to store the data files. For example, the location of the subfolder can be D:\ftproot\ftptemp.
c. Launch and connect to Filezilla server.
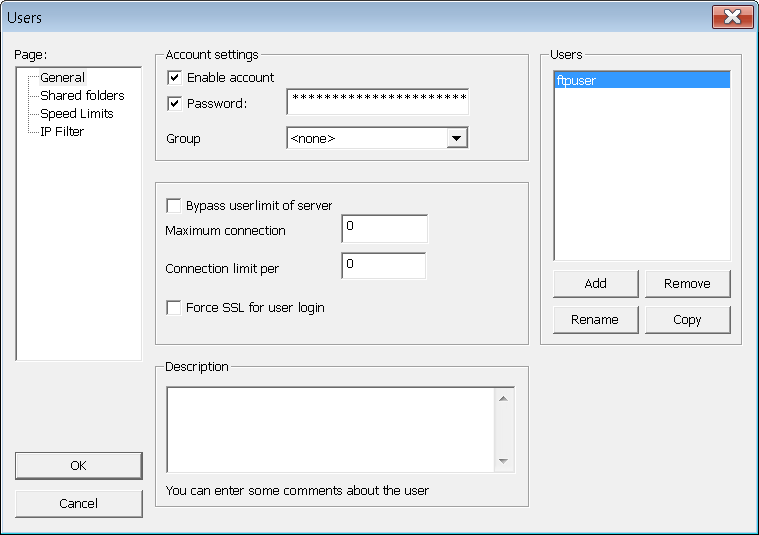
d. Click > > to create a new user. The Users dialog box opens.
e. Click Add. The Add User Account dialog box opens.
f. Type the name and click OK.
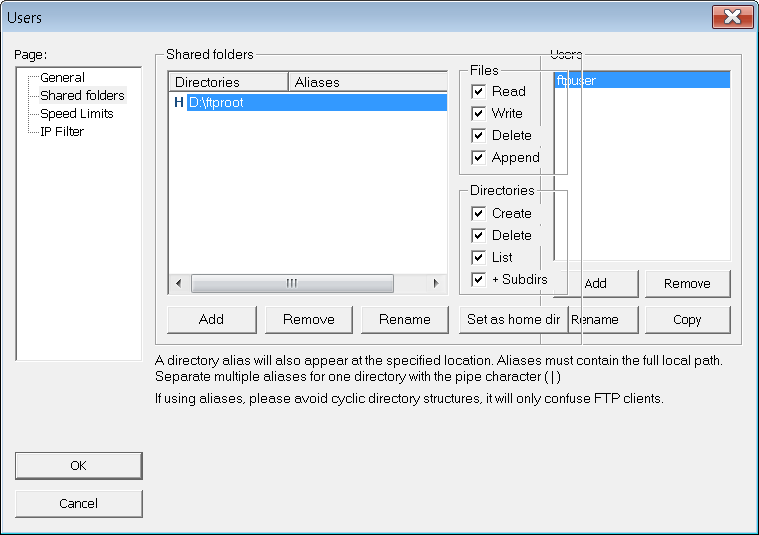
g. Click Shared folders.
h. Click Add and browse to the location of the folder that you have created for FTP sharing in step 18a. For example, the location of the folder can be D:\ftproot.
i. To ensure that the user has complete access to the folder that is added, select the checkboxes for all the entities under the Files and Directories sections.
j. Click Set as home dir to set it as default folder.
k. Click OK.
Go to Windchill server and try ftp://<machine_name>.ptcnet.ptc.com/ to check if the FTP is accessible.
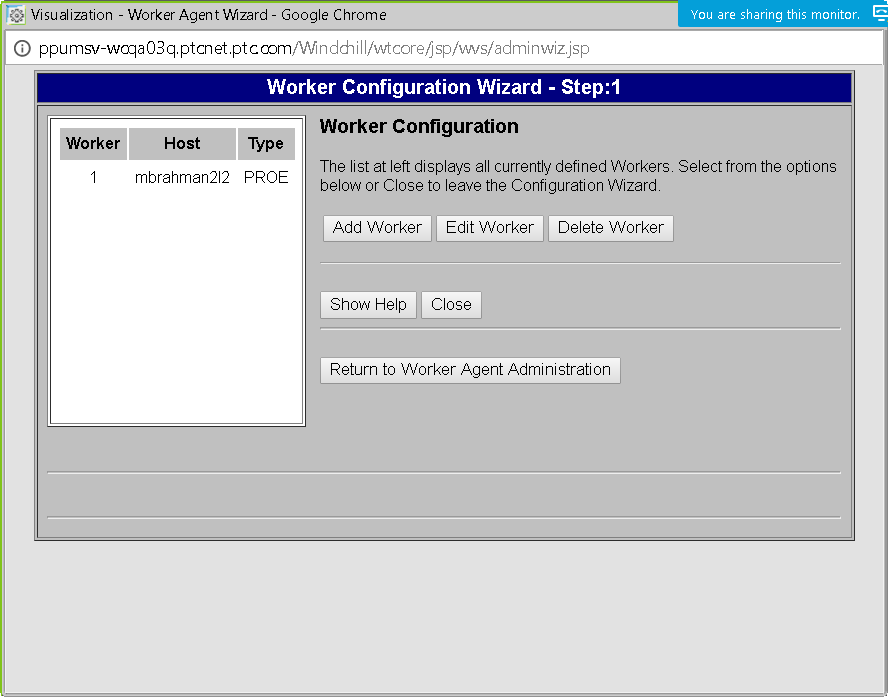
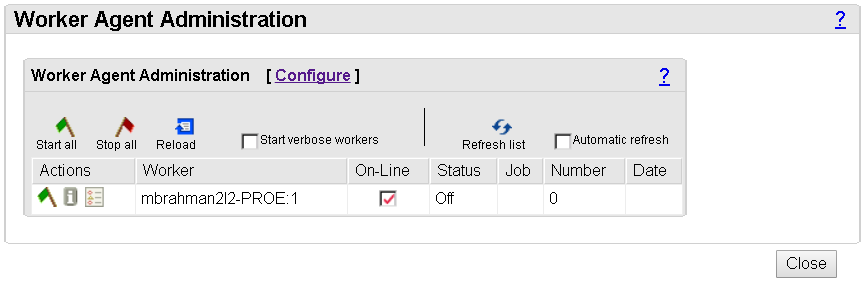
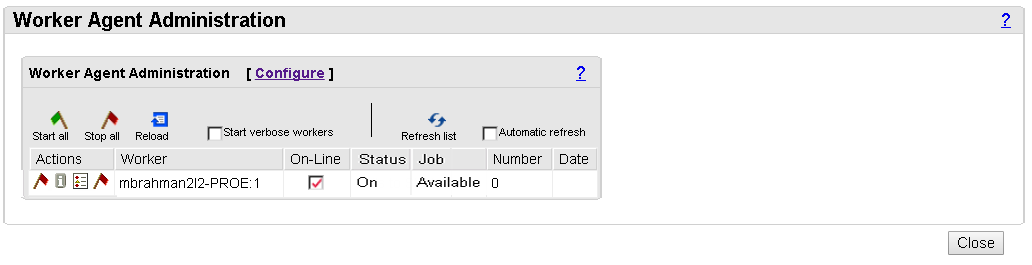
19. Perform the following configurations in Worker Agent Administration in Site utilities in Windchill, as follows:
a. Click Configure.
b. Click Add Worker.
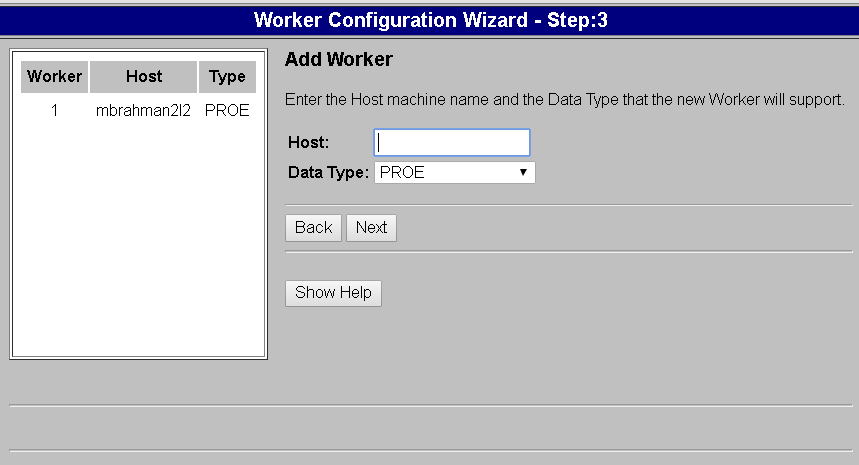
c. Enter details for host and data type as follows and click Next:
▪ Host: <Windows_machine_name>
▪ DataType: Select PROE from the drop down list.
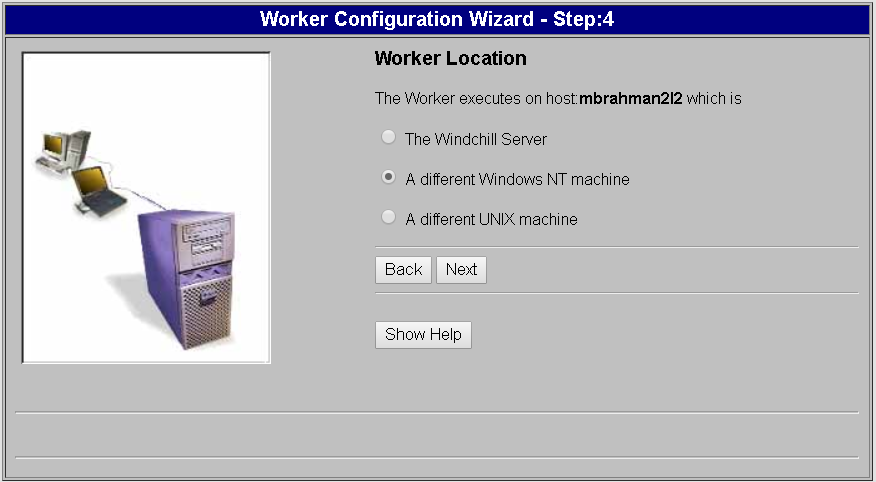
d. In Worker Location, click A different Windows NT Machine, and click Next.
| Select The Windchill Server option if the server is available on the same machine. |
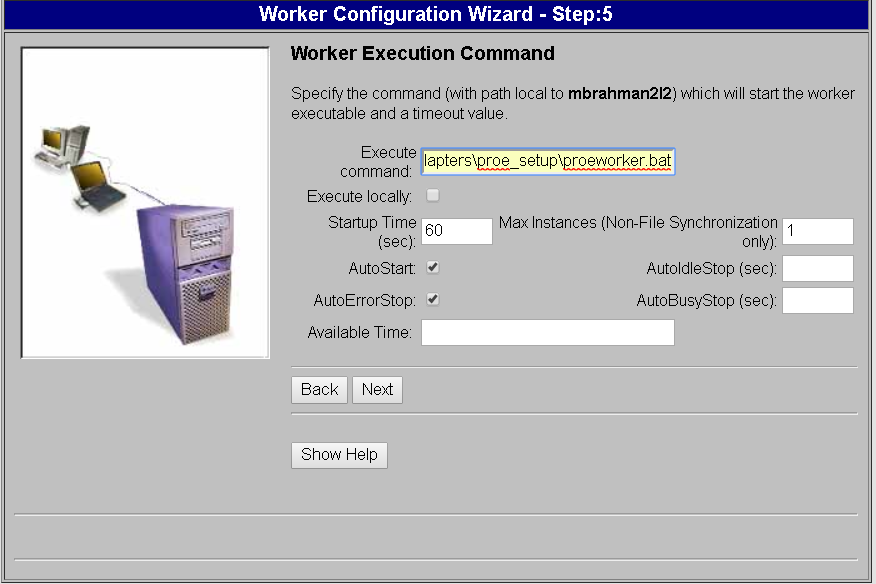
e. In Worker Execution Command, specify the details as follows:
▪ In Execute Command, enter the location of proeworker.bat file.
For example, D:\ptc\creo_view_adapters\proe_setup\proeworker.bat
▪ Clear the checkbox for Execute Locally.
▪ Select AutoStart checkbox.
▪ Select AutoErrorStop checkbox.
f. Click Next.
g. In Worker Daemon Port, specify 601 as the port number and click Next.
| This step might not be encountered by all the users. |
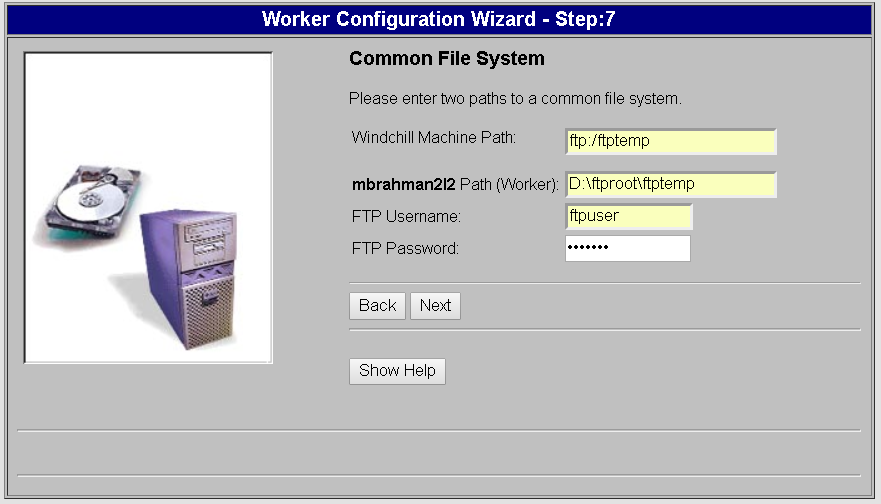
a. In Common File System, specify the details as follows:
▪ Windchill Machine Path: ftp:/<ftp_subfolder>
▪ Path (Worker): <full_Windows_path_to_subfolder>
For example, D:\ptc\Shared_ftp\test
▪ FTP Username: <ftp_username_in_filezilla>
▪ FTP Password: <ftp_password_in_filezilla>
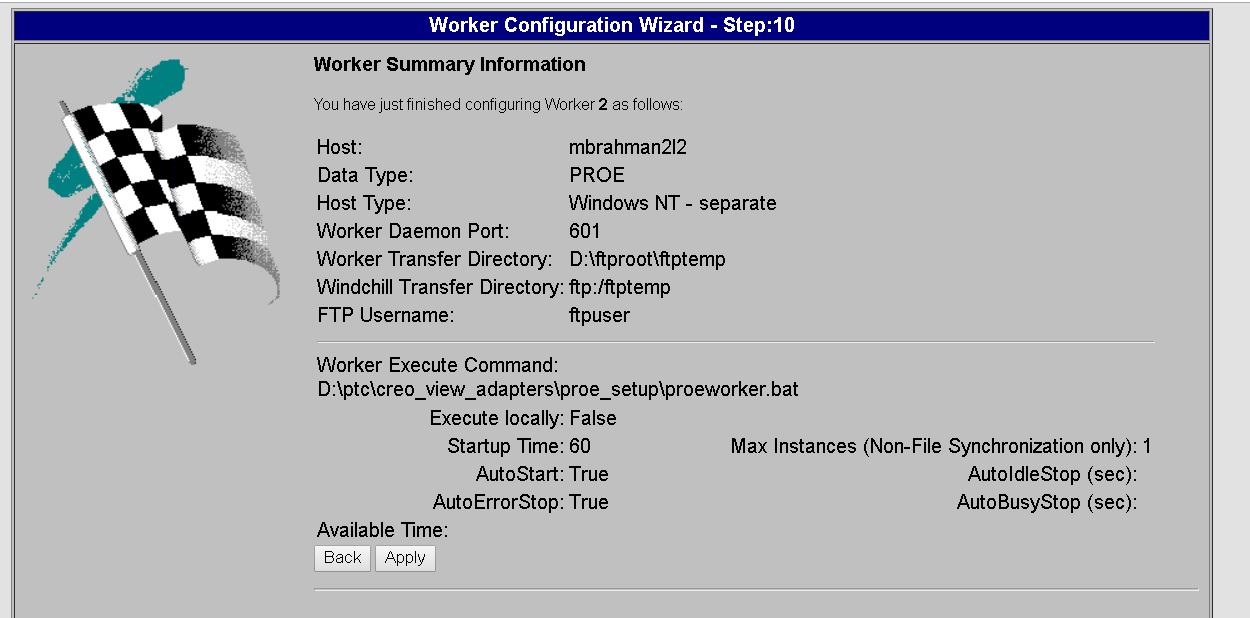
i. Click Next to display the Worker Summary Information.
j. In Worker Summary Information, click Apply.
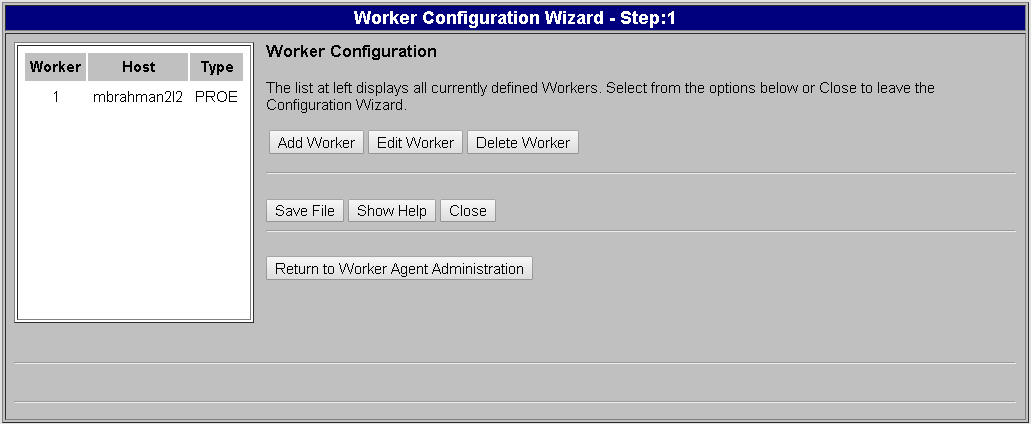
k. In the Worker Configuration, click Save File.
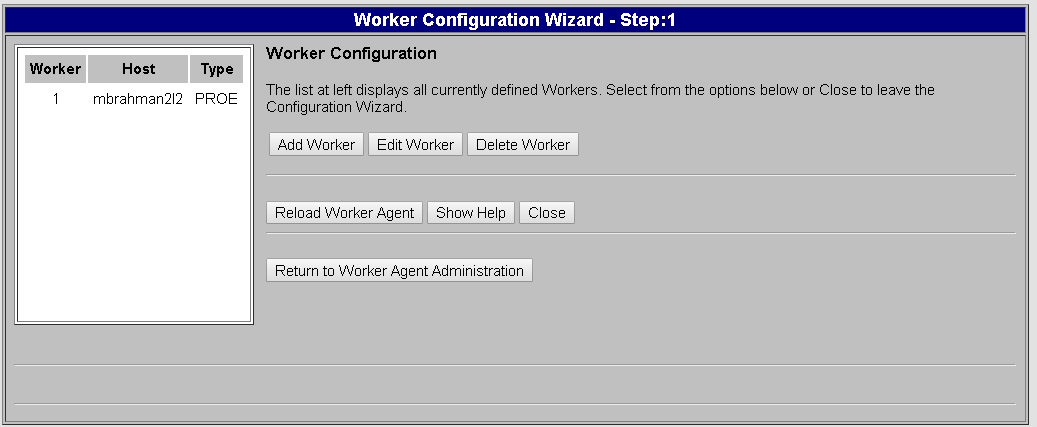
l. Click Reload Worker Agent.
m. Click Return to Worker Agent Administration. The Worker Agent Administration dialog box opens.
n. Under Actions, click the green flag. Wait for the worker to start. On successful completion, red flags are displayed.
Troubleshooting
You may encounter the following error when creating a standard control characteristic.
Following are the possible scenarios in which the error appears, and its suggested resolution:
• Model annotations are not published correctly to Windchill.
Solution: You need to ensure that the CAD Worker Is ON and running when you check in the CAD file.
• The CAD file corresponding to a downstream part is missing . This happens if you have not added a property that copies a CAD file from upstream section to downstream section during the BOM transformation process.
Solution: Add the following two properties to mpmlink.properties.xconf file located at <WindchillHome>\codebase\com\ptc\windchill\mpml\xconfs\. Propagate the changes using the Xconf Utility and restart the server.
<AddToProperty name="com.ptc.windchill.mpml.copyOver.mapsb.newBranch.create.wt.part.WTPart" value="WCTYPE|wt.part.WTPart~MBA|buildTarget@WCTYPE|wt.epm.build.EPMBuildRule"/>
<AddToProperty name="com.ptc.windchill.mpml.copyOver.mapsb.newPart.create.wt.part.WTPart" value="WCTYPE|wt.part.WTPart~MBA|buildTarget@WCTYPE|wt.epm.build.EPMBuildRule"/>
| Use Creo View 4.2 or later versions to view the model annotations in Visualization tabs. |
For related information, refer the following topics in Creo MCAD Adapters Installation and Configuration Guide:
• Introduction to the Creo View Adapter for Creo Parametric
• Troubleshooting Server Controlled Publishing