Creating ESI User Accounts and Configuring SAP for Windchill ESI
This section provides an overview on how to create a Windchill ESI user account and configure SAP distribution targets for Windchill ESI. It involves the following tasks:
• Setting up an SAP User Account for Windchill ESI
• Setting up SAP Configurations
• Configuring Document Parameters
• Configuring Change Management Parameters
• Configuring Revision Levels
• Configuring Engineering Change Management Parameters
• Configuring BOMs
• Configuring External Number Ranges for Parts, Documents, CNs, Process Plans and Resources
• Configuring the Availability Check Default Value for Different Materials in Specific Plants
• Determining the Approach to Use When Updating Routings in SAP
• Determining the Approach to Create or Updating Equipment in SAP
• Importing Custom RFCs
• Changing the Define Workcenter Application (T-CODE:DC30)
Assumptions
The instructions in the following sections make the following assumptions:
• You are acquainted with SAP interfaces and are familiar with their navigation and selection processes.
• You have administrator privileges.
|
|
Since distribution targets can be customized some of the options and screens presented in the following steps may not match what you have on your systems. Refer to the documentation provided with your systems for more specific and detailed information.
|
Setting up an SAP User Account for Windchill ESI
To set up the required SAP user account Windchill ESI use the following procedures:
• Use transaction SU01 to create a SAP user account ESISYS. Perform the following:
◦ Under the LogOn Data tab, select Communication Data for User Type. This account is valid and used only by automated RFCs to communicate with the TIBCO Adapter for SAP.
◦ Under Default Settings, establish the following date format YYYY-MM-DD and the decimal notation: 1,234,567.89 as preferences for the ESISYS account.
◦ To maintain security, do not grant a broad security authorization profile, such as SAP_ALL to the ESISYS account. Since this account is not a GUI-enabled dialog-type user account, SAP does not allow end-users to log onto the account via the SAP graphical user interface.
◦ To ensure the authorization profile complies with security policies, review the precise SAP access required by Windchill ESI with your SAP administrators. Determine the acceptable authorization profile for your particular SAP systems. For reference, the primary online transactions that correspond to the APIs used by Windchill ESI are as follows:
|
Transaction Code
|
Description
|
|
MM01
|
Create Material
|
|
MM02
|
Change Material
|
|
MM03
|
Display Material
|
|
CS01
|
Create Material BOM
|
|
CS02
|
Change Material BOM
|
|
CS03
|
Display Material BOM
|
|
CS05
|
Change BOM Group
|
|
CS06
|
Display BOM Group
|
|
CV01N
|
Create Document
|
|
CV02N
|
Change Document
|
|
CV03N
|
Display Document
|
|
CC01
|
Create Change Master
|
|
CC02
|
Change Change Master
|
|
CC03
|
Display Change Master
|
|
IE01
|
Create Equipment
|
|
IE02
|
Change Equipment
|
|
IE03
|
Display Equipment
|
|
CR01
|
Create Work center
|
|
CR02
|
Change Work center
|
|
CR03
|
Display Work center
|
|
CA11
|
Create Reference Operation Set
|
|
CA12
|
Change Reference Operation Set
|
|
CA13
|
Display Reference Operation Set
|
|
CA01
|
Create Routing
|
|
CA02
|
Change Routing
|
|
CA03
|
Display Routing
|
|
QS21
|
Creating Master Inspection Characteristics
|
|
QS23
|
Change Master Inspection Characteristics
|
|
QS61
|
Maintain Material Specification
|
Setting up SAP Configurations
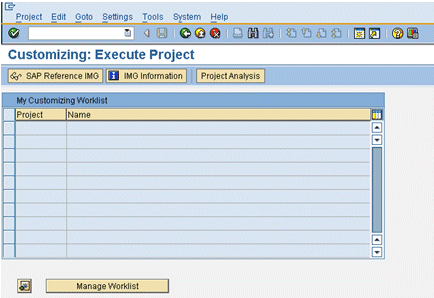
All Windchill ESI configurations are performed through the Implementation Guide for Customizing (SAP Reference IMG) interface.
1. Enter Transaction /nSPRO in the Transaction window to bring up the Implementation Guide window.
2. Click SAP Reference IMG. The following window appears:
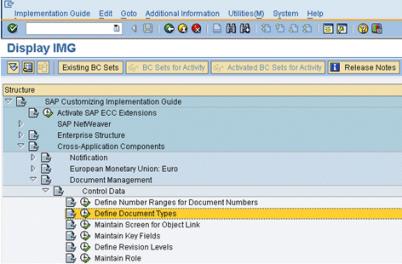
3. Navigate through this file to find all the necessary configuration screens in the following steps. Alternately, you can use the search function, CRTL+F, to search the node titles for key words.
Configuring Document Parameters
This involves defining document types. To define document types, perform these steps:
1. From the Implementation Guide for Customizing (IMG), select > > .
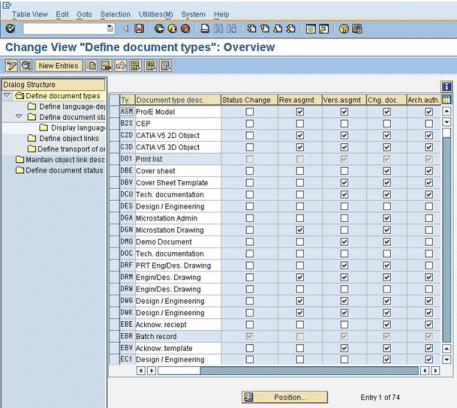
2. Select Define document types. The following window appears:
3. Deselect all indicators forWindchill ESI document types: DES, DOC, DRW, SPE, and TST.
4. Save your changes.
5. Select DES (the document type). Double-click to display details on the document types as shown in the following window:
| These descriptions are unique to each document type and do not need to be changed; however, certain fields need to be populated as shown in the preceding window. |
6. Enter the following values for these fields:
Field | Value |
Internal number range | Any valid internal number range |
External number range | Enter a valid external number range. See Configuring External Number Ranges for Parts, Documents, CNs, Process Plans and Resources.. |
Number exit | MCDOKZNR |
Vers. no. incr. | 8 |
File size | 12000000 |
Class type | 017 |
Class | CL0001 |
Document Status | Does not equal “-” (suppress field) |
Document desc. | Does not equal “-” (suppress field) |
User | Does not equal “-” (suppress field) |
Change number | Does not equal “-” (suppress field) |
7. Save changes.
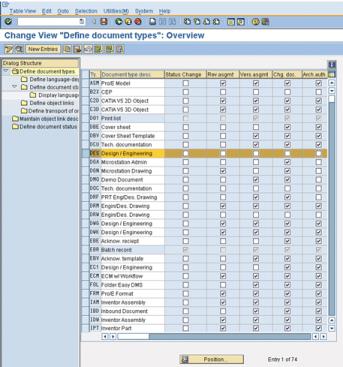
8. Press F3 to go back to the Define document types: Overview window. Repeat steps 5–7 for all the other document types: DOC, DRW, SPE, and TST.
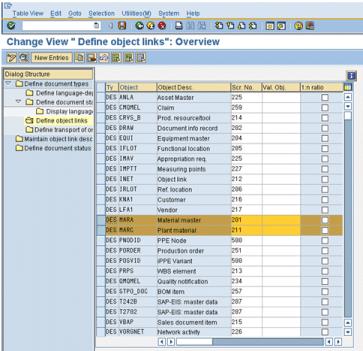
9. Press F3 to go back to the Define document types: Overview window. Highlight DES and select Define object links from the panel on the left. The following window appears:
10. Verify that MARA and MARC are listed with Scr. No. (screen numbers) 201 and 211, respectively. If they are not listed, then add the screen numbers by clicking New Entries.
| Make sure the 1:n ratio field is deselected for both MARA & MARC entries. |
11. Save changes.
12. Repeat Steps 9–11 for all the other document types: DOC, DRW, SPE, and TST.
When you are done defining all these document object links, perform the next step.
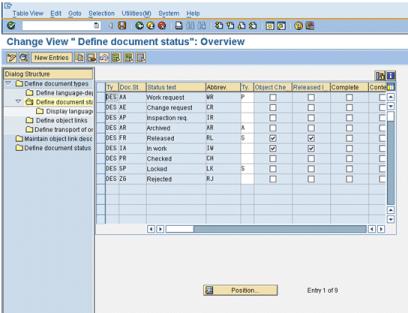
13. Press F3 to go back to the Define document types: Overview window. Select DES (Document Type) and select Define document status from the panel on the left. The following window appears:
14. Double-click Status IA. If entry IA does not appear, click New Entries and add the type IA. The following window appears:
15. Verify that the following Status IA attributes are set to:
Attribute | Value/Action |
Status type | Leave this field blank |
Object check | Selected |
Release flag | Selected |
Prev. 1 ...6 | Leave this field blank |
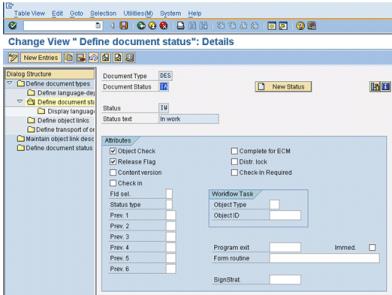
Go back to the previous window and double-click FR in the Doc.St column. If entry FR does not appear, click New Entries and add the type FR. The following window appears:
16. Verify that the following Status FRattributes are set to:
Attribute | Value/Action |
Status type | S |
Object check | Selected |
Release flag | Selected |
Prev. 1 | Leave this field blank |
Prev. 2 | Leave this field blank |
Prev. 3 | Leave this field blank |
| These are not the default values. You must change them. |
17. Verify that the document status for each document type is listed. If they are not, click New Entries to add them.
18. Repeat for each document type: DOC, DRW, SPE and TST.
19. Click Save and create a Transport Request.
| For these functional changes to take effect you must create a Transport Request. |
Configuring Change Management Parameters
Configuring Change management parameters involves the following:
• Configuring Revision Levels
• Configuring Engineering Change Management Parameters
Configuring Revision Levels
To configure the Material revision levels, perform the following procedures:
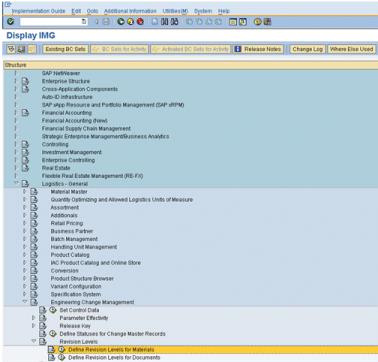
1. From the Implementation Guide window select > > , as shown in the following window:
2. Select
Define Revision Levels for Materials. The following window appears.
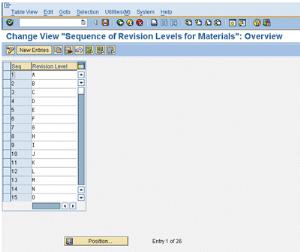
3. Verify that the numbers in the Seq (sequence) column goes up to 26 to correspond with the letters of the alphabet, A-Z. This is the default revision scheme. If you need to you can add, change or delete revision levels. Refer to your SAP documentation for details.
Configuring Engineering Change Management Parameters
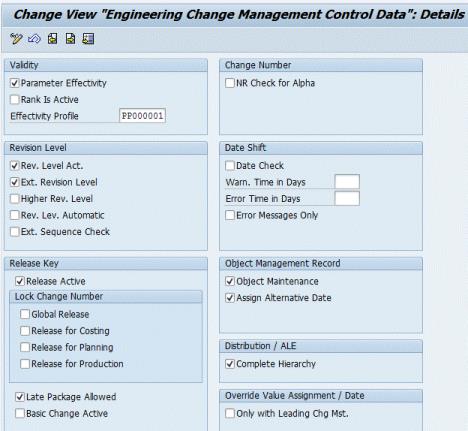
To configure Engineering Change Management parameters, perform the following steps:
1. From the Implementation Guide window select > > . The following window appears:
2. Verify the following fields are selected:
◦ Parameter effectivity
◦ Rev. level act.
◦ Ext. revision level
◦ Release active
◦ Late package allowed
◦ Object maintenance
◦ Assign alternative date
◦ Complete hierarchy
3. Save your changes.
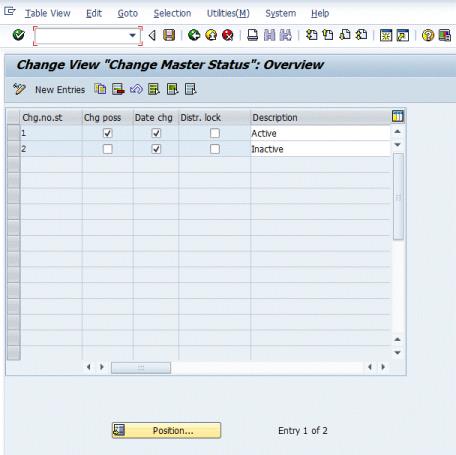
4. From the Project View window select > > . The following window appears:
5. Verify the following options for these fields are selected:
Chg.no.st 1 | Chg.no.st 2 |
Chg poss Date chg | Date chg |
Configuring BOMs
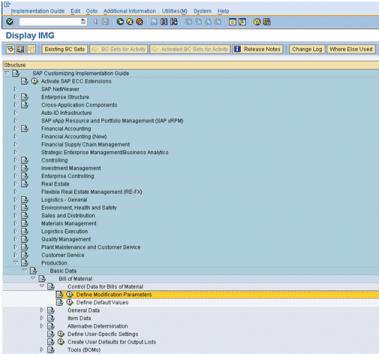
To configure BOMs, perform the following procedure:
1. From the Implementation Guide window, select > > > > , as shown in the following window:
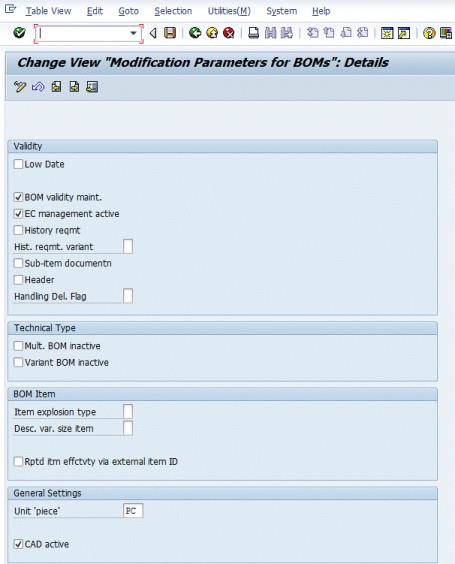
2. Select Define Modification Parameters. The following window appears:
3. Verify that the following modification parameters are selected:
◦ BOM validity maint.
◦ EC management active
◦ CAD active
and Unit 'piece' is set to PC.
Configuring External Number Ranges for Parts, Documents, CNs, Process Plans and Resources
If you would like to change the out-of-the-box SAP external number ranges listed in the following table, make sure that the Windchill PDMLink object number schemas correspond with the external number ranges specified. For information on how to configure object numbers in Windchill PDMLink refer to the Windchill Business Administrator's Guide.
Object | Internal Range | External Range |
Parts | 1 to 99,999,999 100,000,000 to 199,999,999 | A to ZZZZZZZZ |
CNs | 00,000,000,000 to 999,999,999,999 | 1 to 499,999,999,999 |
Documents | 10,000,000,000 to 9,999,999,999,999,999 10,000,000,000,000,000 to 99,999,999,999,999,999,999 100,000 to 999,999 | 1 to 99,999 1,000,000 to 9,999,999,999 |
Equipment | 00000001 to 00199999 | A to ZZZZZZZZ |
Process Plans | 50000000 to 99999999 | A to ZZZZZZZZ |
Process Materials | 1 to 99,999,999 100,000,000 to 199,999,999 | A to ZZZZZZZZ |
| In the following sections, installation and configuration instructions apply to both Windows and UNIX installations. Where Windows and UNIX differ, additional documentation is provided to show the differences. |
Configuring the Availability Check Default Value for Different Material types in Specific Plants
The following process describes how to set the Availability Check default values for materials in a specific plant:
1. Login to SAP. Use the transaction /NSPRO
| You must have the required privileges to customize the SAP instance. |
2. Select the SAP Reference IMG option and navigate to:
> > > >
3. Select Define Checking Groups Default Value.
This will display the default values for Availability Check for a given material for a specific plant.
4. In order to set the default value for a given plant and specific material type, select the New entries option.
For example, to set the Availability check value of 01 viz.. Daily requirements for material type description Finished product (FERT) in plant 1400 use the following procedure:.
1. Specify the 'Matl type' from list (For example, FERT).
2. Specify the plant from list (For example, 1400).
3. Select the required availability value (For example, 01).
4. Repeat steps 1 through 3 for all required values.
5. Save the settings.
Determining the Approach to Use When Updating Routings in SAP
There are two approaches for updating process plans (Routings):
1. Using the custom RFC ZRFC_MODIFY_ROUTING developed and owned by PTC.
2. Using CP_BD_DIRECT_INPUT_PLAN API provided by SAP. This API contains the status “Not released to customer” and therefore thorough testing should be carried out on an identical TEST environment before updating. For more information on CP_BD_DIRECT_INPUT_PLAN API refer to the following sections in the Windchill Enterprise Systems Integration Customizer's Guide - SAP:
◦ Advantages of using CP_BD_DIRECT_INPUT_PLAN
◦ Various actions tested on ECC60 SAP IDES instances.
◦ Sample test data for CP_BD_DIRECT_INPUT_PLAN
◦ Other RFC/ZRFC required to support CP_BD_DIRECT_INPUT_PLAN
You can also refer to the Windchill Enterprise Systems Integration Implementation Guide - SAP for information on the mappings and other ZRFC/RFCs required to support the CP_BD_DIRECT_INPUT_PLAN API approach.
If no issues have been found when using the CP_BD_DIRECT_INPUT_PLAN API approach in a test environment then you may continue with this approach. The following settings must be modified:
• Global variable changes:
◦ By default the ESIFlag/ use ZRFC_MODIFY_ROUTING global variable is set to “true”. ZRFC_MODIFY_ROUTING must be imported if the value is set to “true”. To continue with the CP_BD_DIRECT_INPUT_PLAN API approach you must set this value to “false”.
◦ Import the custom RFC ZRFC_OPR_LABEL. There is a limitation when using the CP_BD_DIRECT_INPUT_PLAN approach in that this API is not capable of modifying the operation label (activity /sub activity values). In order to achieve this specific functionality only, the custom RFC has been developed by PTC using BDC technology. The functionality of this custom RFC is very limited and is used to update operation labels only.
Determining the Approach for Creating or Updating Equipment in SAP
The following standard BAPIs are used to create and update an Equipment:
◦ BAPI_EQUI_CREATE
◦ BAPI_EQUI_CHANGE
There is a limitation with BAPI_EQUI_CREATE. The BAPI will not set the TASKLIST USAGE value to 009. It must invoke RFC_CALL_TRANSACTION_USING to provide the task list usage (by default it is set to 009 for Routing ). This API contains the status as “Not released to customer” and therefore thorough testing should be carried out on an identical TEST environment
If you accept to use RFC_CALL_TRANSACTION_USING then the above Equipment BAPIs can be used safely and there is no need to use ZRFC_CREATE_EQUIPMENT and ZRFC_MODIFY_EQUIPMENT.
If the BAPI approach is selected the following configurations can be set to disable the business logic to use BAPIs instead of ZRFC in order to create or update an equipment.
• Global Variable: ESIFlags/UsingZRFC
• Description: A flag for enabling the ZRFC when a not released RFC/API does not work in a production environment. ZRFC_CREATE_EQUIPMENT and ZRFC_MODIFY_EQUIPMENT must be imported if the value is set to “true”. By default this flag value is set to “true”
For more information refer to the Windchill Enterprise Systems Integration Implementation Guide - SAP.
Importing Custom RFCs
To publish process plans and tooling (of category fixture) you must use the following information and procedures.
Windchill ESI uses the following PTC developed custom RFCs:
• ZRFC_MODIFY_ROUTING
• ZRFC_CREATE_EQUIPMENT
• ZRFC_MODIFY_EQUIPMENT
| There is no standard BAPI available to associate and disassociate MIC from a Material and from an Operation. The following custom RFC have been developed to achieve these functionalities: • ZRFC_MAINTAIN_MAT_SPEC To import these zRFCs, take the appropriate files from <TIBCO_HOME>/esi/RFC/<SAP Version>/TransportRequest_MIC.zip |
When updating a routing if the CP_BD_DIRECT_INPUT_PLAN approach is used you should be using the custom RFC ZRFC_OPR_LABEL rather than ZRFC_MODIFY_ROUTING.
When deploying the solution using the Middleware Installation and Configuration Utility (MICU), the cofiles and data files are copied to the following location:
• RFC/<<SAP version>>/TransportRequest.zip
• RFC/<<SAP version>>/TransportRequest_OPR_LABEL.zip. The TransportRequest.zip file contains the source cofiles and data file for ZRFC_MODIFY_ROUTING, ZRFC_CREATE_EQUIPMENT AND ZRFC_MODIFY_EQUIPMENT. TransportRequest_OPR_LABEL.zip contains the source cofiles and data files for ZRFC_OPR_LABEL.
For example, if your SAP version is ECC6.0 then the file location is:
• <TIBCO_HOME>/esi/RFC/6.0/TransportRequest.zip.
The TransportRequest.zip file contains both the cofiles and the data files.
| If you already have these RFCs deployed from a previous Windchill release and these RFCs have been modified or customized, then importing these RFCs again will overwrite all customizations that you have done. Verify that your customizations are in the newly imported code. If not then your customizations will need to be redone. |
It is recommended that before importing the latest code, your existing customized code be saved to the transport request and these requests should be released. On releasing the transport request the cofiles and data files are generated. Backup these files.
Use the following procedure to begin creating custom RFCs, by creating transport requests:
1. Navigate to the Transport.zip file (or if the CP_BD_DIRECT_INPUT_PLAN approach is being used, TransportRequest_OPR_LABEL.zip), found in the following directory:
<TIBCO_HOME>/esi/RFC/<<SAP version 5.0/6.0>>
2. Copy the following files to the following SAP application directory path locations:
On Windows systems:
◦ K9000XX.SID to <<drive>>:\usr\sap\trans\cofiles
◦ R9000XX.SID to <<drive>>:\usr\sap\trans\data
On UNIX systems:
◦ K9000XX.SID to /usr/sap/trans/cofiles/
◦ R9000XX.SID to usr/sap/trans/data/
3. Using Telnet, copy the transport request to the cofiles and data folders of the target system. For example:
K900016.PT3 to /usr/sap/trans/cofiles/
R900016.PT3 to /usr/sap/trans/data/
4. Change the owner of the request from root:other to <sidadm>:sapsys(Only for UNIX based systems)
After you have completed this procedure, logon to the Target SAP instance in the client where you wish to import the request.
| To logon, use T-Code STMS |
Complete the following procedure:
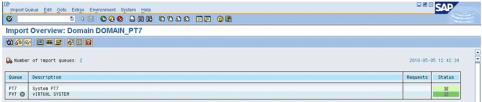
1. In the Transport Management screen click the Import and Overview icon.
2. In the Import Overview window double-click the SID to import.
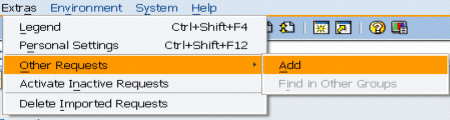
3. The transport request has not yet been added. Click > > .
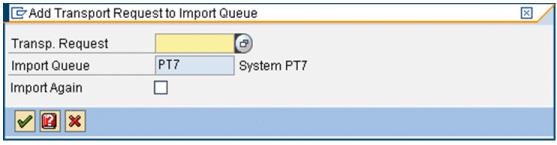
4. In the Add Transport Request to Import Queue window click F4.
5. Select the transport requests to import, and click Enter. The transport request is added to the import queue.
6. Select the transport request and click the Import Request icon.
| Do not click the Import All Requests icon. |
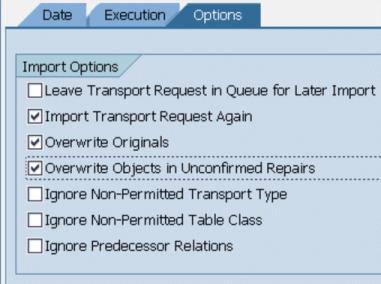
7. In theImport Transport Request window:
◦ On the Date tab change the Target Client field to 800.
◦ On the Execution tab, select the Synchronous option.
◦ On the Options tab set the import options as shown.
8. Click the green checkmark icon and click Yes to start importing.
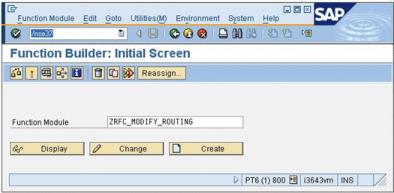
9. Once import is complete navigate to SE37 transaction in SAP, and check for the following:
◦ ZRFC_MODIFY_ROUTING
◦ ZRFC_CREATE_EQUIPMENT
◦ ZRFC_MODIFY_EQUIPMENT
10. Execute the function module.
Changing the WorkStation Application (T-CODE: DC30)
If you are using any SAP instance on which SAP Note 948177 has been implemented, use the following procedure to change the Define Workcenter Application:
1. Enter the transaction code DC30.
2. Select the application NET.
3. Apply the following suffix: *
4. Ensure that the file format is *.*