Configuring Windchill with Oracle or SQL Server
Use the following instructions to set up the cluster configuration with Oracle or an SQL server through the PTC Solution Installer. These instructions are only applicable for a new Windchill installation.
1. Decide on the host name for your Windchill cluster. This name is used in the URL for accessing Windchill.
Create an entry in the local hosts file on the machine where you are installing Windchill. The entry resolves the cluster host name to 127.0.0.1. The local hosts file can be found in the following locations:
◦ UNIX: /etc/hosts
◦ Windows: C:/WINNT/System32/Drivers/Etc/Hosts
For example, use the following line if wc-cluster.company.com is the host name of the cluster:
127.0.0.1 wc-cluster.company.com
2. Follow the instructions in the
Installing Windchill Solutions topic of the
Windchill Installation and Configuration Guide to use the PTC Solution Installer to install
Windchill solutions.
In addition to the installation instructions, apply the following:
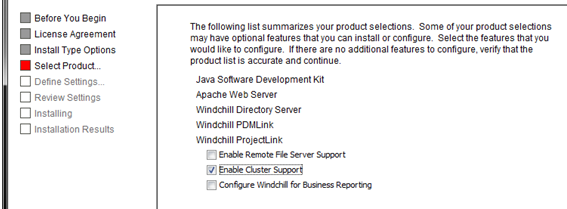
◦ Select Enable Cluster Support when adding optional features for the Windchill solution during the Select Product segment of the installation.
For example:
◦ Insert the appropriate information for the requested fields when specifying the cluster information during the Define Settings segment of the installation.
| In the Host name and IP address for each node in the cluster(space-separated list) field, also add the IP addresses of the cluster nodes to avoid any Domain Name System (DNS) problems. This field is used to populate the wt.cache.master.slaveHosts property in the wt.properties file. |
◦ Set the following values during the Define Settings segment of the installation for each field:
▪ Web Server DNS Registered Host Name: cluster host name (wc-cluster.company.com)
| This field is used to populate the wt.cache.master.slaveHosts property in the wt.properties file. |
▪ Oracle Database DNS Registered Host Name: real host name of the Oracle database server; ensure that this is a host name that all cluster nodes can access.
▪ LDAP Server DNS Registered Host Name: real host name of the LDAP server host; ensure that this is a host name that all cluster nodes can access.
In addition to the instructions, apply the following options for each field:
◦ Repository Name: use the host name for the cluster master server. For example:
master.company.com
◦ Repository Type: com.ptc.windchill
Post-Installation Steps for Configuring a Cluster
The following instructions should be performed to complete a cluster setup:
1. If you are configuring a dedicated master in the cluster, use the xconfmanager utility to set the following property:
wt.cache.master.hostname=[hostnames allowed to become a master]
2. Copy the changes to files in the Windchill, HTTP Server, and Embedded Servlet Engine directories from the master cache server to the slave cache server. To do the copy, you can use rsync or any other tool of your choice (such as robocopy).
3. Create an entry in the local hosts file on the machine where you are installing Windchill. The entry resolves the cluster host name to 127.0.0.1. The local hosts file can be found in the following locations:
◦ UNIX: /etc/hosts
◦ Windows: C:/WINNT/System32/Drivers/Etc/Hosts
For example, use the following line if wc-cluster.company.com is the host name of the cluster:
127.0.0.1 wc-cluster.company.com

