Using the Middleware Installation and Configuration Utility
This section describes how to install and configure Windchill ESI using the Middleware Installation and Configuration Utility (MICU). It is divided into the following subsections:
• Performing Preinstallation Steps : Describes the steps that must be completed before you installWindchill ESI using the Middleware Installation and Configuration Utility.
• Using the Middleware Installation and Configuration Utility (MICU) : Describes how to launch and use the MICU to install and configure Windchill ESI.
• Performing Post Installation Steps : Describes the steps that must be completed after executing the MICU.
Pre-installation Notes
Before beginning installation of Windchill ESI note the following:
• From 11.0 release onwards, SAP adapter is Java based, so there is no need for RFCSDK.
• You may be asked to replace the <version>.xml file that already exists in the folder. There is no danger in doing so and you can continue with the installation.
• If you are installing both a TIBCO Adapter for an SAP system, and a TIBCO Adapter for an Oracle system, then you must install both adapters in the same location. If you have an adapter installed already, and you would like to install the other adapter in a different location you must first uninstall the first adapter and the TIBCO Runtime Agent.
• From Windchill 10.2 M10 onwards SAP JCO 3.0.8 or higher 3.0.x is supported. SAP JCO 2.1.x is retired.
• On Windows, if you already have an older librfc32.dll in the %WINDir%\system32 directory, replace it with the one that comes with JCO.
• From Windchill 10.2 M30 onwards, all TIBCO components including, TIBCO SAP Adapter on Windows platforms, are 64bit application. SAPJCO must be of 64bit mode or flavour.
◦ SAP JCo Libraries for Design-time: Download SAP JCO 3.0.8 or higher 3.0.x from the SAP Service Marketplace.
• From Windchill 11.0 M30 onwards, all TIBCO components including, TIBCO SAP Adapter on Windows platforms, are 64 bit application. SAPJCO must be of 64 bit mode or flavour.
◦ SAP JCo Libraries for Design-time: Download 3.0.x service packs higher than 3.0.14 are supported from the SAP Service Marketplace.
• From Windchill 11.1 M20 onwards, all TIBCO components including, TIBCO SAP Adapter on Windows platforms, are 64 bit application. SAPJCO must be of 64 bit mode or flavour.
◦ SAP JCo Libraries for Design-time: Download 3.0.x service packs higher than 3.0.20 are supported from the SAP Service Marketplace.
|
|
PTC strongly recommends the use of defense-in-depth in the deployment of the TIBCO Administration web application by making this application available only within the internal corporate network and never exposed to the internet. PTC also recommends that TIBCO be hosted on a separate server within the corporate network and not on the same server hosting the Windchill application. PTC recommends not to expose the TIBCO Administration console to the internet. For more information on enabling HTTPS configuration, see section Enabling HTTPS Configuration in the TIBCO Administrator Domain below.
|
Performing Pre-installation Steps
This section describes the steps that must be completed before you install Windchill ESI using the Middleware Installation and Configuration Utility.
To prepare your system for the installation of Windchill ESI use the following procedure:
1. Create a staging directory. For example on:
Windows: D:\MICUstage
UNIX: /opt/MICUstage
2. Copy the contents of the Windchill ESI Integration Suite for <platform> CD, and the Windchill ESI Adapter for ERP CD, to this staging directory, where <platform> represents the operating system you are using. (for example, Windows or Solaris) and ERP represents the ERP System (for example, SAP or Oracle) you are using.
Using the Middleware Installation and Configuration Utility (MICU)
This section describes how to launch and use the Middleware Installation and Configuration Utility (MICU) to install and configure Windchill ESI. Windchill ESI can be installed and configured all at once (Typical) or in separate components (Custom).
During the installation process the following options are available to you:
Typical
This option enables you to install and configure theWindchill ESI middleware in its entirety. During this process you configure the ESI Business Logic and install the following components:
• TIBCO Enterprise Messaging Service
• TIBCO BusinessWorks
• TIBCO Administrator
• TIBCO Adapter for SAP or Oracle
|
|
• If not already on your system the TIBCO Runtime Agent is also installed. The TIBCO Runtime Agent is a prerequisite required for installing TIBCO BusinessWorks, TIBCO Administrator and TIBCO Adapter for SAP or Oracle.
|
|
|
Windchill ESI can be configured and deployed on multiple SAP or Oracle instances.
|
Custom
This option allows you to select components to install, including the option to configure the ESI Business Logic. The following components can be selected for installation:
• TIBCO Enterprise Messaging Service
• TIBCO BusinessWorks
• TIBCO Administrator
• TIBCO Adapter for SAP or Oracle
Installing and Configuring Windchill ESI for SAP
Use the following procedure to install and configure Windchill ESI for an SAP system:
1. Load the Windchill ESI Business Logic for SAP CD.
2. Launch the setup program from the CD.
|
|
This installer includes a virtual machine and does not require a Java Runtime Environment.
|
The setup programs are named as follows:
Windows: setup.vbs
UNIX: setup
3. On the PTC Language Selection window, use the drop-down menu to select the language to be used by Windchill ESI users. Click OK.
4. Review the Before You Begin window. This window provides information on additional prerequisites needed to complete the installation. Click Next.
|
|
Any previously installed TIBCO products will be detected by the MICU. These products are not re-installed or upgraded by the MICU.
|
5. On the Select Option window select Typical and click Next.
|
|
Selecting Custom allows you to install specific components, instead of installing all components at once. If components have already been installed they will not be available for selection.
|
6. In the Select Directory window, select the directory to install in and click Next.
The directory you select should be different from your operating system directory.
|
|
If you have selected a Custom installation method, and are installing specific components, or if you plan to deploy the EAR on multiple SAP instances, take note of the directory you have selected to install in. Any components that you choose to install at a later date must be installed in this same directory.
|
7. In the Select MICU Staging Directory window, select the staging directory you created while Performing Preinstallation Steps. Click Next.
8. In the Select TIBCO Home Directory window, select the directory in which TIBCO products are to be installed. Click Next.
|
|
If you have selected a Custom installation method, and are installing specific components, or if you plan to deploy the EAR on multiple SAP instances, take note of the directory you have selected to install in. Any components that you choose to install at a later date must be installed in this same directory.
|
9. In the ESI TIBCO Domain Properties window set the following properties.
◦ Domain Name: Choose the domain name. It is recommended that you use the same name as the host name where TIBCO is installed.
◦ Machine Name: The host name where TIBCO is installed.
◦ Domain Administrator Username: The TIBCO administrator user name. When installing TIBCO administrator software, you will be asked to enter this value.
◦ Domain Administrator Password: The TIBCO administrator password. When installing TIBCO administrator software, you will be asked to enter this value
Click Next.
10. In the ESI TIBCO Web Service Properties window set the following properties:
◦ ESI Web Service Port: Port number on which the Web Service providing the ESI ERP Part Information functionality is hosted.
Click Next.
11. In the ESI TIBCO Domain Tomcat Properties window set the following properties:
◦ HTTP Port: The recommended port number is 8426. Otherwise, enter any available port.
◦ AJP 1.3 Port: The recommended port number is 8427. Otherwise, enter any available port.
◦ Shutdown Port: The recommended port number is 8428. Otherwise, enter any available port.
◦ Apache Warp Connector Port: The recommended port number is 8429. Otherwise, enter any available port.
Click Next.
|
|
Ensure that these port numbers are not the same as those of the Windchill Tomcat server or any other servers running on this machine. To verify this run the following command:
• On Windows:
netstat | find /I "<portnumber>"
• On UNIX:
netstat | grep <portnumber>
|
12. In the ESI Middleware Mail Notification Properties window set the following properties:
◦ Mail Server: The host name of the SMTP mail server.
◦ To Email Address: The e-mail address TIBCO and Windchill ESI use to send transaction information to.
◦ From Email Address: The e-mail address TIBCO and Windchill ESI use to send transaction information from.
Click Next.
13. In the SAP JCo directories window enter the required installation directories.
Click Next.
14. In the ESI SAP Adapter Properties window enter the following properties:
◦ SAP Username: The default value is ESISYS.
◦ SAP Password: The default value is ESISYS.
◦ Locale: The default value is en_US.
Click Next.
15. In the SAP ERP Properties window set the following properties:
◦ SAP Application Server: The host name where the SAP application server is installed and setup.
◦ SAP System Number: The system number of the SAP application server.
◦ SAP System ID: The system ID of the SAP application server.
◦ SAP Client: The client of the SAP application server.
|
|
Contact your SAP Administrator if you do not have this information.
|
Click Next.
16. In the EMS Server Properties window set the following properties:
◦ EMS Server Host Name: The name of the machine where the EMS Server is installed. The default is the host name.
◦ Administrator Username:
The EMS server administrator’s user name. The default is admin.
◦ Administrator Password:
The EMS server administrator’s password. The default is admin.
Click Next.
17. In the ESI EMS Username and Password window set the following properties:
◦ ESI Middleware Queues Username: The username for the JMS queues used by TIBCO Middleware to communicate with ESI Services. The default is ESISYS.
◦ ESI Middleware Queues Password:
The password for the JMS queues used by TIBCO Middleware to communicate with Windchill ESI services. The default is ESISYS.
◦ ESI Services Queues Username: The username for the JMS queues used byWindchill ESI Services to communicate with TIBCO Middleware. The default is WCESI. This entry must match the value specified for theWindchill ESI preferences Data Response Queue User Name and Result Queue User Name.
◦ ESI Services Queues Password: The password for the JMS queues used byWindchill ESI Services to communicate with TIBCO Middleware. The default is WCESI. This entry must match the value specified for theWindchill ESI preferences Data Response Queue Password and Result Queue Password.
Click Next.
18. In the ESI EMS Queues window set the following properties:
◦ Queue name for ESI EMS Data Response: The data response queue name. The default is com.ptc.windchill.esi.DataResponse.<SAPSystem ID>.<SAP Client>. The portion of the value that occurs before the placeholders (viz., com.ptc.windchill.esi.DataResponse for the default value) must match the value specified for theWindchill ESI preference Data Response Queue Name.
◦ Queue name for ESI EMS Result:
The result queue name. The default is com.ptc.windchill.esi.Result. This entry must match the value specified for theWindchill ESI preference Result Queue Name.
Click Next.
19. In the Specify Organization Internet Domain Name window set the name of your organization. This name must be the same as the domain name entered when installing Windchill.
|
|
To find the domain name in Windchill open the following file:
• <Windchill_Home>\\installer\\WNC-installer.properties
Then look for the domain name specified in the following variable:
• WC_PROMPTED.wt.inf.container.SiteOrganization.internetDomain
|
Click Next.
20. In the Specify Application Name for Deployment window set the application name. This name must be unique for each SAP instance and is used to identify the different applications configured for different SAP instances in the TIBCO Administrator domain. Click Next.
21. Verify your settings and click Install.
|
|
During the installation of TIBCO Rendezvous on a UNIX system, if control is directed to the installer terminal and sudo/root password is asked, specify sudo/root credentials to continue TIBCO installation.
|
Providing Root User Privileges to the TIBCO Hawk Agent Process (UNIX Systems Only)
On UNIX systems you must set the root user as the owner for the TIBCO Hawk agent. Also, the Hawk HMA process must have the same set of rights as a root user. To achieve this, execute the following commands as a root user:
chown root
<<Tibco_Home>>/hawk/<version>/bin/tibhawkma
chmod u+s
<<Tibco_Home>>/hawk/<version>/bin/tibhawkma
Additionally, you must resolve the library dependency of the tibhawkma file. To do this on:
• HPUX v3: Update the /etc/dld.sl.conf file and add <<Tibco_Home>>/tibrv/<version>/lib to the list. Then run the following command:
chmod 744 /etc/dld.sl.conf
• On Solaris: Run the following command:
crle -64 -s <<Tibco_Home>>/tibrv/<version>/lib
• On Linux: Update the /etc/ld.so.conf file and add <<Tibco_Home>>/tibrv/<version>/lib to the list. Then run the following command:
ldconfig
Providing Installation User Privileges to the TIBCO Rendezvous Process (UNIX Systems Only)
On UNIX systems, you must set the installation user as the owner for the TIBCO and TIBRV related files and folders. To achieve this, execute the following command as a root user:
chown <<installation_user>> -R <<TIBCO_HOME>>
Common Installation and Configuration Errors
The following errors could cause problems during the installation and configuration process. Should you have difficulty completing any installation or configuration steps refer to the following for a possible cause:
• The removal and cleaning up of previous versions of TIBCO software was not completed properly.
• Inconsistent domain names were specified while using the custom installation option during multiple runs of the MICU.
• When installing some components on one machine and the remaining components on another machine errors may occur if you set ESISAPAdapter/JMSProviderURL to localhost. Use the EMS server hostname instead. (SAP only)
• Same application name used while deploying.
• Incorrect logon credentials (ERP/EMS/Admin).
• An additional Hawk service is running on UNIX platforms.
• Java parameters not set during manual deployment.
• Incorrect Java version in use. TIBCO installer fails to launch with an exit code 1 if the Java version is incompatible.
• Incorrect SAPJCo libraries are being used (SAP only).
• Incorrect CDs are being used. This often occurs during Solaris installations.
• Not enough space in the temporary installation directories, especially when using VMware machines.
• There is a space in the installation folder name. For example, C:\ptc\esi_10.0\TIBCO Install.
• A Windchill ESI solution deployment error message is displayed during deployment on Solaris SPARC11 using Windchill 11.0 ESI Business Logic for SAP, for the following reasons:
◦ The server is down
◦ The server is too busy to respond
Run the following command from the command prompt: <TIBCO_HOME>/esi/bin/ESILookups.properties/TIBCO-HOME/tibco/tra/5.10/bin/AppManage -deploy -ear /TIBCO-HOME/tibco/esi/ear/ESI_SAP_TIB_11_F00_23.ear -deployconfig/TIBCO-HOME%/template/SAP-deployment_template.xml -app SAP_ESI_Solution -domain domain-name -user admin -pw admin
Alternatively, navigate to the directory: <TIBCO_HOME>/tibco/tra/5.10/bin and run the following command from the command prompt: ../AppManage -deploy -ear %TIBCO-HOME%/tibco/esi/ear/ESI_SAP_TIB_11_F00_23.ear -deployconfig %TIBCO-HOME%/template/SAP-deployment_template.xml -app SAP_ESI_Solution -domain domain-name -user admin -pw admin
Configuring Enterprise Messaging Service
Perform the following steps to configure the EMS:
1. Start TIBCO EMS administrator:
a. Change directory to <ems_home>/bin/
b. Execute ./tibemsadmin64
|
|
For TIBCO EMS administrator the default username is admin and password is <press Enter>
|
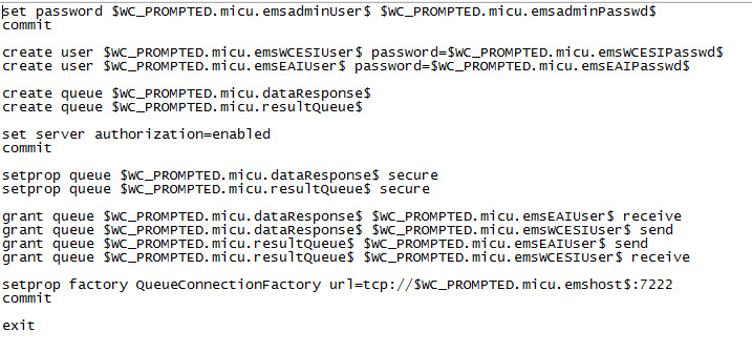
2. Open EMS_ESI_Config.src file from <TIBCO_home>/Conf folder:
Sample file:
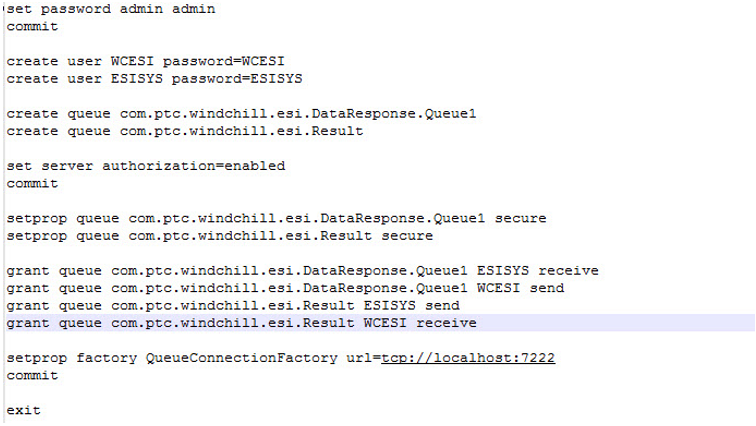
3. Provide SID or instance name for creating a queue. For example, queue 1
Sample file:
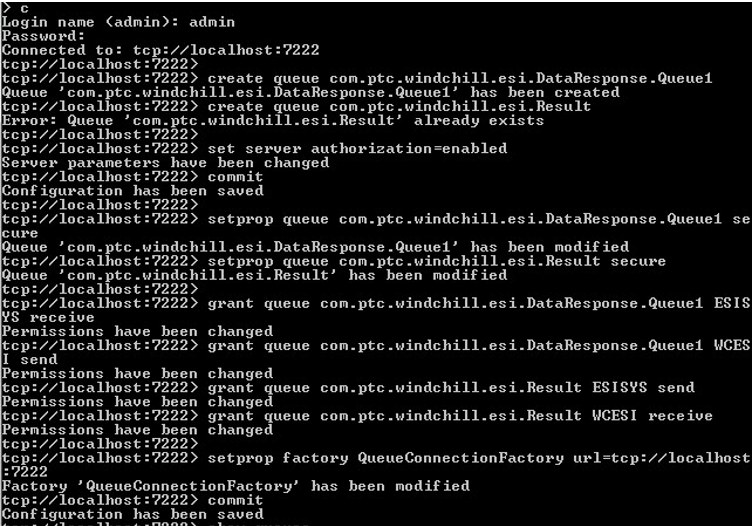
4. Configure the EMS and create queue by running all the commands from EMS_ESI_config.src file from TIBCO EMS administrator.
Sample file:
5. After successful creation of queues check queues and connection details using following commands:
◦ Show connections- Displays list of connections.
◦ Show queues- Displays list of queues.
Sample file:
Performing Post Installation Steps
This section describes the steps that must be completed after executing the MICU.
Enabling HTTPS Configuration in the TIBCO Administrator Domain
For instructions on enabling HTTPS configuration for the TIBCO Administrator Domain, refer to the TIB_TRA_<<version>>_domain_utility_usr.pdf file located at <<TIBCO_HOME>>/TRA/<<version>>/doc/pdf. Here, <<TIBCO_HOME>> refers to the location where TIBCO is installed. Specifically, see the section titled Enabling HTTPS for a Domain in the chapter Machine Management and Domain Configuration.
Enabling Cookie Attribute SameSite and Secure for TIBCO Administrator Domain
This section describes the procedure for enabling the cookie attributes SameSite and Secure in the TIBCO Administrator Domain.
Configure Secure Cookie Attribute
To configure the Secure cookie attribute in the TIBCO Administrator Domain, you must first enable HTTPS. After the HTTPS is enabled, the Secure attribute is automatically set. For more information on the procedure to enable HTTPS, see the section Enabling HTTPS Configuration for the TIBCO Administrator Domain above.
Configure SameSite Cookie Attribute
To set the SameSite cookie attribute, update the context.xml file by adding the element <CookieProcessor sameSiteCookies="strict" /> under the context parent and restart your Admin server. The context.xml file is available at the following location:
<<TIBCO_HOME>>/administrator/domain/domainname/tomcat/conf/context.xml.
Here, <<TIBCO_HOME>> refers to the location where TIBCO is installed.
For example:
<Context>
<!-- Default set of monitored resources -->
<WatchedResource>WEB-INF/web.xml</WatchedResource>
<!-- Uncomment this to disable session persistence across Tomcat restarts -->
<!-- -->
<Manager pathname="" />
<JarScanner scanManifest="false" scanBootstrapClassPath="false" scanClassPath="false" scanAllFiles="false" scanAllDirectories="false"/>
<CookieProcessor sameSiteCookies="strict" />
</Context>
Password Obfuscation (Optional)
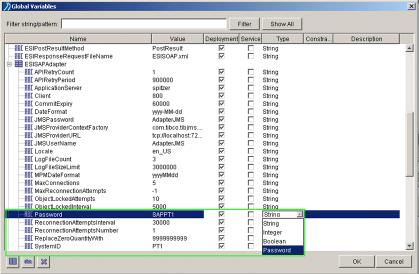
Use this procedure to hide password values displayed in some global variables.
1. Open the project in TIBCO designer.
2. Select the Global Variables tab.
3. Click the pencil icon to modify one or more global variables.
4. Select the appropriate global variable and change the Type to Password. The default type is String. Retype the Value for that global variable. The password is now obfuscated.
5. Save the project.
6. Generate a new EAR.
7. Manually deploy the new EAR from the TIBCO Administrator window.
How to Check if the Web Service for ERP Part Information is Working
If exceptions are being thrown when you try to access ERP cost details for a part, it could mean one of the following; Either the web service hasn't been configured properly, or the service is not running in the background. The following procedure describes how to check for these issues:
Go to the preferences section and click on the pencil icon to see if the web service can be accessed. You should see a WSDL being used for fetching part costs. In case you face problems with the web service, verify the following:
1. Verify that the port on which the web service is running is not blocked. For example, a firewall, intruder detection software, or virus scan software could be blocking the web service. If it is being blocked, change the appropriate settings to permit data traffic on this port or use an open port for the web service.
2. Verify that the port is not being used by another application. If it is being used by another application, use another open port.
Publishing Documents with Cross-Referencing Values
In order to publish documents successfully with cross-referencing values, you must update the file <TIBCO_HOME>\esi\bin\ESILookups.properties with the Domain Name Value for each Windchill document type. The default value for the domain is PTCNET. For more information refer to the following comment in the ESILookups.properties file:
| Cross-referencing refers to the use of ERP equivalents for the data that comes from Windchill. |
• # CROSS REFERENCING VALUES FOR DOCUMENTS
For example the line:
Type.WCTYPE|wt.doc.WTDocument| <InternetDomain>.Plan$$Document.*.*=DOC
may be modified to read as follows:
Type.WCTYPE|wt.doc.WTDocument|com.ptc.ptcnet.Plan$$Document.*.*=DOC
Prerequisites for Publishing Operations
In order to successfully publish operations the work centers that are associated with the operations in a process plan need to exist in the SAP system. Work centers need to be defined with the standard SAP2 key. Other standard keys are only supported if they have similar types of times (setup time, processing time, labor time, standard queue time, standard move time, max wait time) defined.
Updating ESILookups.properties and ESIDefaults.properties
Refer to the <<TIBCO_HOME>>/esi/bin/ESILookups.properties and <<TIBCO_HOME>>/esi/bin/ESIDefaults.properties files to update the default settings as per your requirements.
BusinessWorks Configuration Settings
To configure BusinessWorks use the following procedure:
1. Backup the following file:
<<TibcoHome>>/designer/<<version>>/bin/designer.tra
2. In a text editor, open the following file:
<<TibcoHome>>/designer/<<version>>/bin/designer.tra
3. Search for the following string:
tibco.env.CUSTOM_CP_EXT
4. Replace that string with the following:
tibco.env.CUSTOM_CP_EXT %RV_HOME%/lib/tibrvj.jar:%RV_HOME%/lib:%RV_HOME%/lib/64:
| There may be additional folders on the path. Keep these entries when replacing the string. |
5. Search for the following string:
tibco.env.CUSTOM_LIB_PATH
6. Replace that string with the following:
tibco.env.CUSTOM_LIB_PATH %RV_HOME%/lib:%RV_HOME%/lib/64:
| There may be additional folders on the path. Keep these entries when replacing the string. |
7. Save and close designer.tra
8. Open TIBCO Designer and start the process archive.
Manually Deploying the ESI EAR
By default MICU deploys the ESI EAR. However, in some cases, as when you are deploying custom business logic, or supporting multiple SAP instances you may need to manually deploy the newly generated EAR.
To manually deploy the EAR using the TIBCO Administrator use the following procedure:
1. In a browser window login to the TIBCO Administrator in GUI mode using http://Administratorhostname:8426. For example: http://localhost:8426
2. In the TIBCO Administrator click Application Management.
3. Click New Application.
4. Browse to and select the following EAR:
◦ <TIBCO_HOME>/esi/ear/ESI_SAP_TIB_5_6_EAR_10_0_<BuildNumber>.ear” )
5. Click OK.
6. Ensure that ProcessArchive.par displays the target as a BusinessWorks host machine, and that ESISAPAdapterConfiguration.aar displays the target as AdapterHostMachine.
7. Click Save.
| The deployment name string can only be modified from the "-" symbol on. The string content before that symbol is the domain name. For example, if the Deployment Name text box displays i2607 - SAP then: • i2607 is the domain name • SAP is the deployment name |
8. In the Configuration Builder window click SAP. This is the application name.
9. Click the Advanced tab.
10. Modify the ESIJMS and ESISAPAdapter variable groups and the ESIDirectory variable. For more information see Windchill ESI Preferences, Distribution Target Attributes and Global Variable Groups.
| Ensure that • "/" is used as a path separator and that the ESIDirectory path is terminated by "/" . • <ESISAPAdapter/SystemID>/.<ESISAPAdapterClient> is appended to the value of the global variable ESIJMS/DataResponseQueue. • The JMS URL in ESIJMS/JNDIContextURL and ESISAPAdapter/JMSProviderURL, has the relevant hostname instead of “localhost”. |
11. Click Save.
12. Click > .
13. Increase the Heap Size, Set Maximum Heap Size (MB) and Java Thread Stack Size (KB) to 512 or higher.
14. Click Save.
15. Click > > > > > > and set the existing value to a higher value (for example, 6), then add adr3.locale to UTF8.
16. Click Save.
17. ClickDeploy and then OK.
| If the EAR was deployed manually you need to configure the EMS appropriately. |
Configuring the EMS
To configure the EMS when the EAR has been deployed manually use the following commands in the EMS Administration Tool window:
• Replace <ESIDataResponse>, <EAIUser>, <WCESIUser> and the remaining variables with the applicable values such as com.ptc.windchill.esi.DataResponse.TSTA, ESISYS, WCESI and so on.
• create user <WCESIUser> password=<WCESIPassword>
• create user <EAIUser> password=<EAIPassword>
• create queue <ESIResult>
• create queue <ESIDataResponse>
• set server authorization=enabled
• setprop queue <ESIDataResponse> secure
• setprop queue <ESIResult> secure
• grant queue <ESIDataResponse> <EAIUser> receive
• grant queue <ESIDataResponse> <WCESIUser> send
• grant queue <ESIResult> <EAIUser> send
• grant queue <ESIResult> <WCESIUser> receive
• setprop factory QueueConnectionFactory url=tcp://<JMSServer>:7222
• commit


