モデルサブクラス処理用の PSB のカスタマイズ
目的
カスタムのモデルビジネスオブジェクトはすでに作成済みです。ここでは、モデルサブクラスを完全にサポートするように PSB をカスタマイズします。
範囲/適用可能性/前提条件
モデルサブクラスを別に作成してあります。
予測される結果
モデルサブクラスのインスタンスは、デフォルトのモデルオブジェクトと同様に、PSB によって検出され、表示されます。
ソリューション
以下の 3 つの領域に変更を加えます。
• LogicalAttributes.xml
• PSB テーブルおよびパネル
• カスタマイズされたコマンド代理
前提となる知識
この目的を達成するには、次のことを理解している必要があります。
• XML ファイルのカスタマイズの管理
• RBINFO ファイルのカスタマイズの管理
ソリューションエレメント
|
エレメント
|
タイプ
|
説明
|
|
LogicalAttributes.xml
|
XML ファイル
|
"論理フォーム" からそれに対応する "外部フォーム" へのモデル属性マッピングを設定するために使用されます。
|
手順 - モデルサブクラス処理用の PSB のカスタマイズ
このセクションは次のトピックで構成されます。
• LogicalAttributes.xml
• PSB テーブルおよびパネル
• カスタマイズされたコマンド代理
LogicalAttributes.xml
<Windchill>/codebase にある LogicalAttributes.xml ファイルは、"論理フォーム" からそれに対応する "外部フォーム" へのモデル属性マッピングを設定するために使用されます。カスタムモデルサブタイプを作成した後、参照属性 TSPart (カスタムモデルサブタイプ) のマッピングエントリをターゲットサーバーの LogicalAttributes.xml ファイルに追加しなければなりません。更新する前に、カスタマイズしたファイルを安全領域に移動し、変更をターゲットサーバーで適用する必要もあります。新規カスタムモデルサブタイプを作成するとき、デフォルトの LogicalAttributes.xml ファイルを更新する代わりに、新規 LogicalAttributes.xml ファイルを作成し、新規カスタムモデルタイプに関連付けるモデル属性マッピングのエントリをそれに含めます。新規作成された LogicalAttribute.xml ファイルのパスを、xconf を使用して wt.properties の com.ptc.core.meta.common.impl.LogicalIdentifierFactory.translatorSelectors プロパティに追加しなければなりません。マッピングは、オブジェクト間の関連付けを表すすべてのモデル属性に対して必要となります。たとえば、WTPart と WTPartMaster との間の参照に関して定義されたエントリは、次のようになります。
<Class name="wt.part.WTPart">
<Property>
<LogicalForm>defaultUnit</LogicalForm>
<ExternalForm>MBA|masterReference^WCTYPE|
wt.part.WTPartMaster~MBA|defaultUnit</ExternalForm>
</Property>
<Property>
<LogicalForm>masterReference</LogicalForm>
<ExternalForm>MBA|masterReference^WCTYPE|
wt.part.WTPartMaster</ExternalForm>
</Property>
<Property>
<LogicalForm>name</LogicalForm>
<ExternalForm>MBA|masterReference^WCTYPE|
wt.part.WTPartMaster~MBA|name</ExternalForm>
</Property>
<Property>
<LogicalForm>number</LogicalForm>
<ExternalForm>MBA|masterReference^WCTYPE|
wt.part.WTPartMaster~MBA|number</ExternalForm>
</Property>
<Property>
<LogicalForm>organizationReference</LogicalForm>
<ExternalForm>MBA|masterReference^WCTYPE|
wt.part.WTPartMaster~MBA|organizationReference^WCTYPE|
wt.org.WTOrganization</ExternalForm>
</Property>
<Property>
<LogicalForm>organizationName</LogicalForm>
<ExternalForm>MBA|masterReference^WCTYPE|
wt.part.WTPartMaster~MBA|organizationReference^WCTYPE|
wt.org.WTOrganization~MBA|name</ExternalForm>
</Property>
<Property>
<LogicalForm>usedLineNumber</LogicalForm>
<ExternalForm>MBA|masterReference^WCTYPE|
wt.part.WTPartMaster~MBA|uses@WCTYPE|
wt.part.WTPartUsageLink~MBA|
lineNumber.value</ExternalForm>
</Property>
<Property>
<LogicalForm>usedLink</LogicalForm>
<ExternalForm>MBA|masterReference^WCTYPE|
wt.part.WTPartMaster~MBA|uses@WCTYPE|
wt.part.WTPartUsageLink</ExternalForm>
</Property>
</Class>
ext.cust.CustPart が wt.part.WTPart を拡張し、ext.cust.SubPartMaster が wt.part.WTPartMaster を拡張する例を使用する場合は、<Windchill>/codebase/LogicalAttributesSite.xml という名前のサイト固有のファイルに次のコード行を追加する必要があります。
<Class name="ext.cust.CustPart">
<Property>
<LogicalForm>defaultUnit</LogicalForm>
<ExternalForm>MBA|masterReference^WCTYPE|
ext.cust.SubPartMaster~MBA|defaultUnit</ExternalForm>
</Property>
<Property>
<LogicalForm>masterReference</LogicalForm>
<ExternalForm>MBA|masterReference^WCTYPE|
ext.cust.SubPartMaster</ExternalForm>
</Property>
<Property>
<LogicalForm>name</LogicalForm>
<ExternalForm>MBA|masterReference^WCTYPE|
ext.cust.SubPartMaster~MBA|name</ExternalForm>
</Property>
<Property>
<LogicalForm>number</LogicalForm>
<ExternalForm>MBA|masterReference^WCTYPE|
ext.cust.SubPartMaster~MBA|number</ExternalForm>
</Property>
<Property>
<LogicalForm>organizationReference</LogicalForm>
<ExternalForm>MBA|masterReference^WCTYPE|
ext.cust.SubPartMaster~MBA|organizationReference^WCTYPE|
wt.org.WTOrganization</ExternalForm>
</Property>
<Property>
<LogicalForm>organizationName</LogicalForm>
<ExternalForm>MBA|masterReference^WCTYPE|
ext.cust.SubPartMaster~MBA|organizationReference^WCTYPE|
wt.org.WTOrganization~MBA|name</ExternalForm>
</Property>
<LogicalForm>usedLineNumber</LogicalForm>
<ExternalForm>MBA|masterReference^WCTYPE|
ext.cust.SubPartMaster~MBA|uses@WCTYPE|
wt.part.WTPartUsageLink~MBA|
lineNumber.value</ExternalForm>
</Property>
<Property>
<LogicalForm>usedLink</LogicalForm>
<ExternalForm>MBA|masterReference^WCTYPE|
ext.cust.SubPartMaster~MBA|uses@WCTYPE|
wt.part.WTPartUsageLink</ExternalForm>
</Property>
</Class>
PSB テーブルおよびパネル
新規のモデル属性を LogicalAttributes.xml ファイルに追加する必要はありませんが、適切な PSB 設定の XML ファイルに追加する必要があります。
|
|
サブクラスオブジェクトに関してのみ定義された新規のモデル属性を指定する場合は、"wt.part.WTPart" コンテキストで定義された、対応する "AttributeGroup"、"AttributeTable"、または "Table" を適切なサブクラスコンテキストにコピーする必要があります。
|
リストしなければならないのは、新規モデル属性のみです。「名前および番号」などの既存の属性は、WTPart から継承されます。
継承される属性をサブクラスパネルから除去するには、次のように <Placement remove="true"/> を使用します。
<AttributeDefinition id="contextName”>
<Placement remove="true"/>"
</AttributeDefinition>
カスタマイズされたオブジェクトのエレメントグループを追加する場合は、既存のファイルを編集するのではなく、カスタマイズされたすべての変更を別のファイルに挿入するのが賢明です。これらには、CustomExplorerForTablesAndPanels.xml などの統一性のある名前を付けてください。
ext.cust.CustPart が wt.part.WTPart を拡張する前述の例を使用する場合は、次の AttributeGroup
<ExplorerElementGroup>
<LogicContext application="ptc.wnc.StructureExplorer"
dataType="wt.part.WTPart"/>
<AttributeGroup id="ptc.wnc.exp.ViewPropertiesPanel" displayMode="view">
<CellDefinition id="number">
<AttributeDefinition attributeId="number"/>
</CellDefinition>
<CellDefinition id="organizationIdentifier">
<AttributeDefinition attributeId="organizationIdentifier"/>
</CellDefinition>
<CellDefinition id="name">
<AttributeDefinition attributeId="name"/>
</CellDefinition>
<CellDefinition id="versionIterationView">
<AttributeDefinition attributeId="versionIterationView"/>
</CellDefinition>
...
</AttributeGroup>
</ElementGroup>
を次のように ext.cust.CustPart の LogicContext の下にコピーします。
<ExplorerElementGroup>
<LogicContext application="ptc.wnc.StructureExplorer"
dataType=" ext.cust.CustPart "/>
<AttributeGroup id="ptc.wnc.exp.ViewPropertiesPanel" displayMode="view">
<!-- name and number will inherit from WTPart -->
<!-- adding new modeled attributes here -->
<CellDefinition id="intMBA">
<AttributeDefinition attributeId="intMBA"/>
</CellDefinition>
...
</AttributeGroup>
</ElementGroup>
カスタマイズされたコマンド代理
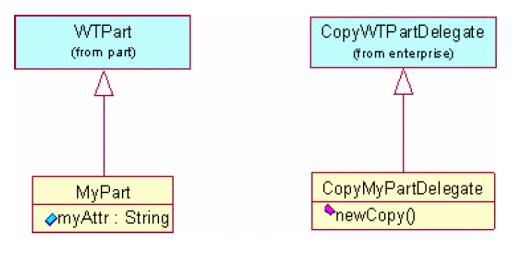
PSB では、一部の操作を制御するために Command/CommandDelegate マッピングが使用されます。その最も顕著な例は "コピー操作" です。カスタマイズされたクラスを "コピー" するには、適切なコピー代理をサブクラス化する必要があります。"CustPart" の場合は、wt.enterprise.CopyWTPartDelegate のサブクラスであるクラスを作成して、カスタマイズされたモデル属性のコピーを処理する必要があります。
カスタムクラス向けコピー委任の作成
デフォルトのビジネスオブジェクト (部品など) をカスタマイズしてモデルサブクラスを作成する場合は、部品がコピー (または複製) されたときに追加のモデル属性が正しく処理されるように、カスタムコピー代理クラスを作成および設定する必要があります。
このドキュメントでは、カスタム部品クラス "MyPart" が単一の文字列属性 "myAttr" を使用して wt.part.WTPart を拡張するという単純な例に基づいた手順を示します。
コピー委任の作成
図に示すとおり、wt.enterprise.CopyWTPartDelegate を拡張して、その newCopy() メソッドをオーバーライドすることは簡単です。これを行う目的は、任意のカスタム属性、この例の場合は myAttr を処理することです。このメソッドは次のように実装されています。
public final RevisionControlled newCopy( RevisionControlled object
)throws WTException {
//##begin newCopy%461E645C0050f.body preserve=yes
if (object == null) return null;
MyPart new_copy = (MyPart) super.newCopy(object);
MyPart original = (MyPart) object;
String my_attr = original.getMyAttr();
if (my_attr != null) {
try {
new_copy.setMyAttr(original.getMyAttr());
}
catch (WTPropertyVetoException e) {
throw new WTException(e);
}
return new_copy;
//##end newCopy%461E645C0050f.body
}
コピー委任の作成
コピー委任の設定
Windchill がカスタムのコピー委任 CopyMyPartDelegate を MyPart のコピー委任クラスとして使用するように指定するには、コンフィギュレーションファイル <Windchill インストールディレクトリ>/codebase/wt/enterprise/EnterpriseServerDelegate.properties に次の行を挿入しなければなりません。
wt.services/svc/default/wt.enterprise.CopyDelegate/null/<my-
package>.MyPart/0=<mypackage>.
CopyMyPartDelegate/singleton
カスタマイズポイント
ローカライズ可能なラベルおよび列挙のカスタマイズ
各モデルオブジェクトには、オブジェクトの生成時に作成される RBINFO ファイルが関連付けられています。このファイルには、PSB で属性および列のラベルとして使用される、ローカライズされた文字列が保存されています。ラベルを変更する必要がある場合は、それに対応する RBIFNO ファイルを編集します。たとえば、属性 "booleanMBA" のラベルを変更するには、ファイル CustPartModelRB.rbInfo で以下の行を編集します。
CustPart.booleanMBA.value=New Label for booleanMBA
モデル化された列挙は、PSB でドロップダウンメニューとしてレンダリングされた場合、列挙の内部値が表示します。ドロップダウンメニューに表示されるラベルを変更するには、列挙に対応する RBINFO ファイルを編集する必要があります。たとえば、"apple"、"dog"、"cat" という値を使用して "public final class MyEnum extends EnumeratedType" というクラスを生成した場合に、ドロップダウンメニューの表示値を変更するには、ファイル MyEnumRB.rbInfo を次のように編集します。
# Entry Contents
apple.value=Apples
dog.value=Dogs
cat.value=Cats