カスタムナビゲーション基準フィルタの作成
「フィルタを編集」ウィンドウにカスタムフィルタタブを追加するには、次の手順に従います。
1. Windchill シェルを開き、次のコマンドを実行して、カスタムフィルタを表すタイプをロードします。
windchill wt.load.LoadFromFile -d %WT_HOME%\loadFiles\type\CustomFilter.xml
これにより、「タイプおよび属性の管理」の UI に wt.filter.custom.CustomFilter がロードされます。
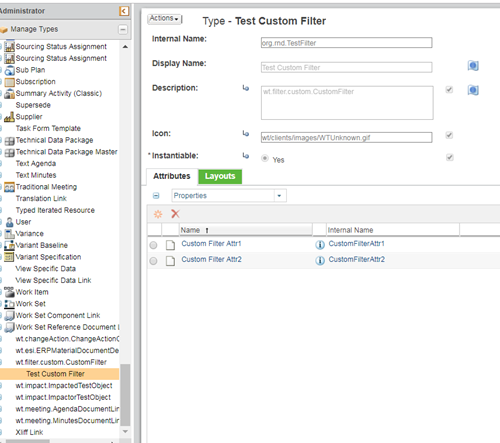
2. 「タイプおよび属性の管理」の UI を使用して、org.rnd.TestFilter などの内部名を持つ wt.filter.custom.CustomFilter のサブタイプを作成し、インスタンス化属性を Yes に設定します。
3. 「属性」タブから、ステップ 2 で作成した org.rnd.TestFilter タイプに属性を追加します。これらの属性は、必要に応じてカスタムフィルタを表します。また、「レイアウト」タブからこれらの属性を 1 つ以上のグループとデフォルトのレイアウトに適宜追加します。作成したグループごとに「ローカライズ」オプションを使用してグループ名を指定し、オプションで説明を指定します。
4. ModuleName- service.properties.xconf ファイルでエントリを追加し、ステップ 2 で定義した wt.filter.custom.CustomFilter のサブタイプの内部名を変更します。
<!-- Uncomment to enable using a Custom Filter
<Option requestor="null" cardinality="singleton"
selector="WCTYPE|wt.filter.custom.CustomFilter| |<<Custom Filter Subclass>>"
serviceClass="com.ptc.expansionui.client.ui.renderers.DefaultCustomFilterRenderer"/> -->
<!-- Uncomment to enable using a Custom Filter
<Option requestor="null" cardinality="singleton"
selector="WCTYPE|wt.filter.custom.CustomFilter| |<<Custom Filter Subclass>>"
serviceClass="com.ptc.expansionui.server.validators.DefaultCustomFilterTabValidator"/> -->
5. DefaultCustomFilterTabValidator はデフォルトのバリデータです。このバリデータを使用するか、NavigationCriteriaTabValidator または DefaultCustomFilterTabValidator を使用してバリデータをオーバーライドします。
6. moduleName-wt.properties.xconf ファイル内の以下のエントリにエントリを追加し、フィルタの表示順序を示す数値に xx を置き換えます。
<!-- Uncomment to enable using a Custom Filter
<Property name="NavigationCriteria.filters.order.xx"
default="WCTYPE|wt.filter.custom.CustomFilter|<<Subtype Name>> "/> -->
7. 上記の変更を行った後、Windchill シェルから次のコマンドを実行します。
xconfmanager –Fp
8. メソッドサーバーを再起動します。
カスタムフィルタ委任の設定
Windchill には、フィルタ中にカスタムフィルタ属性を処理するための委任が用意されています。この DefaultCustomFilterDelegate は、IBA の値に基づいてフィルタを実行します。フィルタオブジェクト (この場合は部品) にソフト属性の値が含まれている場合にのみ、この委任はフィルタのためのチェックを行います。DefaultCustomFilterDelegate を使用することも、この委任をオーバーライドしてカスタム委任を指定することもできます。サービスプロパティを使用して、この委任を設定します。XCONF ファイルを作成するか修正して、適切な新しいプロパティ値が含まれるようにします。
<?xml version="1.0" encoding="utf-8"?>
<!DOCTYPE Configuration SYSTEM "xconf.dtd">
<Configuration targetFile="codebase/typedservices.properties">
<Service context="default" name="wt.filter.NavigationFilterDelegate2">
<Option cardinality="singleton" requestor="null"
serviceClass="wt.filter.custom.DefaultCustomFilterDelegate"
selector="WCTYPE|wt.filter.custom.CustomFilter|<<Custom Filter Subclass>>"/>
</Service>
xconfmanager ユーティリティを使用して、Windchill サービスプロパティを更新します。次のコマンドは、新規ファイルとそのコンテンツを登録します。
xconfmanager -i codebase/custom/myServiceXconfFile.properties.xconf -p
部品情報ページから WTPart 構造の「フィルタを編集」 UI を起動します。この UI に org.rnd.TestFilter という新規フィルタタブが表示されます。