SSO コンフィギュレーションでの電子署名の検証
このトピックは以下のユーザーに関連します。
• サイトでワークフロープロセスの一環として電子署名が使用されている。詳細については、
電子署名の設定を参照してください。
• 電子署名を提出する前に資格証明の提供をユーザーに求める必要がある。
• サイトでシングルサインオン (SSO) 構成とアイデンティティプロバイダ (IdP) による認証を行っている。
Apache の設定
1. 以下のテキストを <APACHE ホーム>/conf/conf.d/30-app-Windchill-1Auth.conf に追加します。
<LocationMatch ^/+Windchill/reauthsecure?>
AuthType shibboleth
ShibRequestSetting applicationId reauthsecure
ShibUseHeaders on # mod_jk doesn't pass environment, so useHeaders is required
require shib-session
</LocationMatch>
2. <APACHE ホーム>/conf/conf.d/00-1mod_shib.conf に移動します。
<Location /Shibboleth.sso> を見つけます。閉じタグの直後に、以下を追加します。
<Location /reauthsecure/Shibboleth.sso>
AuthType None
require shib-session false
</Location>
3. 00-1mod_shib.conf の末尾に以下のテキストを追加します:
Alias /Windchill/reauthsecure/ "/reauthsecure/Shibboleth.sso/Login"
<Location /reauthsecure>
AuthType shibboleth
ShibRequestSetting applicationId reauthsecure
require shib-session
</Location>
4. Apache サーバーを再起動します。
Shibboleth の設定
<SHIBBOLETH_インストールディレクトリ>/etc/shibboleth/shibboleth2.xml に移動します。
1. <HOST> エレメントの内側に以下のタグを追加します。ターゲットの機能は新規アプリケーションのように動作し、その結果として、ユーザーはサーバーによって再認証を強制されます。
<Path name="reauthsecure" authType="shibboleth" requireSession="true" forceAuthn="true" applicationId="reauthsecure" />
例:
<Host name="sp.example.org">
<Path name="secure" authType="shibboleth" requireSession="true"/>
<Path name="reauthsecure" authType="shibboleth" requireSession="true" forceAuthn="true" applicationId="reauthsecure" />
</Host>
2. <ApplicationDefaults> エレメントの内側に以下のタグを追加します。これによってデフォルトのアプリケーションがオーバーライドされます。
<ApplicationOverride id="reauthsecure" entityID="SP_CONNECTION_NAME" REMOTE_USER="uid eppn persistent-id targeted-id" cipherSuites="ECDHE+AESGCM:ECDHE:!aNULL:!eNULL:!LOW:!EXPORT:!RC4:!SHA:!SSLv2" >
<Sessions lifetime="1" timeout="1" checkAddress="false" relayState="ss:mem" handlerURL="/reauthsecure/Shibboleth.sso" maxTimeSinceAuthn="2" >
<SSO entityID="PTC-Capricorn-PingFederate" discoveryProtocol="SAMLDS" discoveryURL="https://ds.example.org/DS/WAYF" forceAuthn="true" >
SAML2 SAML1
</SSO>
<!-- SAML and local-only logout. -->
<Logout>SAML2 Local</Logout>
<!-- Extension service that generates "approximate" metadata based on SP configuration. -->
<Handler type="MetadataGenerator" Location="/Metadata" signing="false"/>
<!-- Status reporting service. -->
<Handler type="Status" Location="/Status" acl="127.0.0.1 ::1"/>
<!-- Session diagnostic service. -->
<Handler type="Session" Location="/Session" showAttributeValues="true"/>
<!-- JSON feed of discovery information. -->
<Handler type="DiscoveryFeed" Location="/DiscoFeed"/>
</Sessions>
</ApplicationOverride>
3. Shibboleth サービスを再起動します。
IdP の設定
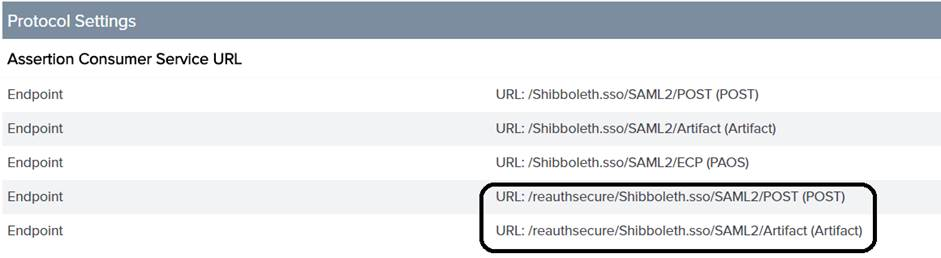
以下のエンドポイントを既存のサービスプロバイダ (SP) 接続に追加するよう IdP を設定します。
/reauthsecure/Shibboleth.sso/SAML2/POST
/reauthsecure/Shibboleth.sso/SAML2/Artifact
たとえば、PingFederate を使用する場合、以下のステップを実行します。
1. 管理コンソールの > で、SP 名をクリックします。
2. 「SP Connection」ページから、「Browser SSO」を選択して「Configure Browser SSO」をクリックします。
3. 「Configure Browser SSO」ページから、「Protocol Settings」を選択して「Configure Protocol Settings」をクリックします。
4. 「Assertion Consumer Service URL」で次のエンドポイントを追加し、コンフィギュレーションを保存します。
/reauthsecure/Shibboleth.sso/SAML2/POST
/reauthsecure/Shibboleth.sso/SAML2/Artifact
wt.properties の更新
wt.properties を更新して、プロパティ wt.org.electronicIdentification.class の値を wt.workflow.engine.SSOConfiguredSignatureEngine に変更します。
wt.org.electronicIdentification.class=wt.workflow.engine.SSOConfiguredSignatureEngine