Creating a Configuration Context
You create a configuration context from a context part information page after the part structure has been filtered and reduced to the parts relevant to a design task. A context part is a part assembly from which the configuration context is created. The structure beneath the context part shows all the parts required to define the configuration context.
To create a configuration context:
1. On the part information page of the context assembly (.asm) part, select > from the Actions menu or the tool bar.
The New Configuration Context window appears.
2. Enter or select entries for the following fields:
|
Field Name
|
Description
|
|
Organization ID
|
The globally unique organization identifier, such as CAGE code or DUNS number, associated with the object.
|
|
Depending on the settings at your site, this field may not be available.
|
|
|
Number
|
A number that uniquely identifies a configuration context. It may be automatically supplied by a standard number generator.
|
|
Name
|
A name for the configuration context.
|
|
Description
|
A brief description of the configuration context.
|
|
Location
|
The location on the server where the configuration is stored.
Select one of the following choices:
• Autoselect Folder – Uses a predetermined folder location specified by object initialization rules. • Select Folder – Use the default location or click the set location  icon to display the Set Location window. Select the context from the drop-down menu and select the desired folder from the folder window. | The default context and folder are determined by the location of the part from which the New Configuration Context operation was launched. |
|
|
Life Cycle Template
|
If available, select the life cycle template that you want to use for the configuration context.
|
|
In almost all cases, the value is auto-generated by the system.
|
|
|
Team Template
|
If available, select the team template that you want to use for the configuration context.
|
|
In almost all cases, the value is auto-generated by the system.
|
|
3. Click OK to create the configuration context.
The following actions can be expected:
◦ A confirmation message appears when the configuration context has been created.
◦ The context part and filter criteria are saved for future changes if necessary.
|
|
Parts that are subsequently revised in the original product structure may cause different parts to appear in the configuration context based on saved filter criteria.
|
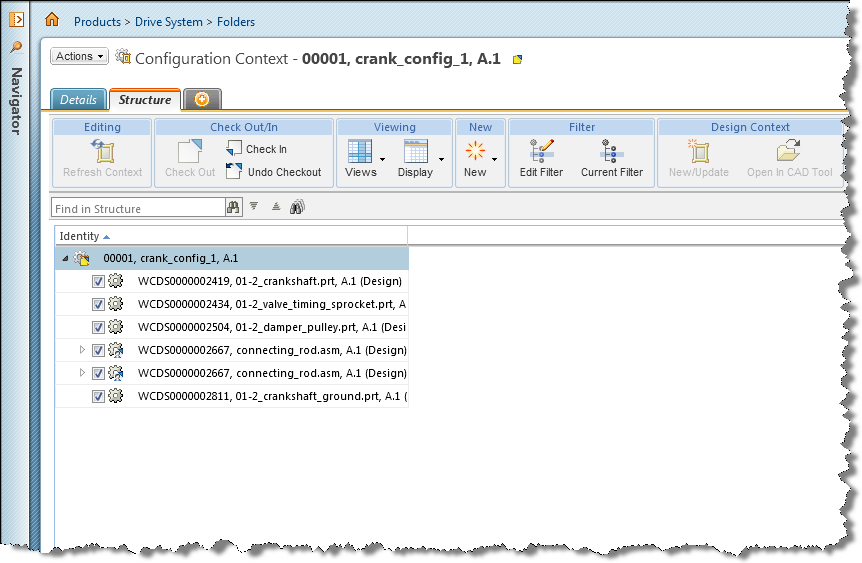
◦ Parts without reference designators (non-occurrenced parts) are included in the configuration context structure and identified in the tree using a special glyph. When reference designators are added in the Occurrences tab, part occurrences are automatically populated in the structure.
◦ The system displays the Structure tab on the configuration context information page.
◦ The root node that represents the configuration context is checked out enabling the configuration context to be edited.
◦ Checked selection boxes appear next to each part in the configuration context structure indicating that all parts have been included as shown in the following figure.
|
|
• The newly created configuration context remains checked out so that you can modify it further using rules.
• You can uncheck the part selection boxes to exclude undesirable parts before creating a design context. Note that the configuration must be checked back in and refreshed to see your changes.
|
Display Auto Create Occurrence Preference
As a Windchill administrator, you can control the display of the Auto Create Occurrences action located in the Edit menu of the Part Structure toolbar. This action updates the occurrence information at all levels in the configuration context.
To enable the display of the Auto Create Occurrences action in the Edit menu, set the value of the Display Auto Create Occurrences action preference to Yes as shown in the following figure. The default is No.