Gateway Configuration For TIBCO EMS
Configuring the Queue on an EMS Server
To create the queue on an EMS server:
1. Start the EMS server by either selecting > > > > > , or by running tibemsd.exe in the <TIBCO_installation_directory>\ems\bin folder.
2. Start the EMS administrator tool by either selecting > > > > > or by running tibemsadmin.exe in the <TIBCO_installation_directory>\ems\bin folder
3. Connect to the server by entering connect, and clicking Enter in the TIBCO EMS administrator tool.
4. Create queues by entering create queue <queue_name>.
Configuration on the Windchill Side
After installing Windchill Gateway for Creo Elements/Direct Model Manager, the Windchill adapter page looks like the following figure.
To configure TIBCO on Windchill:
1. Open the Info*Engine administrator page, at > .
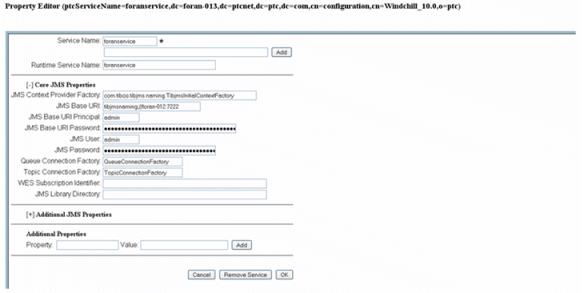
2. Click Create Entry and select JMS Service from the menu.
3. Change the following values in the Property Editor:
a. JMS Context Provider Factory = com.tibco.tibjmn.naming.TibjmsInitialContextFactory
b. JMS Base URI = tibjmsnaming://@<host>:7222/
c. JMS User = <username> (Refer to the Windchill Installation and Configuration Guide if this property is to be encrypted.)
d. JMS Password = <password> (Refer to the Windchill Installation and Configuration Guide if this property is to be encrypted.)
e. Queue Connection Factory = QueueConnectionFactory
f. JMS Base URI Principal = <username>
g. JMS Base URI Password = <password>
4. Restart all the servers.
Configuration on the Adapter Side
To make an adapter, use TIBCO queues:
1. Run the Creo Elements/Direct Model Manager.server configuration tool, and then follow the installation steps as given in Installing Windchill Gateway on Creo Elements/Direct Model Manager.
2. Stop the Creo Elements/Direct Manager Services after the installation.
3. Open the GatewayConfig.xml file, and add the following values to these properties:
<JMSUser> admin </JMSUser>
<JMSPassword> admin</JMSPassword>
<JMSBaseURIPrincipal> admin </JMSBaseURIPrincipal>
<JMSBaseURIPassword> admin </JMSBaseURIPassword>
| If these properties are to be encrypted, refer to the Windchill system administration online help. |
4. Restart Creo Elements/Direct Manager Services after the changes have been made.

