Filtering in the Document View
The Document view contains a filter bar that allows you to filter by visible text and/or fields in the document. The filter criteria creates a sentence in the filter bar that indicates what you are looking for, for example: Show items containing waterproof where Reference Mode is one of Author.
Filter Bar: User Interface Components
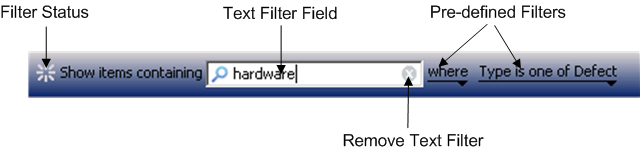
The following is an example of an active filter bar in the Document view:
The filter bar includes the following user interface components that allow you to filter items in the Document view:
Component | Description |
Filter Status | As you apply a filter to the Document view, the filter status icon animates to indicate progress. When you initially apply a filter to an unfiltered Document view, the color of the filter bar changes color. When all filters are removed, the filter bar reverts to the default color. |
Text Filter | Filters items by visible text in the Document view. Type the text that you want to filter by. The list of items is filtered when there is a pause in typing or when you finish typing. Note the following: • The text filter field is case-insensitive. • To filter for an exact text string, use double quotes, for example, "water depth". If you do not specify double quotes, Windchill RV&S searches for items containing all of the words in the text string in any order. • You can also filter by numeric values. A text filter that includes a section ID returns results; however, it does not return the specific section ID you are searching for. For example, if you type 2.1, sections 2.1, 2.1.1, and 2.1.2 display. |
Remove Text Filter | Clicking  clears the text filter, removing the applied text filter. | You can also click > ; however, this also removes applied field filters |
|
Field Filter | Filters items by visible fields in the Document view, for example, ReferenceMode, Category, and ID. To filter by a field, click where and select a field from the list. | Applying multiple field filters creates a logical AND relationship between the field filters. You cannot create logical OR relationships between field filters. |
To filter by a field that does not display in the where menu, select > . To apply a recent field filter, select > then field filter. To remove all applied field filters, select > . To remove an applied field filter, select field filter then Remove. For example, select > . To edit an applied field filter, select field filter then field name. For example, select > . To invert an applied field filter, select field filter then field name is not. For example, select > . |
Status Bar | Displays the number of items matching the filter and the selected items. |
Filtered Subsegment and Node Items | Filtering removes non-matching rows from the content pane only. All non-matching rows in the outline view remain visible to retain a complete view of the outline; however, the non-matching rows are greyed out. |
Key Considerations
• The shortcut key for filtering in the Document view is CTRL+SHIFT+F.
• Only documents with less than 3,000 rows can be filtered with the text filter. This value is non-configurable. To use the text filter on larger documents, first set one or more field filters that match less than 3,000 items.
• If you select a row in a filtered view for a cut/copy operation and then change the filter, the paste operation is still available (even when the cut row is filtered out).
• In a move operation with a filter applied, the rows above and below the selected target of a move operation may be filtered out in the content pane, making the results unclear. In this scenario, PTC recommends switching to the Outline panel to perform move operations.
• You can use inline editing to edit matching rows in the view. If you change the value in a row that matched the filter, the row remains visible until you re-apply the filter.
• Pasted rows always appear in the Content panel, even if the row contents do not meet the current filter criteria (until the next time the filter criteria is modified or the view is refreshed).
• Operations performed on content in the Outline panel cause the content to appear in the Content panel even if the row contents do not meet the current filter criteria (until the next time the filter criteria is modified or the view is refreshed).
• If the Document view is configured to display parents (see
Configuring the Document View), a child’s parent content displays in the Content panel even when the parent does not meet the filter criteria, and is indicated in the filter bar by the text
and their parents. Note the following information about parent content and filters:
◦ If structural changes are made to the document that result in the parent no longer containing any children (the content is no longer a parent), the parent content remains displayed in the Content panel until the next time the filter criteria is modified or the view is refreshed.
◦ If the parent meets the filter criteria but its children do not, only the parent is displayed in the Content panel.
◦ If structural changes are made to a child but the parent does not meet the filter criteria, the parent will not display in the Content panel until the filter criteria is modified or the view is refreshed.
Using Advanced Filter in the Document View
The Document view contains a filter bar from which you can narrow the results of your search. From the where list, you can select Advanced Filter to use the logical AND,OR, and NOT operators, individually or in combination.
The AND operator specifies that all of the conditions must be met for an item to appear in the filtered results. For example, you can apply the filter for which the field ID is less than 74 and the field category is a Heading.
(((field[ID]<74) and (field[Category]=”Heading”)))
The OR operator specifies that one or more of the conditions must be met for an item to appear in the filtered results. For example, you can apply the filter for which the field ID is less than 74 or the field category is a Heading.
(((field[ID]<74) or (field[Category]=”Heading”)))
The NOT operator specifies that the logical value of a condition on which it operates is inverted. For example, if the filter is ‘Type is Defect’, the inverted value is ‘Type is not Defect’.
(not(field[Type]=“Defect”))
To create an advanced filter
1. In the Document view, select the Advanced Filter from the where list.
The Advanced Filter Definition window opens.
| Only one advanced filter can be applied at a time. If you want to apply another advanced filter, a warning appears stating that the new advanced filter will replace the existing filter. Click Yes to replace the filter. Click No, to retain the existing filter. |
2. Select Add Filter.
The Add Filter window opens. Specify the criteria for the filter you wish to create.
3. Select the field that you want to filter by, and then click OK.
4. Click Finish.
The criteria selected in the advanced filter are applied to the document view.
| You can add a condition by selecting the And or Or button for a logical relationship, individually or in combination. |
From the Add Filter window you can perform the following tasks:
Task | Procedure |
To invert a logical condition | Click the logical condition that you want to invert, and then select Invert. |
To temporarily disable logical condition | Click the logical condition that you want to disable, and then select Disable. |
To re-enable disabled logical condition | Click the logical condition that you want to enable, and then select Enable. |
To remove a logical condition | Click the logical condition that you want to remove, and then select Remove. |
You can apply the advanced filter from:
• >
• > >
| To view the filter definition: • Hover the cursor over the Advanced Filter over the pin on the filter bar. • Hover the cursor over the advanced filter from > > . |
The advanced filter seen in the Recent filter list is the latest used advanced filter across all the documents in the client. For example, when you open a document in the Document view by applying an advanced filter “where ID= 40”, and you open the second document by applying the advanced filter “where category = comment”, the advanced filter in the most recently used list is “where category = comment” across all the documents.
You can edit or remove the advanced filter by clicking the advanced filter pin on the filter bar, and then clicking Edit or Remove. You can also remove all the applied filters on the pin bar by clicking > .