Document Locking
|
CLI EQUIVALENT
|
im copytype / im createtype / im edittype
|
Document locking lets users protect a document from unwanted modifications by others. You can configure a document type for locking by either individuals or groups. Only users who own a lock on a document, either individually or as part of a group, can modify these types oft document.
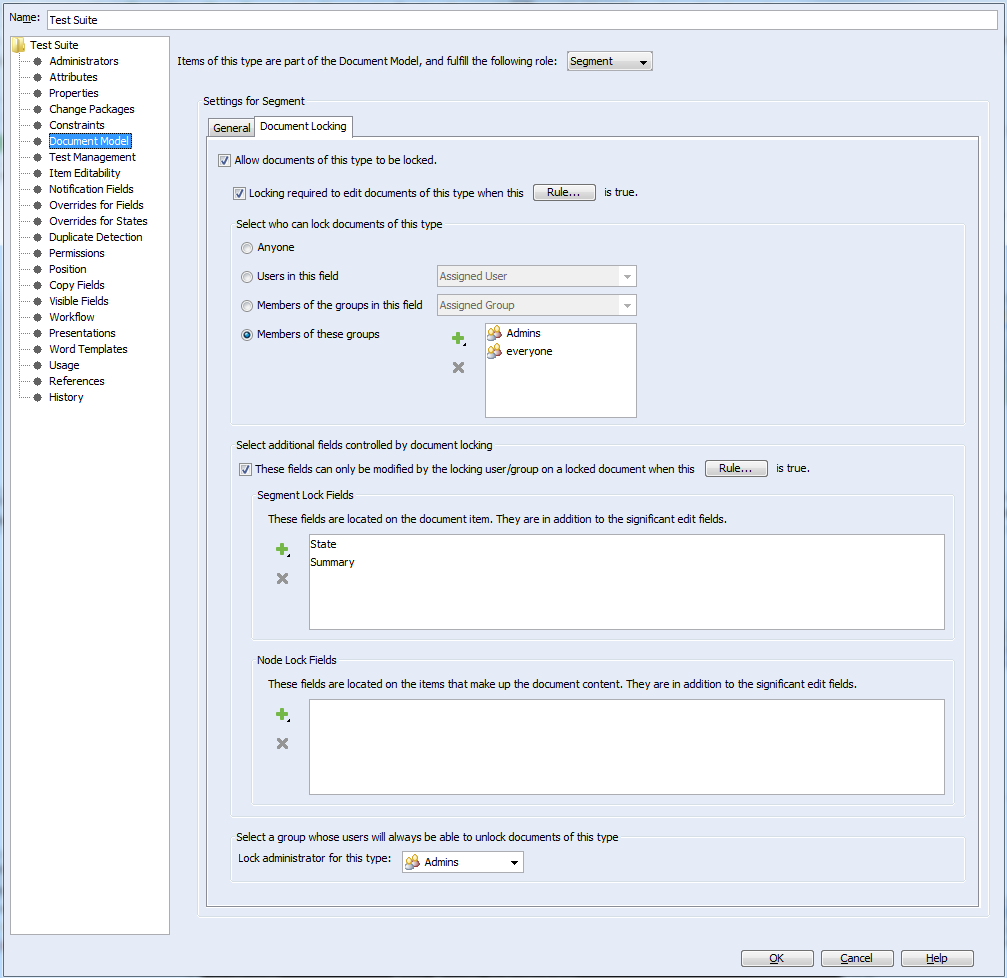
You must configure document locking for each document type that is to use this feature. You can do this in the Windchill RV&S administration client GUI. From the Types view, select the type that you want to edit and select > . The Edit Type window opens. Select the Document Model node and then the Document Locking tab.
All document locking configuration for the selected type can be done on the Document Locking tab. The following sections discuss how to configure the various aspects of document locking.
Step 1: Enable document locking
To enable document locking for documents of this type, select Allow documents of this type to be locked.
If users must lock a document of this type before making changes to it, select
Locking required to edit documents of this type when this Rule... is true. Click
Rule... to specify the rule that details precisely when locking is required before editing. If no rule is specified, all documents of this type must always be locked before they can be edited. See
“Defining Rules” for more information about specifying rules.
Step 2: Select who can lock documents
On the Document Locking tab, there is a section labeled Select who can lock documents of this type. In this section, there are four choices for defining who can lock documents.
Anyone
Allows all users on the system to lock documents of this type. The user who locks a document personally owns the lock on that document. Only that user can modify the fields in that document under locking control.
Users in this field
Specifies a field on the segment root of this document type that can contain one or more user names. Only users whose user names appear in the specified field can lock documents of this type. The user who locks a document personally owns the lock on that document. Only the user who owns the lock on the document can modify the fields in that document under locking control. By default, this field is Assigned User.
Members of the groups in this field
Specifies a field on the segment root of this document type that can contain one or more group names. Only members of the groups whose names appear in the specified field can lock documents of this type. When locking a document, the user has two choices:
◦ Own the lock personally
◦ Have the lock owned by one of the eligible groups to which the user belongs
When the user owns the lock personally, only that user can modify the fields in that document under locking control. When a group owns the lock on a document, any member of that group can modify the fields in that document under locking control. By default, this field is Assigned Group.
Members of these groups
Specifies one or more groups whose members are allowed to lock documents of this type. When locking a document, the user has two choices:
◦ Own the lock personally
◦ Have the lock owned by one of the eligible groups to which the user belongs
When the user owns the lock personally, only that user can modify the fields in that document under locking control. When a group owns the lock on a document, any member of that group can modify the fields in that document under locking control.
Step 3: Specify additional segment and node fields controlled by document locking
Normally, only the significant fields for a type are under the control of document locking. However, you can place additional fields on the segment root or content nodes of a document of this type under control of document locking.
1. Select These fields can only be modified by the locking user/group on a locked document when this Rule... is true.
2. click
Rule... to specify the rule that details precisely when these additional fields fall under the control of document locking. If you do not specify a rule, the additional fields always fall under the control of document locking. See
“Defining Rules” for more information about specifying rules.
3. In Segment Lock Fields, specify the additional fields on the segment root to place under control of document locking. In Node Lock Fields, specify the additional fields on the content nodes to place under control of document locking.
| Documents can contain FVA (field value attributes) fields that are backed by a field in another document. As a result, it is possible that the FVA field is not under the control of document locking but the backing field is. In such a situation, users could edit the FVA field. The change is then made to the backing field, even when the document containing the backing field is locked. To avoid this situation, PTC recommends that administrators put both the FVA field and its backing field under the control of document locking. |
Step 4: Specify a group to act as lock administrators
Normally, to unlock a locked document, the user must be one of the following:
• The user who locked the document
• A member of the group who owns the lock on the document
However, sometimes it is necessary for others to be able to unlock documents. For example, a user who has left the company can still have documents locked personally. To handle such situations, specify a group in the Lock administrator for this type field. Members of this group can always unlock a locked document of this type, even if they do not meet the normal criteria.
| You can grant RemoveOtherUserLocks permission to users. Users with this permission can use the > > action (or right-click View Project Locks) action to open the Project Locks view. In this view, they can find locks by all users on all members of a sandbox or project. They can also remove all or selected members and non-member revision locks. |
Related Links