新しいペットの作成
新しいペットを作成するには、そのダイアログを構築し、それがテーブルに表示されるようにする必要があります。
1. ペットを作成するためのウィザード create.jsp を作成します。
a. > > > > の順に移動してから、「Next」をクリックします。
|
|
> > オプションを使用できない場合は、Web Page Editor をインストールします。これは、Helios ソフトウェアサイトを使用している場合は「Web, XML, and Java EE Development」カテゴリにあります。もう 1 つの方法として、一般ファイルを作成することもできます ( > > )。
|
b. そのフォルダは cust_Windchill_src/src/netmarkets/jsp/acme/pet であり、ファイル名は create.jsp です。
c. 「終了」をクリックし、内容を次の内容に置き換えます。
<%@taglib prefix="jca" uri="http://www.ptc.com/windchill/taglib/components"%>
<%@taglib prefix="attachments"
uri="http://www.ptc.com/windchill/taglib/attachments"%>
<%@include file="/netmarkets/jsp/components/beginWizard.jspf"%>
<%@include file="/netmarkets/jsp/components/includeWizBean.jspf"%>
<jca:initializeItem baseTypeName="com.acme.Pet" operation="${createBean.create}"
attributePopulatorClass="com.ptc.core.components.forms.DefaultAttributePopulator"/>
<jca:wizard>
<jca:wizardStep action="petDefineItemAttributesWizStep" type="pet"/>
<jca:wizardStep action="attachments_step" type="attachments"/>
</jca:wizard>
<attachments:fileSelectionAndUploadApplet/>
<%@include file="/netmarkets/jsp/util/end.jspf"%>
2. petDefineItemAttributesWizStep 操作を定義します。
a. config.actions で Pet-actionmodels.xml と平行して Pet-actions.xml を作成します。
b. 次のようにその内容を割り当てます。
<?xml version="1.0" encoding="UTF-8"?>
<!DOCTYPE listofactions SYSTEM 'actions.dtd'>
<listofactions>
<objecttype name="pet" class="com.acme.Pet"
resourceBundle="com.acme.jca.acmeActionResource">
<action name="petDefineItemAttributesWizStep" afterVK="setAttributesWizStep"
preloadWizardPage="true" required="true">
<command url="netmarkets/jsp/acme/pet/defineItemAttributesWizStep.jsp"
windowType="wizard_step"/>
</action>
</objecttype>
</listofactions>
c. Pet-actions.xml を site.xconf <AddToProperty name="com.ptc.netmarkets.util.misc.defaultActions" value="config/actions/Pet-actions.xml"/> で登録します。
d. 再び xconfmanager を実行して、変更を適用します。
3. 次の内容が含まれる defineItemAttributesWizStep.jsp ページを create.jsp と平行して作成します。
<%@taglib uri="http://www.ptc.com/windchill/taglib/mvc" prefix="mvc"%>
<%@include file="/netmarkets/jsp/util/begin_comp.jspf"%>
<jsp:include page="${mvc:getComponentURL('acme.pet.SetAttributesPanel')}"/>
<%@include file="/netmarkets/jsp/util/end_comp.jspf"%>
4. コンポーネントを定義します (acme.pet.SetAttributesPanel)。
a. 次の内容で PetSetAttributesPanelBuilder を作成します。
package com.acme.mvc.builders;
import wt.util.WTException;
import com.acme.Pet;
import com.ptc.core.ui.resources.ComponentType;
import com.ptc.jca.mvc.components.AbstractAttributesComponentBuilder;
import com.ptc.jca.mvc.components.JcaAttributeConfig;
import com.ptc.jca.mvc.components.JcaGroupConfig;
import com.ptc.mvc.components.AttributePanelConfig;
import com.ptc.mvc.components.ComponentBuilder;
import com.ptc.mvc.components.ComponentConfigFactory;
import com.ptc.mvc.components.ComponentId;
import com.ptc.mvc.components.ComponentParams;
import com.ptc.mvc.components.TypeBased;
@ComponentBuilder("acme.pet.SetAttributesPanel")
@TypeBased("com.acme.Pet")
public class PetSetAttributesPanelBuilder extends
AbstractAttributesComponentBuilder {
@Override
protected AttributePanelConfig buildAttributesComponentConfig
(final ComponentParams params) throws WTException {
final ComponentConfigFactory factory = getComponentConfigFactory();
final AttributePanelConfig panel; {
panel = factory.newAttributePanelConfig
(ComponentId.ATTRIBUTE_PANEL_ID);
panel.setComponentType
(ComponentType.WIZARD_ATTRIBUTES_TABLE);
final JcaGroupConfig group; {
group = (JcaGroupConfig) factory.newGroupConfig();
group.setId("setAttributes");
group.setLabel("Set Attributes");
group.setIsGridLayout(true);
group.addComponent(getAttribute(Pet.NAME, factory));
group.addComponent(getAttribute(Pet.KIND, factory));
group.addComponent(getAttribute(Pet.DATE_OF_BIRTH, factory));
group.addComponent(getAttribute(Pet.FIXED, factory));
}
panel.addComponent(group);
}
return panel;
}
JcaAttributeConfig getAttribute(final String id, final ComponentConfigFactory
factory) {
final JcaAttributeConfig attribute = (JcaAttributeConfig)
factory.newAttributeConfig();
attribute.setId(id);
return attribute;
} }
b. Pet-configs.xml に <bean id="acme.pet.SetAttributesPanel" class="com.acme.mvc.builders.PetSetAttributesPanelBuilder"/> を追加して、ビルダーを登録します。
5. 次の内容が含まれる、petDefineItemAttributesWizStep によって参照される resourceBundle を作成します (ペットを作成するためのアイコンとして createPackage.gif が再利用されています)。
package com.acme.jca;
import wt.util.resource.*;
@RBUUID("com.acme.jca.acmeActionResource")
public final class acmeActionResource extends WTListResourceBundle {
@RBEntry("New Pet")
public static final String PET_CREATE_TITLE = "pet.create.title";
@RBEntry("New Pet")
public static final String PET_CREATE_TOOLTIP = "pet.create.tooltip";
@RBEntry("New Pet")
public static final String PET_CREATE_DESCRIPTION = "pet.create.description";
@RBEntry("createPackage.gif")
public static final String PET_CREATE_ICON = "pet.create.icon";}
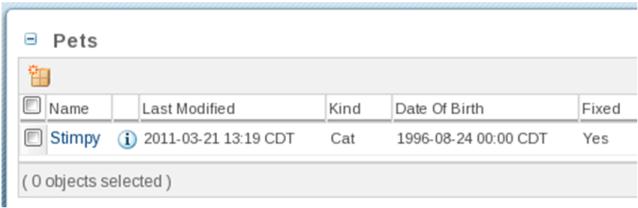
6. 作成操作を PetTable に組み込みます。
a. 次のモデルを Pet-actionmodels.xml に追加します (petDetails モデルのすぐ上)。
<model name="pets list">
<action name="create" type="pet" shortcut="true"/>
</model>
b. 作成操作を Pet-actions.xml のペットに追加します (petDefineItemAttributesWizStep のすぐ上)。
<action name="create">
<command class="com.ptc.core.components.forms.CreateObjectFormProcessor"
url="netmarkets/jsp/acme/pet/create.jsp" windowType="popup"/>
</action>
c. 操作モデル (pets list) を PetTable に組み込みます (table.setSelectable(true); の前に追加)。例: table.setActionModel("pets list");
7. Windchill を起動/再起動します。
a. 「New Pet」アイコンがテーブルに表示されていることを確認します。
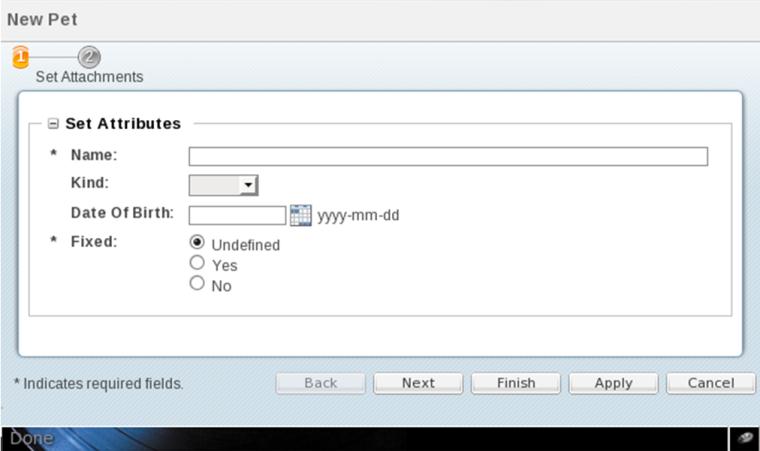
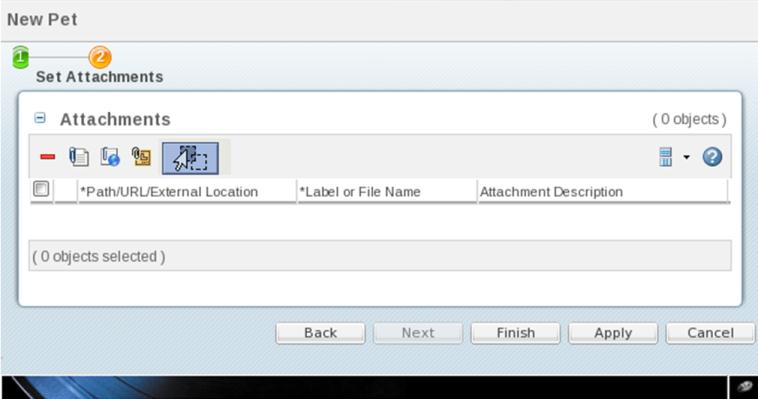
c. 「New Pet」アイコンをクリックし、2 つのステップで構成されるウィザードのポップアップが表示されることを確認します。
d. ペットを作成します。必ずコンテンツをアップロードしてください。
e. 新しいペットの "情報" ページに移動し、コンテンツが表示されていることとダウンロード可能であることを確認します。