Configuring Windchill ESI Using SUNMQS JMS
To configure Windchill ESI using SUNMQS JMS use the following procedures.
• Enable JMS in TIBCO ActiveMatrix BusinessWorks
• Connect to SUNMQ using LDAP
• Configure TIBCO
• Configuring SUNMQ
• Configuring Windchill
|
|
These procedures apply to systems with Windchill I-deas TDM Gateway installed and configured before Windchill ESI is installed, and are based on the assumption thatWindchill ESI is to use a Gateway configured SUNMQ JMS.
|
Enable JMS in TIBCO ActiveMatrix BusinessWorks
TIBCO ActiveMatrix BusinessWorks acts as a JMS client when sending messages to, or receiving messages from a JMS provider. Because of this you must place the appropriate JMS client files supplied by the JMS provider, in the proper location. Typically, this includes placing JAR files in a directory that is included on the client's CLASSPATH.
See the documentation provided by your JMS provider for more information on which files are needed and the location to place them to enable client access to the JMS server.
Once you have located the appropriate files, you can place them in the following directory:
<TIBCO_HOME>/bw/<version>/lib
This directory is in the TIBCO ActiveMatrix BusinessWorks CLASSPATH, and placing the JMS client files in this directory allows you to design and test the TIBCO ActiveMatrix BusinessWorks process definitions that include JMS Palette activities.
When deploying your project the machine where the process engine is deployed must also have the appropriate JMS client files. You should also place the JMS client files in the <TIBCO_HOME>/bw/<version>/lib directory of the machines where your process engines are deployed.
Connect to SUNMQ using LDAP
To connect to SUNMQ using LDAP the following files are required:
• fscontext.jar: available with SUNMQ installations
• imq.jar: available with SUNMQ installations
• ldap.jar: available from Sun
• jndi.jar: available from Sun
Copy these files into the following directory:
<TIBCO_HOME>/bw/<version>/lib
Configure TIBCO
To configure TIBCO use the following procedure:
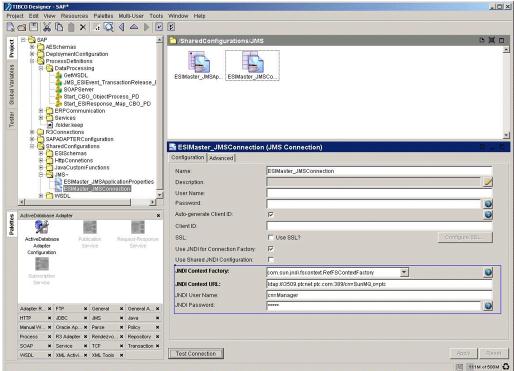
1. Open the existing ESI TIBCO project in the designer.
2. Navigate to the following project:
◦ > >
3. Modify the following parameters, using the appropriate JNDI properties:
◦ JNDI Context Factory
◦ JNDI Context URL
◦ JNDI User Name
◦ JNDI Password
4. Click Apply and then click Test Connection.
5. If the connection test is successful test again using the Designer Tester to confirm.
6. Click > to generate a new EAR for deployment.
Configuring SUNMQ
To configure SUNMQ use the following procedures:
• Create queues on SUNMQ
You must create the following queues on the SUNMQ destination:
◦ SAP Default: com.ptc.windchill.esi. DataResponse.<systemID>.<client>
Where <systemID> is the system name for the SAP distribution target. and <client> is the client for the SAP system. For example, 800 .<system> and <client> must match the values specified for the attributes System ID and Client respectively of the distribution target in Windchill.
◦ Oracle Applications Default: com.ptc.windchill.esi. DataResponse.<DSN>
Where <DSN> is the ODBC datasource name for Oracle Applications underlying database connection. This is the same value that is provided for ESIOMAdapter/Datasource global variable.
To create these queues use the following procedure:
1. Create LDAP entries for each queue.
2. Select the Destination tab.
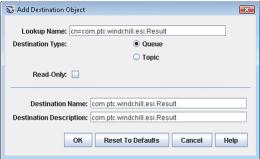
3. Click theAdd Destination icon. The Add Destination Objectwindow appears
4. Enter the following:
▪ Lookup Name: cn=com.ptc.windchill.esi.Result
▪ Destination Type: Queue
▪ Destination Name: com.ptc.windchill.esi.Result
• Create ESISYS and WCESI users on SUNMQ
To create ESISYS and WCESI Users on SUNMQ use the following procedure:
1. Open a command prompt.
2. Navigate to %MQ_HOME%/bin.
3. Create a user in the admin group by executing the following command.
imqusermgr add -u <username> -p <password> -g admin
Configuring Windchill
Use the following procedure to configure Windchill with SUNMQ:
1. Open the Info*Engine Administrator window, located at > .
2. Click on the Windchill adapter (com.ptc.ptcnet.<machine_name>.Windchill), and change the following values:
◦ JMS Base URI: <value_of_JMS_Base_URI> For example: ldap://i2467.ptcnet.ptc.com:389/dc=SunMQ,dc=I4242
◦ Queue Connection Factory: <Name_of_Queue_Connection_Factory> For example: ieQCF
3. Delete the value for the following property
◦ JMS Context Provider Factory: <blank>

