SolidWorks Toolbox Setup with Windchill
This section describes how to set up Windchill to be used for SolidWorks Toolbox.
Library Setup
A library needs to be set on the Windchill server to be used for the SolidWorks Toolbox information.
To learn about creating a new product or library, see
Product and Library Administration.
1. Click the new library icon

on the
Libraries table.
The New Library window opens.
2. Select the type of library you are creating from the Type drop-down list.
3. In the Name text field, enter the name of the library being created.
| The library name must be a unique library name within the current organization context, and cannot contain any of the following special characters: /, \, !, @, #, $, %, ^, &, *, (, ), :, ?, ", <, >, or |. |
| Take note of the library name you created, as this will be used later in a preference setting. |
4. In the Description text field, enter a description of the library.
5. Click OK to create the library and close the window.
| At Windchill 10.2, when (1) a library has not been created for SolidWorks Toolbox components on the server, and (2) the Define Library Used by Application preference is not set to this library, and (3) a user adds a Toolbox component from a Toolbox in an active assembly, the component will silently be saved to the workspace. In addition, SolidWorks Toolbox components will have a different icon, with the Toolbox Part tooltip and the Document subcategory set to Library Part. |
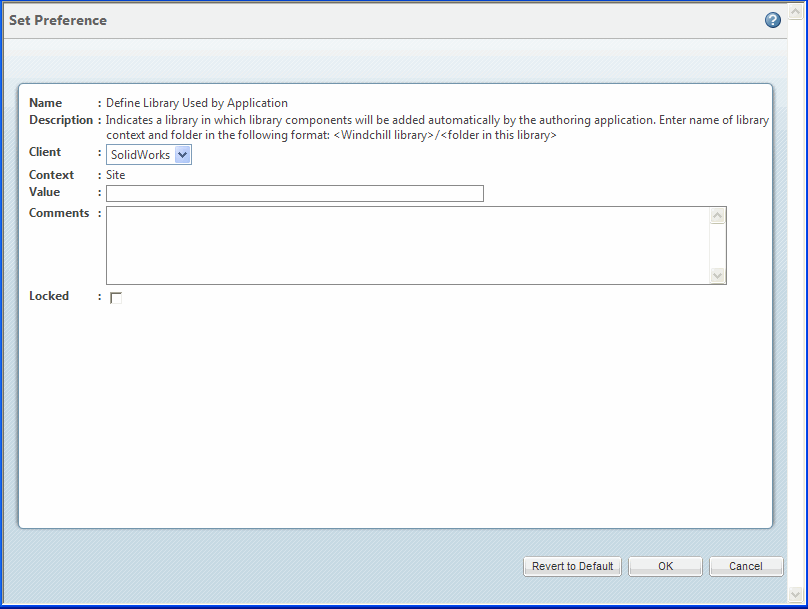
Preference Setup
To define the library used for the SolidWorks Toolbox, the Define Library Used by Application preference must be configured.
1. On the Windchill server, navigate to > > .
Locate the preference > .
2. In the Value field enter the library name you created in Step 3 and Click OK.
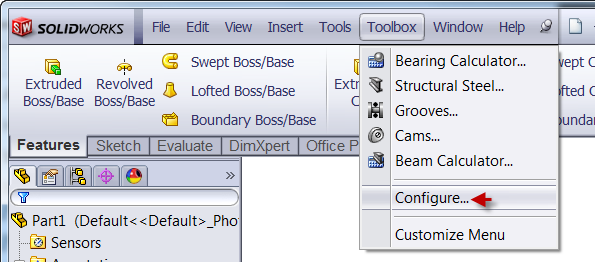
SolidWorks Toolbox Configuration
This section describes the SolidWorks Toolbox configuration with Windchill.
1. In SolidWorks, select > .
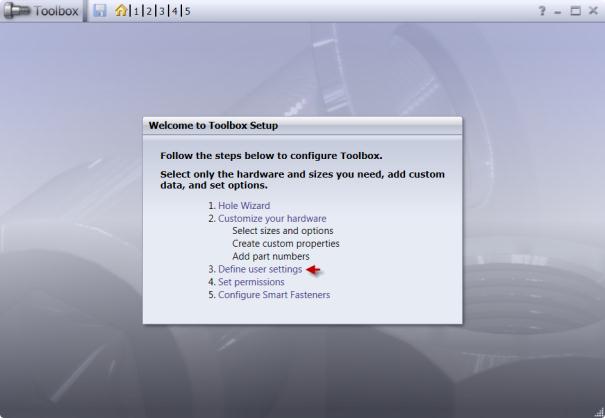
2. Select Define user settings.
3. Select Create Parts and enter a temporary folder for the Create Parts option in folder field (d:\ptc\temp). The location does not matter, as this will be set programmatically by the Windchill Workgroup Manager for SolidWorks to the active Workspace directory so that Toolbox parts will be created in Workspace rather than an external cache file. Click Close when you are finished.
| Only the "Create Parts" option for Toolbox is supported - the Configurations option is not supported. |