Using the Example
The initial page displayed is created by the following JSPs and tasks:
• JSPs:
◦ document/index.jsp
◦ manage.jsp
◦ init.jspf
◦ table.jsp (Once for checked out objects and once for checked in objects)
• Tasks:
◦ util/LocalDomain.xml
◦ util/UserInfo.xml
When you log in to the example, three links appear at the top left of your screen:
• [Document Management]: This link initiates the Document Management page.
The JSPs and tasks involved in operation of the Document Management content are the following:
◦ JSPs:
▪ document/index.jsp
▪ manage.jsp
◦ Tasks:
▪ contentHolder/Query.xml
• [Part Management]: This link initiates the Parts Management page.
The JSPs and tasks involved in the operation of the Part Management content are the following:
◦ JSPs:
▪ manage.jsp
◦ Tasks:
▪ part/Query.xml
• [Source]: This link initiates the page that contains links to all of the JSPs and tasks that are involved in the entire demo. The operation of this link is not relevant to this example description.
Below those three links is a field with the heading My Documents with two more links off to the right:
• Delete: Deletes documents that already exist within the example.
◦ JSPs:
▪ action.jsp
◦ Tasks:
▪ persistable/Delete.xml
• Create: Creates a new document within the example.
◦ JSPs:
▪ document/create.jsp
◦ Tasks:
▪ contentHolder/create.xml
The first time you use this example, there are no existing documents.
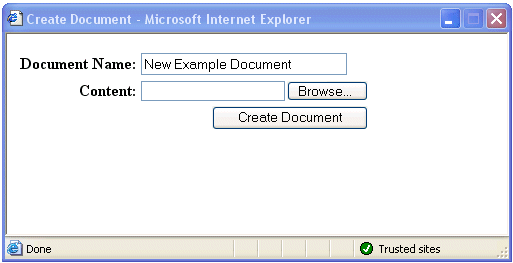
Click the Create link to create a document. The Create Document window opens:
Field | Description |
Document Name | The name the document is listed under in the example. |
Content | The local file to be used as the primary content of the new document. |
Browse | Opens the window with which you can search for the file you wish to add to the example. |
Create Document | Creates the document within the example. |
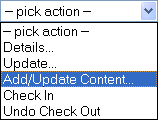
After you have created a document, you can perform actions on the document by selecting actions from the pick action drop-down menu. For example, to update the document you created, you have to check it out. To do this, select the Check Out action:
This adds the document to the Checked Out section. While a document is checked out, only the person who checked the document out will be able to access it until the document is checked back in or the check out is undone.
The JSPs and tasks involved in checking out a document are the following:
• JSPs:
◦ action.jsp
• Tasks:
◦ persistable/CheckOut.xml
After you have checked a document out, you can update it. Locate the pick action drop-down menu that corresponds to the document you want to update under the heading “Checked Out.” Select the Add/Update Content action:
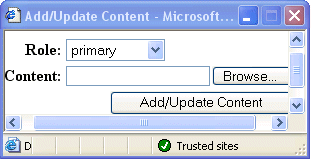
This opens the Add/Update Content window.
The Add/Update Content fields and buttons are described as follows:
Field | Description |
Role | Relates directly to the ROLE parameter on Add-ContentItems and describes the different “roles” that are supported for ContentItems. |
Content | The local file to be used as the primary content of the new document. |
Browse | Opens the window with which you can search for the file you wish to add or update content with. |
Add/Update Content | Adds new content or replaces existing content within the working copy of the document. |
After you have found the updated document you need, click Add/Update Content to add the new content or replace the existing content within the working copy of the document.
The JSPs and tasks involved in updating a document are the following:
• JSPs:
◦ addContent.jsp
• Tasks:
◦ contentHolder/AddContent.xml
After you have updated the document you need to check it back in. Select Check In from the drop-down menu that is in the same row as the document you wish to check in.
The JSPs and tasks involved in checking a document back in are the following:
• JSPs:
◦ action.jsp
• Tasks:
◦ persistable/CheckIn.xml


