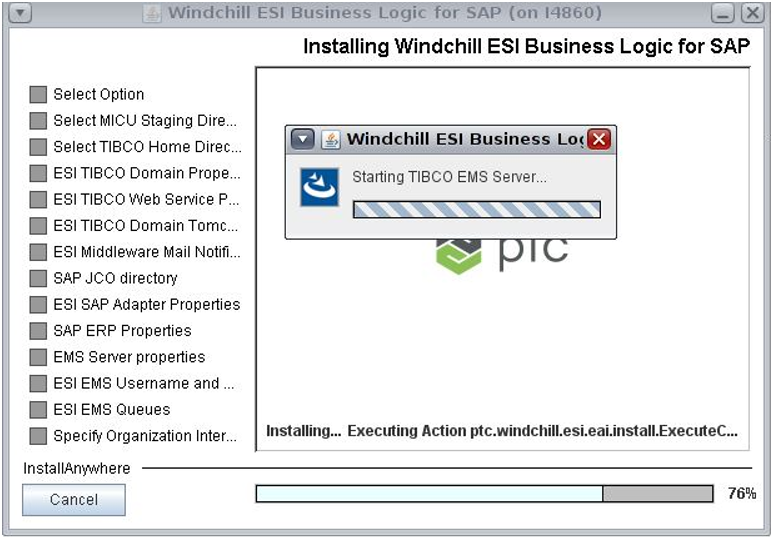
Common Installation and Configuration Errors
The following errors could cause problems during the installation and configuration process. Should you have difficulty completing any installation or configuration steps refer to the following for a possible cause:
• The removal and cleaning up of previous versions of TIBCO software was not completed properly.
• Inconsistent domain names were specified while using the custom installation option during multiple runs of the MICU.
• When installing some components on one machine and the remaining components on another machine errors may occur if you set ESISAPAdapter/JMSProviderURL to localhost. Use the EMS server hostname instead. (SAP only)
• Same application name used while deploying.
• Incorrect logon credentials (ERP/EMS/Admin).
• An additional Hawk service is running on UNIX platforms.
• Java parameters not set during manual deployment.
• Incorrect Java version in use. TIBCO installer fails to launch with an exit code 1 if the Java version is incompatible.
• Incorrect SAPJCo libraries are being used (SAP only).
• Incorrect CDs are being used. This often occurs during Solaris installations.
• Not enough space in the temporary installation directories, especially when using VMware machines.
• There is a space in the installation folder name. For example, C:\ptc\esi_10.0\TIBCO Install.
• A Windchill ESI solution deployment error message is displayed during deployment on Solaris SPARC11 using Windchill 11.0 ESI Business Logic for SAP, for the following reasons:
◦ The server is down
◦ The server is too busy to respond
Run the following command from the command prompt: <TIBCO_HOME>/esi/bin/ESILookups.properties/TIBCO-HOME/tibco/tar/5.10/bin/AppManage -deploy -ear /TIBCO-HOME/tibco/esi/ear/ESI_SAP_TIB_11_F00_23.ear -deployconfig/TIBCO-HOME%/template/SAP-deployment_template.xml -app SAP_ESI_Solution -domain domain-name -user admin -pw admin
Alternatively, navigate to the directory: <TIBCO_HOME>/tibco/tra/5.10/bin and run the following command from the command prompt: ../AppManage -deploy -ear %TIBCO-HOME%/tibco/esi/ear/ESI_SAP_TIB_11_F00_23.ear -deployconfig %TIBCO-HOME%/template/SAP-deployment_template.xml -app SAP_ESI_Solution -domain domain-name -user admin -pw admin
Installation Issue on HPUX
Issue Description—When installing Windchill ESI Business Logic for SAP in HPUX, the installation failed with the error indicating that the system is unable to proceed with installation of other TIBCO components.
Workaround
Perform the following steps to prepare your system for the installation of Windchill ESI using middleware installation:
1. Create a staging directory. For example, /opt/MICUstage
2. Copy the contents of the Windchill ESI Integration Suite for <platform> Change Directory, and the Windchill ESI Adapter for ERP Change Directory, to this staging directory, where <platform> represents the operating system you are using. For example, Windows or Solaris operating system and SAP or Oracle as ERP system.
3. Install all the TIBCO components with TIBCO individual installers as follows:
a. TIBCO EMS 8.3.0
a. Change directory to /opt/MICUstage/EMS/<EMS installer dir>/
b. Run the TIBCOUniversalInstaller-hpux-ia64.bin command from terminal.
b. TIBCO Rendezvous 8.4.4
a. Change directory to /opt/MICUstage/TRA/<TRA installer dir>/
b. Run the TIBCOUniversalInstaller-hpux-ia64.bin command from terminal.
c. TIBCO Runtime Agent 5.10.0
a. Change directory to /opt/MICUstage/TRA/<TRA installer dir>/
b. Run the TIBCOUniversalInstaller-hpux-ia64.bin command from terminal.
You can install the following TIBCO components as per your business requirement:
d. TIBCO Business Works 5.13.0
a. Change directory to /opt/MICUstage/BW/<BW installer dir>/
b. Run the TIBCOUniversalInstaller-hpux-ia64.bin command from terminal.
e. TIBCO Administrator 5.10.0
a. Change directory to /opt/MICUstage/ADMIN/<ADMIN installer dir>/
b. Run the TIBCOUniversalInstaller-hpux-ia64.bin command from terminal.
f. TIBCO data base drivers for Oracle 2.0.5
a. Change directory to /opt/MICUstage/HPUX_IA64/<DBDRIVERS installer dir>/
b. Run the TIBCOUniversalInstaller-hpux-ia64.bin command from terminal.
g. TIBCO Active Database Adapter for 7.2.0
a. Change directory to /opt/MICUstage/HPUX_IA64/<ADADB installer dir>/
b. Run the TIBCOUniversalInstaller-hpux-ia64.bin command from terminal.
4. Unzip the \disk1\resource.tar from ESIMWSAP\ESIMWORA CHANGE DIRECTORY.
5. Unzip all the jars from resource \wc_IIT\ folder.
6. Copy all these folders displayed in the image to your installation directory TIBCO_HOME.
7. Update the following files as described below:
◦ In the bwengine.tra file located at <TIBCO_HOME>/bw/5.13/bin/
▪ Append the following property to the file:
java.property.javax.xml.xpath.XpathFactoryu\:http\://java.sun.com/jaxp/xpath/dom=com.sun.org.apache.xpath.internal.jaxp.XPathFactoryImpl property.
▪ Add the values for the property as listed in the following table:
Property | Value |
TIBCO.env.CUSTOM_EXT_PREPEND_CP= | %RV_HOME%/lib/tibrvj.jar; |
%RV_HOME%/lib: | :%RV_HOME%/lib/64:%RV_HOME%/lib: |
tibco.env.STD_EXT_CP | %TIB_HOME%/esi/bin%PSP%:<full path of ems home> /lib; |
▪ Replace all instances of back slash (\) with forward slash (/).
◦ In the designer.tra file located at <TIBCO_HOME>/designer/5.10/bin/
▪ Add the following properties:
▪ java.extended.properties=-Xms512m -Xmx1024m
▪ java.property.javax.xml.xpath.XpathFactoryu/:http/://java.sun.com/jaxp/xpath/dom=com.sun.org.apache.xpath.internal.jaxp.XPathFactoryImpl
▪ Add the new values for the properties in designer.tra file as listed in the following table:
Default Value | New Value |
tibco.env.CUSTOM_PATH | tibco.env.CUSTOM_PATH%TIB_HOME%/esi/bin%PSP%:<full path of ems home>/lib: |
tibco.env.STD_EXT_CP | tibco.env.STD_EXT_CP%TIB_HOME%/esi/bin%PSP% |
tibco.env.CUSTOM_CP_EXT | tibco.env.CUSTOM_CP_EXT %TIB_HOME%/esi/bin%PSP%:<full path of ems home>/lib: |
tibco.env.CUSTOM_LIB_PATH | tibco.env.CUSTOM_CP_EXT %TIB_HOME%/esi/bin%PSP%:<full path of ems home>/lib: |
tibco.env.HEAP_SIZE 256M | tibco.env.HEAP_SIZE 512M |
▪ Replace all instances of back slash (\) with forward slash (/).
◦ In the adbagent.tra file located at <TIBCO_HOME>/adapter/adadb/7.2/bin/
1. Uncomment and set adb.debug 4
2. Uncomment adb.supportOracleAppsForRPC on
3. Add adb.unicode UTF8
◦ In the adr3.tra file located at <TIBCO_HOME>/adapter/adr3/7.2/bin/
a. Add adr3.contextTimeout 30000
b. Uncomment #adr3.trace.service ON
c. Replace #adr3.trace.log4j.properties C:/ptc/esi_10.2/tibco/adapter/adr3/7.2/bin/adr3.log4j.properties with adr3.trace.log4j.properties <full path of sap adapter>/bin/adr3.log4j.properties
◦ In the filesToRead_ORA.properties located at <TIBCO_HOME>/ems/bin/
▪ Replace Path = C:/tibco/esi with Path = <TIBCO_home path>/esi/bin/
◦ In the filesToRead_SAP.properties located at <TIBCO_HOME>/ems/bin/
1. Replace path = C:/tibco/esi with path = <TIBCO_home path>/esi/bin/
2. On a Linux platform, the Hawk HMA process must have the same set of rights as a root user. To achieve the same set of rights as a root user, execute the following commands as a root user from terminal:
▪ chown root $micu.hawk.home$$/$bin$/$tibhawkhma
▪ chmod u+s $micu.hawk.home$$/$bin$/$tibhawkhma
3. After executing the above commands, Update the /etc/ld.so.conf and add $micu.tibrv.home$$/$lib to the list.
4. Run ldconfig as root user.
8. To start EMS:
a. Change directory to <TIBCO_HOME>/ems/bin/
b. Execute the ./tibemsd64.sh command
9. To start hawk service:
a. Change directory to <TIBCO_HOME>>/tra/domain/<domain_name>/
b. Execute ./hawkagent_<domain_name> command
10. To start administrator service:
a. Change directory to <TIBCO_HOME>/administrator/domain/<domain_name>/bin/
b. Execute the ./tibcoadmin_<domain_name> command
11. Deploy ORACLE application by using TIBCO administrator user interface with EAR files located at <TIBCO_home>/esi/ear folder.
Configuring Enterprise Messaging Service
Perform the following steps to configure the EMS:
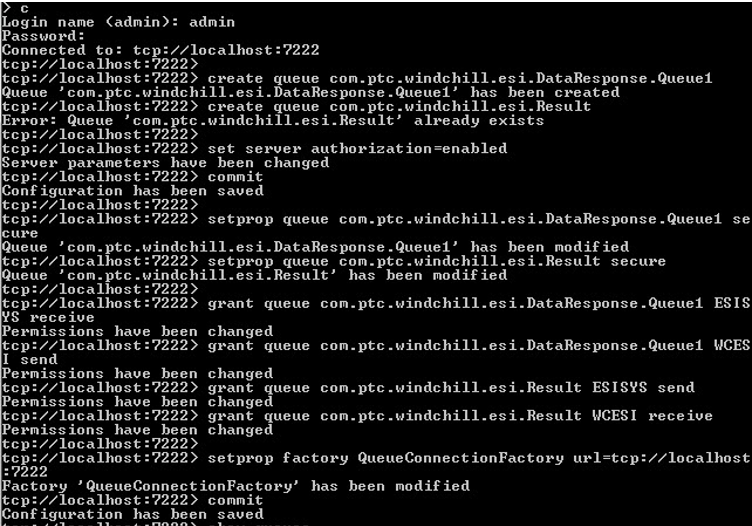
1. Start TIBCO EMS administrator:
a. Change directory to <ems_home>/bin/
b. Execute ./tibemsadmin64
| For TIBCO EMS administrator the default username is admin and password is <press Enter> |
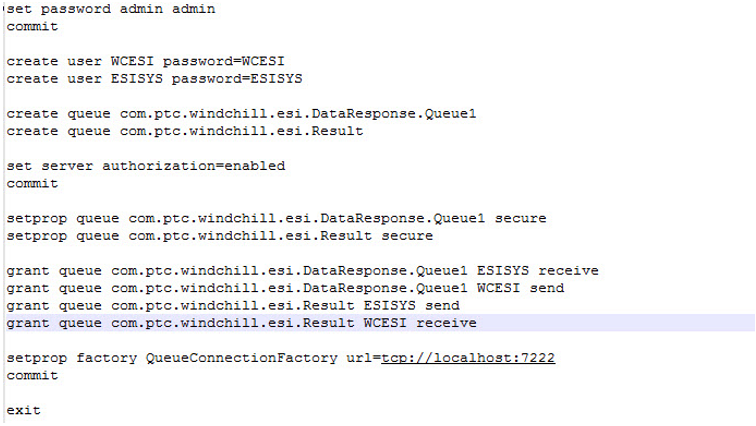
2. Open EMS_ESI_Config.src file from <TIBCO_home>/Conf folder:
Sample file:
3. Provide SID or instance name for creating a queue. For example, queue 1
Sample file:
4. Configure the EMS and create queue by running all the commands from EMS_ESI_config.src file from TIBCO EMS administrator.
Sample file:
5. After successful creation of queues check queues and connection details using following commands:
◦ Show connections- Displays list of connections.
◦ Show queues- Displays list of queues.
Sample file: