建立文件封面頁的範例組態步驟
欲使用 WVS 配置 Adobe Experience Manager 伺服器來建立 PDF 文件封面頁,請執行下列步驟:
1. 使用 xconfmanager 公用程式 (位於 <Windchill>/bin 目錄) 來編輯 wvs.properties.xconf 檔案,以設定下列內容:
◦ 設定 Adobe Experience Manager 伺服器資訊︰
<Property default=" http\://adobelc-host\:8080/soap/services/
AssemblerService " name="edrload.livecycle.assembler.serviceurl"/>
<Property default="$(edrload.livecycle.assembler.serviceurl)?WSDL&
lc_version=9.0.0" name="edrload.livecycle.assembler.wsdlurl"/>
<Property default="PRODUCTVIEW R&D" name="edrload.livecycle.
assembler.credentialalias"/>
<Property default="$(wt.home)$(wvs.dir.sep)livecycleauth.properties"
name="edrload.livecycle.authfile"/>
為文件封面頁設定 Adobe Experience Manager 代理人及其方法:
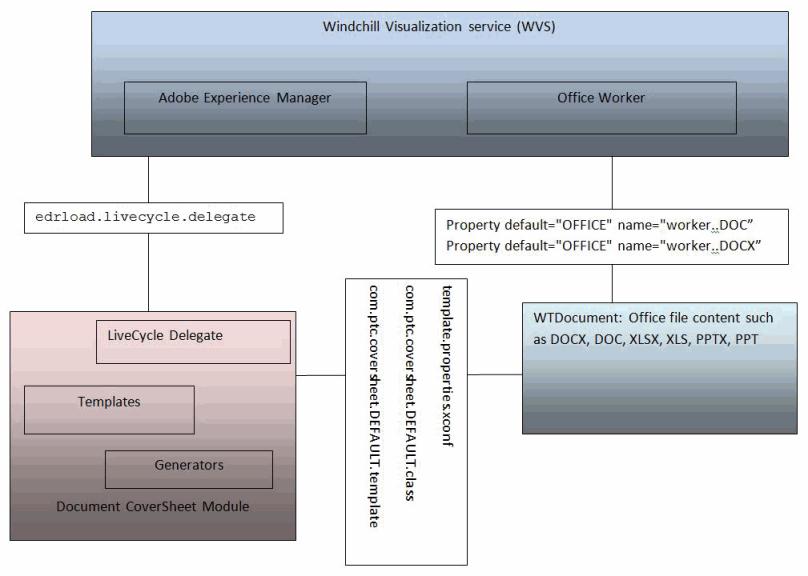
<Property name="edrload.livecycle.delegate"
default="com.ptc.coversheet.wvs.LiveCycleDelegate/getLiveCycleInvocationParams" />
◦ 於變更時重新發行文件
<Property default="true" name="publish.republishondocumentchange"/>
2. 在 Windchill\codebase\WEB-INF\conf\wvs.properties.xconf 中新增下列內容:
<Property default="OFFICE" name="worker..DOC">
<Property default="OFFICE" name="worker..PDF">
<Property default="OFFICE" name="worker..PPT">
<Property default="OFFICE" name="worker..XLS">
<Property default="OFFICE" name="worker..DOCX">
<Property default="OFFICE" name="worker..PPTX">
<Property default="OFFICE" name="worker..XLSX">
3. 在 <Windchill> 目錄中建立 livecycleauth.properties 檔案 (如步驟 #1 所述),並新增以下行。這是驗證 Experience Manager 伺服器的使用者名稱與密碼。如需更多組態資訊,請參閱本主題中的配置 Adobe Experience Manager 伺服器 部份。
4. 配置 OFFICE worker。如需 worker 組態指導原則相關資訊,請參閱 Creo View MCAD Adapters Installation and Configuration Guide (Creo View MCAD 轉接器安裝與組態指南)。
5. 如下所述安裝 xconf:xconfManager -i <Windchill>\codebase\com\ptc\coversheet\template.properties.xconf
6. 傳播所有內容:xconfManager -p。
下圖提供了 Experience Manager 代理人與 Worker 間互動的概念插圖。
