Setting New Names
The
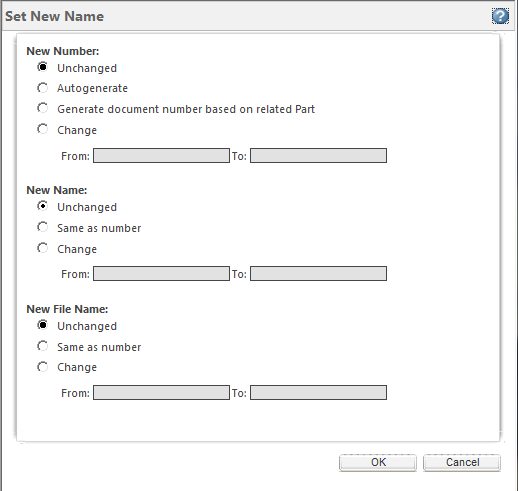
Set New Name window is invoked by clicking the Set New Name

icon in the tool bar of the
Rename or
Save As pages. The options on the
Set New Name page allow you to specify values for
Name,
Number, and (for CAD documents)
File Name. This is subject to the object initialization rules (OIRs) and preference settings that govern the assignment of attributes to new objects. For more information on naming and numbering preferences and using OIRs, see
Managing CAD Document and WTPart Naming and Numbering and
Using OIRs for Naming and Numbering.
| • The options presented in this window are mutually exclusive and are sometimes disabled based on system settings or preferences. • The input for the From: and To: fields are search/replace patterns. These fields are designed for multi-object name and number changes. For more information, see Specifying Change Formats. |
To specify values for name, number, and filename:
1. In the New Number area, select one of the following options.
Possible Options | Result |
Unchanged | The number is set to remain the same. |
Autogenerate | The number is set to auto-generate using object initialization rules (OIRs) |
Generate document number based on related Part | The number is set to be identical to the number of the related Windchill part. | This option is only available if you have selected one or more checked in or uploaded CAD documents. |
|
Change | The number is set to be changed according to a user-defined format that you enter in the From: and To: fields. For more information, see Specifying Change Formats. |
2. In the New Name area, select one of the following options.
Possible Options | Result |
Unchanged | The name is set to remain the same. |
Same as number | The name is set to be the same as the object base number. | • This option is only available on the Rename page. • To keep the name the same as number during a Save As action, use an OIR. |
|
Autogenerate | The name is set to auto-generate using object initialization rules (OIRs). | • This option is only available on the Save As page. • To keep the name the same as number during a Rename action, use the Same as Number option. |
|
Change | The name is set to be changed according to a user-defined format that you enter in the From: and To: fields. For more information, see Specifying Change Formats. |
3. In the New File Name area, select one of the following options.
Possible Options | Result |
Unchanged | The filename is set to remain the same. |
Same as number | The filename is set to be the same as the base number. |
Same as name | The filename is set to be the same as the object name. | This option is only available on the Save As page. |
|
Change | The filename is set to be changed according to a user-defined format that you enter in the From: and To: fields. For more information, see Specifying Change Formats.. |
4. Click OK.
If your settings are valid for all selected objects, the Set New Name window closes and the selected options are applied to the cells for New Name, New File Name (if applicable), and New Number on the Rename or Save As page.
—or—
If your settings are invalid for one or more selected objects, the Set New Name window closes, selected options are applied to the cells of valid objects for New Name, New File Name (if applicable), and New Number. A warning message appears across the top of the Rename or Save As page.
Specifying Change Formats
To set the conventions for changing the naming and numbering of objects when allowed by the system:
1. Enter the object’s number, name, or filename in the appropriate From field (you can use wild-card matching).
2. Edit the To field to your specification. See the following table for examples.
The following table provides examples of how to format the From and To fields to achieve the objective of applying a prefix, applying a suffix, or replacing part of an object name.
Rename Objective | Original Value | Target Value | Format From | Format To |
Apply Prefix | Object.prt | Prefix_Object.prt | * | Prefix_* |
Apply Suffix | Object.prt | Object.prt_Suffix | * | *_Suffix |
Apply Suffix | Object.prt | Object_Suffix.prt | *.* | *_Suffix.* |
Replace | Object.prt | New.prt | *Object* | *New* |
Related Topics