Configuring an HTTPS Connection with SSL in TIBCO BW Engine
This section outlines the steps to establish an HTTPS connection using a self-created PKCS12 certificate in TIBCO BusinessWorks (BW) Engine. These steps are also applicable when using certificates issued by a Certificate Authority (CA).
|
|
This process is only compatible with the PKCS12 certificate format.
|
Steps to Establish an HTTPS Connection
1. Import a CA-issued certificate into PKCS12 KeyStore bundle:
◦ Use the following command to import a CA-signed certificate into the PKCS12 KeyStore:
keytool -import -keystore <keystore_name.pkcs12.keystore> -storepass <password> -alias <your_alias> -file <certificate_file>
|
|
It is recommended to use certificates issued by a public Certificate Authority (CA) in production environments to ensure the security of services. Self-signed certificates may be acceptable in non-production or development environments, depending on your organization's IT security policies.
|
2. Generate a keystore using Java key tool (optional step):
◦ Run the following command from the command prompt to generate a KeyStore:
keytool -genkey -alias <alias_name> -keyalg RSA -keysize 2048 -sigalg SHA256withRSA -keystore <keystore_name.pkcs12.keystore> -storepass <password>
-dname "CN=<hostname>, OU=EastCoast, O=MyComp Ltd, L=New York, ST=, C=US" -ext "SAN=dns:<hostname>,dns:<hostname>,ip:<ip_address>" -validity <validity>
-dname "CN=<hostname>, OU=EastCoast, O=MyComp Ltd, L=New York, ST=, C=US" -ext "SAN=dns:<hostname>,dns:<hostname>,ip:<ip_address>" -validity <validity>
◦ Replace the placeholders, such as <alias_name>, <hostname>, and others, with appropriate values.
◦ This command creates a KeyStore in the current folder.
◦ The command generates a self-signed server certificate with RSA 2048 private key algorithm and places it in a PKCS12 bundle, compatible with Java PKCS12 KeyStore format
|
|
If the KeyStore is self-signed or issued by a lesser-known CA, import it into the relevant Java runtime truststore used by Windchill. Use the following command:
keytool -importkeystore -destkeystore <path_to_java_truststore> -srckeystore <path_to_source_keystore> -srcstoretype pkcs12 -deststoretype jks
|
Define Global Variables for TIBCO Project
1. Pre-requisites:
◦ Add the following property to designer.tra, bwengine.tra, and <APP_Name>_Process_Archive.tra when using HTTPComponent as Server Type.
◦ Deploy the files and restart the application:
java.property.TIBCO_SECURITY_VENDOR=j2se
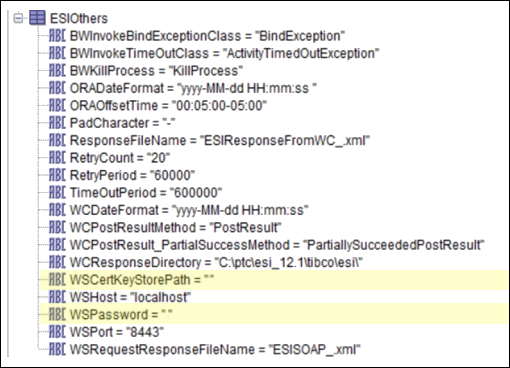
2. Create global variables for KeyStore path and password:
◦ Create a global variable (WSCertKeyStorePath) to store the path to the PKCS12 KeyStore generated earlier. For example, /opt/esi/ws-server.pkcs12 on Linux OS or c:\esi\ws-server.pkcs12 on Windows OS.
◦ Create another global variable (WSPassword) to store the password of the KeyStore.
Update TIBCO Project to Configure Web Server for SSL
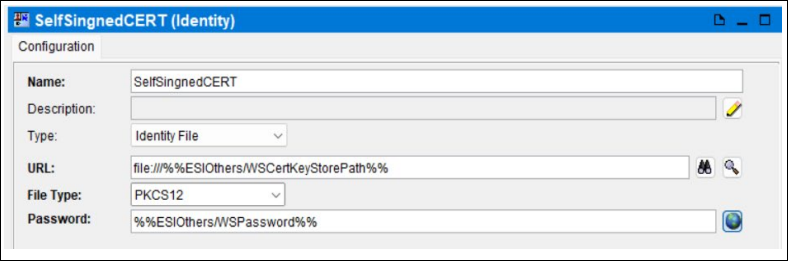
1. Create a new Identity in TIBCO Designer:
◦ Add a new resource from > > > .

◦ In the Identity Configuration, select the Type as Identity File.
◦ In URL, add the global variable created for the path.
◦ Select File Type as PKCS12.
◦ Click the earth icon next to Password.
◦ Click Yes to change the field mode and provide the global variable as the password.
◦ Apply the changes and save the project.
2. Enable SSL in HTTP connection in the Designer
◦ Select Use SSL? in HTTP Connection.
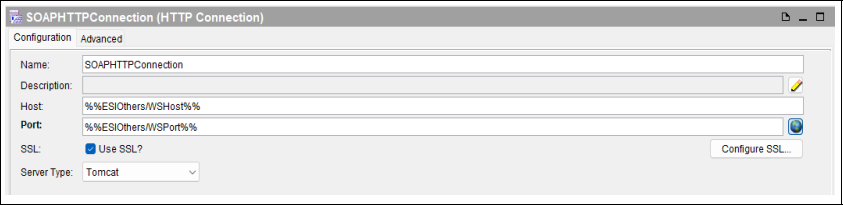
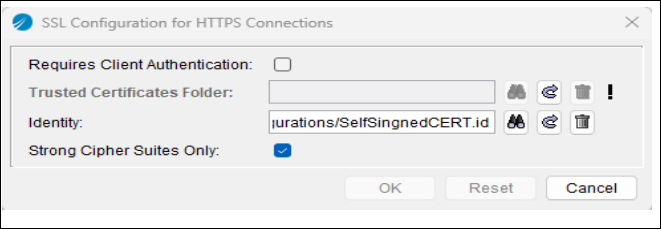
◦ In SSL Configuration for HTTPS Connections, select the Identity created in the previous step.
◦ Select Server Type as Tomcat.
◦ Apply the changes and save the project.
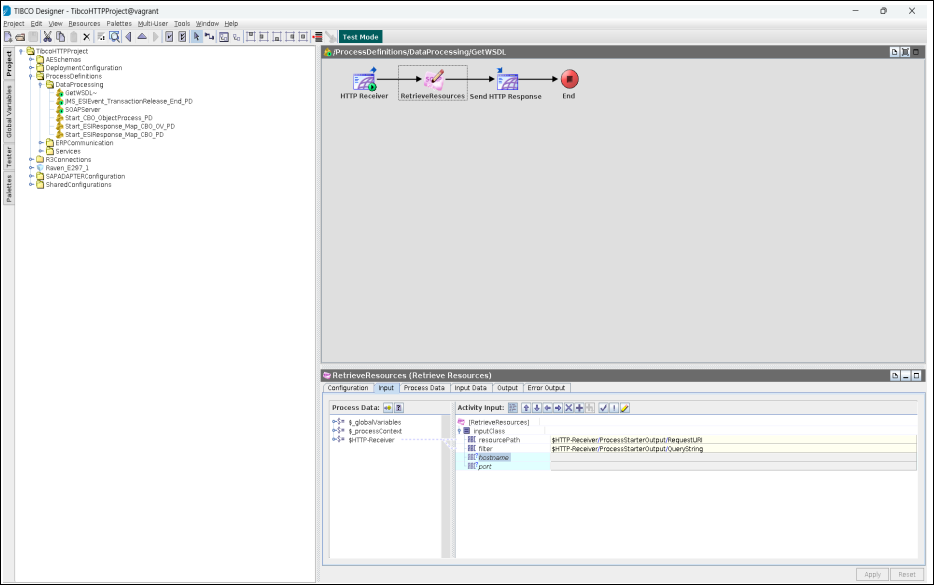
3. Modify GetWSDL.process:
◦ For SSL configuration, leave the hostname and port blank in the Retrieve Resources activity.
To enable detailed debugging, add the following properties in designer.tra, bwengine.tra and <APP_Name> _Process_Archive.tra to get more information on SSL configuration. Trace.Task.*=true java.property.javax.net.debug=ssl,plaintext,record,handshake |
Validate Changes Where Server is Set for SSL
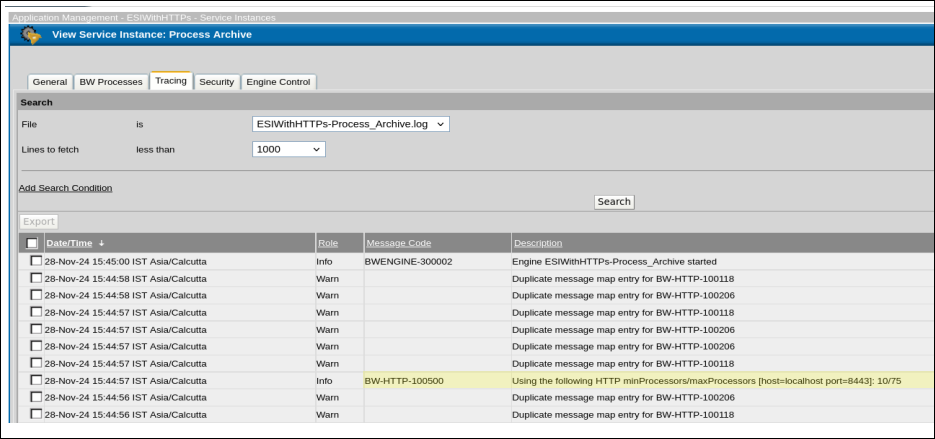
1. Verify the setup for HTTPS connection:
◦ Deploy the project with the HTTPS connection settings in TIBCO administrator.
◦ Verify the highlighted entry in tracing logs of the process archive service in TIBCO Administrator UI.
2. Execute URL to ensure server is working over SSL:
◦ Access the URL in a browser or using a curl command to ensure that the server is working over SSL.
◦ Check the URL after changing the required details (hostname and port number):
https://<hostname>:<port_no>/ProcessDefinitions/DataProcessing/SOAPServer?wsdl
When using a self-signed certificate, the browser may show a not secured warning. This warning does not appear when using a CA issued certificate. |