例: レンダラーを拡張することによる <Part> への属性の追加
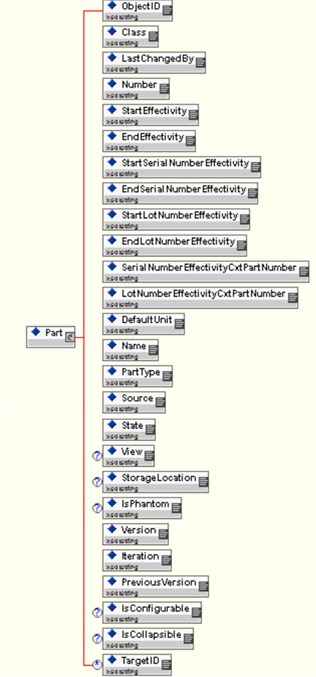
Part XML エレメントのデフォルトの出力をPart XML エレメントのデフォルト構造の図に示します。デフォルトの応答メタ情報ファイル内の Map エレメントは、このドキュメントの例: <Part> への属性の追加セクションに示されています。
新しい <Part> エレメントに子エレメント <Team> が追加されました。
応答メタ情報ファイルの修正された Map エレメントと MapInformation エレメントは以下に示す形式をとります。
<esi:Map id="ESINewPart">
<esi:attributeMapping sourceAttribute="obid">ObjectID</esi:attributeMapping>
<esi:attributeMapping sourceAttribute="xxxx" defaultValue="com.ptc.windchill.esi.Part">Class</esi:attributeMapping>
<esi:attributeMapping sourceAttribute="modifier">LastChangedBy</esi:attributeMapping>
<esi:attributeMapping sourceAttribute="number">Number</esi:attributeMapping>
<esi:attributeMapping sourceAttribute="xxxx">StartEffectivity</esi:attributeMapping>
<esi:attributeMapping sourceAttribute="xxxx">EndEffectivity</esi:attributeMapping>
<esi:attributeMapping sourceAttribute="xxxx">StartSerialNumberEffectivity</esi:attributeMapping>
<esi:attributeMapping sourceAttribute="xxxx">EndSerialNumberEffectivity</esi:attributeMapping>
<esi:attributeMapping sourceAttribute="xxxx">StartLotNumberEffectivity</esi:attributeMapping>
<esi:attributeMapping sourceAttribute="xxxx">EndLotNumberEffectivity</esi:attributeMapping>
<esi:attributeMapping sourceAttribute="xxxx">SerialNumberEffectivityCxtPartNumber</esi:attributeMapping>
<esi:attributeMapping sourceAttribute="xxxx">LotNumberEffectivityCxtPartNumber</esi:attributeMapping>
<esi:attributeMapping sourceAttribute="defaultUnit">DefaultUnit</esi:attributeMapping>
<esi:attributeMapping sourceAttribute="name">Name</esi:attributeMapping>
<esi:attributeMapping sourceAttribute="partType">PartType</esi:attributeMapping>
<esi:attributeMapping sourceAttribute="source">Source</esi:attributeMapping>
<esi:attributeMapping sourceAttribute="state.state">State</esi:attributeMapping>
<esi:attributeMapping sourceAttribute="view" plantSpecificAttribute="true">View</esi:attributeMapping>
<esi:attributeMapping sourceAttribute="storageLocation" plantSpecificAttribute="true">StorageLocation</esi:attributeMapping>
<esi:attributeMapping sourceAttribute="phantom">IsPhantom</esi:attributeMapping>
<esi:attributeMapping sourceAttribute="versionInfo.identifier.versionId">Version</esi:attributeMapping>
<esi:attributeMapping sourceAttribute="iterationInfo.identifier.iterationId">Iteration</esi:attributeMapping>
<esi:attributeMapping sourceAttribute="PreviousVersion">PreviousVersion</esi:attributeMapping>
<esi:attributeMapping sourceAttribute="genericType">IsConfigurable</esi:attributeMapping>
<esi:attributeMapping sourceAttribute="collapsible">IsCollapsible</esi:attributeMapping>
<esi:attributeMapping sourceAttribute="team">Team</esi:attributeMapping>
</esi:Map>
<esi:MapInformation id="ESIPartInfo">
<esi:typedef>wt.part.WTPart</esi:typedef>
<esi:elementMetaName>Part</esi:elementMetaName>
<esi:keyAttribute>Number</esi:keyAttribute>
<esi:keyAttribute>Version</esi:keyAttribute>
<esi:keyAttribute>PreviousVersion</esi:keyAttribute>
<esi:keyAttribute>View</esi:keyAttribute>
<esi:keyAttribute>StorageLocation</esi:keyAttribute>
<esi:mapRef>ESINewPart</esi:mapRef>
</esi:MapInformation>
前述の変更が加えられた応答メタ情報ファイルが <Windchill>/codebase/com/ptc/windchill/esi/examples/ESIResponseMetaInfoExample2.xml にあります。
ESIResponseMetaInfoExample2.xml ファイルが使用された場合、Windchill ESI マッパーは次の出力を生成します。

WTPart オブジェクトには team という属性がないので、マッパーが必要なデータを取得できないことがあります。その結果、修正バージョンの応答メタ情報ファイルをアクティブ化すると、ESI 応答に空の <Team> エレメントが作成されます。これを修正するには、WTPart を拡張して team 属性を含めるか、Windchill ESI の ESIWTPartRenderer クラスを拡張して空の team に値を入力します。クラス Example2MyRenderer はクラス ESIWTPartRenderer の拡張方法を示しています。このクラスのソースコードは以下の場所にあります。
<Windchill>/codebase/com/ptc/windchill/esi/examples/Example2MyRenderer.java。
サンプルファイルのコンテンツを以下に示します。
package com.ptc.windchill.esi.examples;
import com.infoengine.object.factory.Att; import com.infoengine.object.factory.Element;
import com.ptc.windchill.esi.esipart.ESIWTPartRenderer; import com.ptc.windchill.esi.rnd.ESIRendererException; import java.util.Collection;
import wt.eff.Eff; import wt.part.WTPart;
public class Example2MyRenderer extends ESIWTPartRenderer {
// This example method will adjust the mapper to return a value for the attribute "Team". If the attribute "Team" is found
// and the value is null or empty, then this method will update the value.
protected Element adjustPartElement( Element elem,
String group, WTPart part, Eff [] effs,
Collection targets )
throws ESIRendererException {
Att att = elem.getAtt("Team"); // get the attribute "Team" from the mapper output
if ( att != null ) // verify that the attribute exists in the mapper
{
// Check to see if the value of "Team" is null or is empty.
if ( att.getValue() == null || att.getValue().toString().trim().equals(""))
{
// Get the value for "Team" from the part object and use it to set
// the value for the "Team" attribute in the mapper output. att.setValue(part.getTeamName());
}
}
return elem;
}
}
次の点に注意してください。
• package ステートメントは、Java コンパイラの出力が正しいディレクトリに書き込まれるようにします。
• Java import ステートメントは、adjustElement() メソッドへのクラスと引数の継承のために必要です。
• if ステートメント if ( att != null ) により、マッパーは team 属性の存在を制御できます。このために、名前が Team である Att オブジェクトをマッパー出力から取得することを試みます。応答メタ情報ファイルの関連する Map エレメントに値 Team を持つ attributeMapping エントリがない場合、Att オブジェクトの取得の結果は Null になります。
• if ステートメント if ( att.getValue() == null || att.getValue().toString().trim().equals("")) は、マッパーが目的のデータを取得できたかどうかをチェックします。データが取得された場合、何も行われません。これはマッパーの動作をオーバーライドするときに推奨される方法です。
以下の方法によってこの例をコンパイルして実行できます。
• Windchill をインストールしたときに定義された <Windchill> ディレクトリ内から、次のコマンドを使用して Windchill シェルを起動します。
bin/windchill shell
• Java コンパイラを使用してクラスをコンパイルします。
javac -d ./codebase ./codebase/com/ptc/windchill/esi/examples/*.java
• 「配布を管理」 UI を使用して「配布ターゲットを編集」 (または「新規配布ターゲット」) ダイアログを開き、ESI Response Meta Information File Path フィールドの値を編集して ESIResponseMetaInfoExample2.xml ファイルに設定します。「OK」をクリックして変更を保存し、編集した (または新しく作成した) 配布ターゲットを、リリースする部品に関連付けます。
前述の手順では、Windchill ESI Services が部品をレンダリングする際に、例に示した応答メタ情報ファイルが使用されます。これにより、GetPart、GetBOM、GetECN、GetProcessPlan、GetPromotionRequest の ESI 応答の構造が変更されます。構造が変更されると、Windchill および EAI ソフトウェアコンポーネント内の XML スキーマが同期しなくなります。応答メタ情報ファイルに変更を加える場合、このドキュメントの「XML スキーマの作成/修正」セクションの説明に従って XML スキーマを修正する必要があります。さらに、新しいスキーマを使用するように EAI ソフトウェアコンポーネントを修正する必要があります。詳細については、このドキュメントの「XML スキーマ」セクションを参照してください。 |
以下の XML ドキュメントは、新しい部品レンダラークラスをアクティブ化する xconfmanager コマンドへの入力として機能します。
<?xml version="1.0" encoding="utf-8"?>
<!DOCTYPE Configuration SYSTEM "xconf.dtd">
<Configuration targetFile="codebase/service.properties">
<!-- The ESIRenderer entries for use by com.windchill.esi.rnd.ESIRendererFactory -->
<Service context="default" name="com.ptc.windchill.esi.rnd.ESIRenderer">
<Option cardinality="duplicate" requestor="wt.part.WTPart" serviceClass="com.ptc.windchill.esi.examples.Example2MyRenderer"/>
</Service>
</Configuration>
このファイルは以下の場所にあります。
<Windchill>/codebase/com/ptc/windchill/esi/examples/Example2.service.properties.xconf
以下のコマンドは、このファイルで指定された変更を以下のファイルに反映します。
<Windchill>/codebase/service.properties:
xconfmanager –i
codebase/com/ptc/windchill/esi/examples/Example2.service.properties.xconf –p
codebase/com/ptc/windchill/esi/examples/Example2.service.properties.xconf –p
カスタマイズされた応答メタ情報ファイルが使用された場合に生成される Windchill ESI 応答の XML スキーマ定義が以下の場所にあります。
<Windchill>/codebase/com/ptc/windchill/esi/examples/Example2.xsd。
カスタマイズされた応答メタ情報ファイルを使用した場合に生成される Windchill ESI の応答が <Windchill>/codebase/com/ptc/windchill/esi/examples/Example2.xml にあります。
VDB ビルダーと ESI レンダラーを拡張するだけでなく、ESI 応答ジェネレータと ESI Services 実装を拡張することもできます。詳細については、ESIResponseGeneratorおよびStandardESIServiceのセクションを参照してください。 |